3D Printing and Mold Making for Props - NukaCola Bottle
 Chris Ellerby
Admin
Chris Ellerby
Admin
Like many people, I've been playing a lot of Fallout 4 lately. One of the in-game items I'm a big fan of is the Nuka Cola bottle. I decided I wanted to make my own Nuka Cola Quantum (the glowing variety) bottle to keep on the shelf in my shop.
My plan is to design the bottle in OnShape (a great, free, cloud-based, parametric solid CAD program), 3D print the bottle, clean up the print with sandpaper and Smooth-On's new "XTC 3D" print coating. After that I will 3D print mold boxes that will allow me to mold the bottle without any visible seams and minimal cleanup.
I started by taking some in-game screenshots of the bottle, and then designed the bottle profile in OnShape. The scale of the bottle is based off a bottle cap with an internal diameter of 26mm, and then the rest of the design was scaled to match.

From there I designed the fins and adjusted the look of the bottle until I was happy with it.

Next I had to think about how the bottle would be molded and assembled while allowing me access to the inside for lights/electronics. I decided to mold the bottle in 2 pieces with no visible seams. The joint between the upper and lower halves of the bottle will be along the base of the label, so it will be invisible.
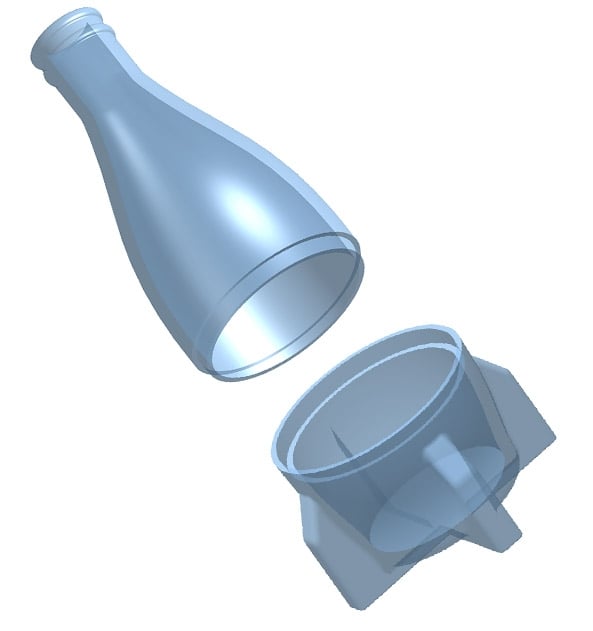
Next I designed a mold for the base of the bottle that will conserve silicone, only key together in one orientation, and socket into a temporary cap that will hold the part for molding as well as create the dividing line for the inner core of the mold. The triangular and rectangular columns that run up the inside of the mold will act as keys for the silicone inner mold, keys for the temporary lid that will be used to create the second half of the mold, keys for the finished second half of the mold, and also reduce the volume of the mold between the fins of the bottle.

Next I designed the temporary lid that will hold the bottom half of the bottle in place during molding. Think of this lid as my temporary mold wall, but rather than clay or shims it's 3D printed. You san see in this picture how the bottle sockets onto a plug on the base of the lid, and how the lid keys into the mother mold for the bottom.


Once these pieces are together silicone can be poured through any of the 4 ports in the lid. These will also act as bleeders to allow silicone escape as the mold is filled. The inside of these sprues are also tapered so they will become the internal keys for the next half of this mold.

Next I will be designing the second half of this mold for the bottom bottle half, then I will start designing the mold for the top half of the bottle.
I've also started designing the label in illustrator. This will need a lot of testing as the curves of the bottle will mean the only way to apply the label without cutting/darting segments for the compound curves is to use shrink labels, which are expensive to have designed in small quantity.

Once all the parts are molded I will be designing an internal component that hides behind the label along the dividing line of the 2 bottle segments. This component will house batteries, LEDs, and diffusion to give the liquid in the top and bottom half of the bottle the appearance of glowing while hiding the source of the light.
I'll also need to find a good liquid to use in the bottle that is just cloudy enough to provide some diffusion so the liquid will light up as desired. The requirements being that the liquid can not settle/separate over time (so no suspended diffusion), and contains no organic compounds that can degrade over time.
I'll post updates here as this project moves forward.
/Chris
My plan is to design the bottle in OnShape (a great, free, cloud-based, parametric solid CAD program), 3D print the bottle, clean up the print with sandpaper and Smooth-On's new "XTC 3D" print coating. After that I will 3D print mold boxes that will allow me to mold the bottle without any visible seams and minimal cleanup.
I started by taking some in-game screenshots of the bottle, and then designed the bottle profile in OnShape. The scale of the bottle is based off a bottle cap with an internal diameter of 26mm, and then the rest of the design was scaled to match.
From there I designed the fins and adjusted the look of the bottle until I was happy with it.
Next I had to think about how the bottle would be molded and assembled while allowing me access to the inside for lights/electronics. I decided to mold the bottle in 2 pieces with no visible seams. The joint between the upper and lower halves of the bottle will be along the base of the label, so it will be invisible.
Next I designed a mold for the base of the bottle that will conserve silicone, only key together in one orientation, and socket into a temporary cap that will hold the part for molding as well as create the dividing line for the inner core of the mold. The triangular and rectangular columns that run up the inside of the mold will act as keys for the silicone inner mold, keys for the temporary lid that will be used to create the second half of the mold, keys for the finished second half of the mold, and also reduce the volume of the mold between the fins of the bottle.
Next I designed the temporary lid that will hold the bottom half of the bottle in place during molding. Think of this lid as my temporary mold wall, but rather than clay or shims it's 3D printed. You san see in this picture how the bottle sockets onto a plug on the base of the lid, and how the lid keys into the mother mold for the bottom.
Once these pieces are together silicone can be poured through any of the 4 ports in the lid. These will also act as bleeders to allow silicone escape as the mold is filled. The inside of these sprues are also tapered so they will become the internal keys for the next half of this mold.
Next I will be designing the second half of this mold for the bottom bottle half, then I will start designing the mold for the top half of the bottle.
I've also started designing the label in illustrator. This will need a lot of testing as the curves of the bottle will mean the only way to apply the label without cutting/darting segments for the compound curves is to use shrink labels, which are expensive to have designed in small quantity.
Once all the parts are molded I will be designing an internal component that hides behind the label along the dividing line of the 2 bottle segments. This component will house batteries, LEDs, and diffusion to give the liquid in the top and bottom half of the bottle the appearance of glowing while hiding the source of the light.
I'll also need to find a good liquid to use in the bottle that is just cloudy enough to provide some diffusion so the liquid will light up as desired. The requirements being that the liquid can not settle/separate over time (so no suspended diffusion), and contains no organic compounds that can degrade over time.
I'll post updates here as this project moves forward.
/Chris
Post edited by Chris Ellerby on
0
Comments
Here you can see that the final section for this mold includes a small core at the center to help support the slug of silicone that will be inside the bottle.
Here you can see the assembled mold for the bottom half of the bottle. You can also see the 8 central holes that will be used to pour in the resin to fill this half of the bottle mold during final casting. When the silicone mold half for this segment is cast (using the 4 outer holes) I will use 1/4" dowels through the 8 central holes that touch the bottle's rim, which will create channels (sprues) thorough the silicone inner mold for the resin.
First I created a keyed cylindrical mold base that envelopes the entire bottle half, with a quarter inch outer lip for mating with the temporary parting lid and the final upper half of the mold. The holes at the bottom will initially be plugged, but they will later allow for the silicone inner mold to easily slide into the mother mold prior to casting by allowing air to escape. This prevents the bottom of the mold from deforming prior to casting.
Next I designed the temporary lid that holds the bottle section in place while the first half of the silicone mold is cast. This also creates the parting line and 4 conical keys for the second half of the mold.
Here is what the mold will look like when pouring up the silicone inner mold for the base. You can see the 4 fill holes/bleeders that will later form the 4 conical keys for the second half of the mold.
Next I designed the top half of the mold which also supports the inner core for the bottle. This is important as the silicone core will need support to assure perfect alignment with the bottom half of the mold.
And here is the final assembled mold. The 8 central holes will be used when casting resin into the internal cavity. When filled they also provide a reservoir of extra resin during pressure pot curing. The 4 outer holes are where silicone will be poured when creating the inner top half of the mold.
So far I'm really happy with these mold designs. I don't see any potential issues (yet). Once I print all 6 mold pieces (3 for each half of the bottle) I'll have a better idea if I overlooked anything. And once I run the silicone inner molds I'll be able to see if I allowed for enough thickness everywhere. I've tried to make sure the silicone inner mold has a minimum thickness of 1/4.
/Chris
/Chris
/Chris
/Chris
/Chris
Progress with the Simplify3D slicing application is going great. The second bottle is much better, even though it was printed in less-than-ideal filament.
I've made a couple minor changes to the bottle design based on these test prints, and hope to start another round of test prints tonight.
Still toying with the idea of finding a resin printer to print these at even higher quality, but a little primer and sanding would clean this print up nicely.
I've also been researching how to make my own heat shrink labeling. The company "Grafix" makes a shrink film that is ink-jet printable. I may grab their white variety and give that a shot.
As for the fluid for inside the bottle, I may just go with a tinted resin with suspended diffusion. It will not be as cool to handle as a liquid filled bottle, but it will probably look/work better than trying random fluids.
I'll still do some fluid testing though.
/Chris
I also have some metallic purple bottle caps coming soon. They are roughy the same shade purple as the NukaCola Quantum label, so they should look great.
I'll also be laser etching a rubber stamp so I can put the NukaCola logo on the caps.
This week I redesigned the joint between the two bottle halves to be better hidden behind the label when these are cast in clear resin. Looking forward to printing up the molds soon.
/Chris
/Chris
This piece was printed using low quality settings to save time, as it is primarily structural and does not need to look nice.
I started printing the second piece last night, but have not had a chance to see if it turned out yet.
/Chris
So far I have 2 of the 3 pieces for the bottle bottom mold done. (3rd is printing right now) and then I will start printing the 3 pieces for the bottle top mold.
Here's what I've printed so far:
I spent many hours yesterday sanding the bottle in the picture above to have a super smooth surface. Next I'll hit it with a couple coats of primer, sand some more, and then hit it with a clear coat and buff the surface prior to molding.
/Chris
/Chris
I plan on making both weathered and unweathered versions, so I'll need a label solution that can be pristine. I should start the molding process soon, and after that I can start playing with labels.
/Chris