Homework - Joshua Skirbunt
 Yukako Shimada
Moderator
Yukako Shimada
Moderator
edited April 2015 in Animatronic Control Systems - Arduino Programming Basics with David Covarrubias
Hi all!
Ok, here is the squirt gun I have to work with taken apart:
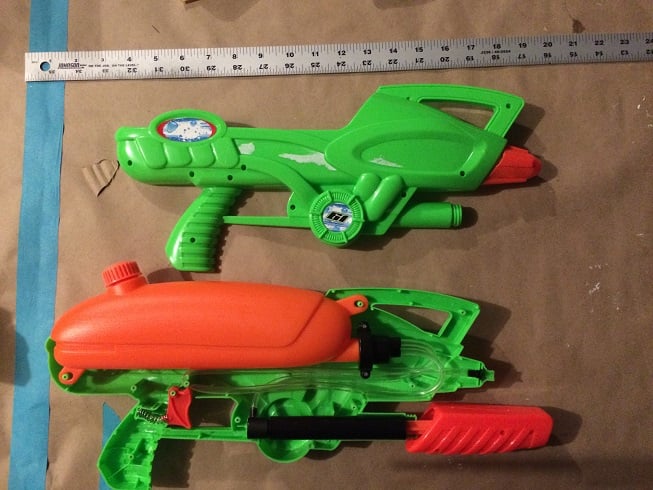
So, my initial idea here, is to make the orange water reservoir a frosted clear piece, and have it light up from the inside and get increasingly brighter and have a louder "charging hum" with each pump, then a flash "discharge" light at the barrel opening and firing sound effect when the trigger is pressed, and the reservoir would go dark again.
If not too daunting, I would also like to have the four U shaped pieces on the back have a button or two that could change the "mode" of the gun, going from a charging rifle, to some kind of automatic pulse rifle, that would be shown by some kind of screen/element in the small oval above them, the circular thing near the bottom as some type of information read out, with the ring around it lighting up, and an "ammo counter" displayed where the sticker currently is.
Here is the list of things I think I need when it's broken down:
Gun dimensions
Button for trigger press
Button for mode change
LEDs
Roll of wire
Soldering kit
Royalty free? sound effects
Ok, here is the squirt gun I have to work with taken apart:
So, my initial idea here, is to make the orange water reservoir a frosted clear piece, and have it light up from the inside and get increasingly brighter and have a louder "charging hum" with each pump, then a flash "discharge" light at the barrel opening and firing sound effect when the trigger is pressed, and the reservoir would go dark again.
If not too daunting, I would also like to have the four U shaped pieces on the back have a button or two that could change the "mode" of the gun, going from a charging rifle, to some kind of automatic pulse rifle, that would be shown by some kind of screen/element in the small oval above them, the circular thing near the bottom as some type of information read out, with the ring around it lighting up, and an "ammo counter" displayed where the sticker currently is.
Here is the list of things I think I need when it's broken down:
Gun dimensions
15 3/4 long
2" circle thingy - lcd number read out screen, led ring to go around it
2 1/4" small oval thingy- lcd character read out screen
4 1/2" big oval thingy - possibly cut shapes and light from inside with amber led's
4 small u shapes 3/4" wide each - push buttons
Mold (with whatever I have enough of) and cast orange piece and circular ring in crystal clear
Button for trigger press
Button for mode change
LEDs
2 strips
One circular
2 2" lcd screens
Arduino
Roll of wire
Soldering kit
Royalty free? sound effects
Charging hum
Blaster discharge
Automatic blaster discharge sound
Paint
airbrush and compressor
Cyno
kicker
The only materials I don't already have are the electronic parts. Not sure if this covers everything I'll need as I've never done this from scratch, only kit-bashed small electronics before (for example, my friend wanted his toilet to sound like a warp pipe from Mario Bros when he flushed it. I used the guts from sound bite keychains. It worked :P)
Josh
1
Comments
//SWSCA Arduino Programming Basics with David Covarrubias
//Different than what you showed us on diplays,//but I'm guessing it's due to this being a 128x64 OLED screen,//and not LCD? Either way, I used the tried and true method//of loading in an example playing with it until I understood//how the library worked
//also had to look up and example on switches, and then tweak//it to fit what I needed it to do. I learned all about debouncing lol
#include <Adafruit_ssd1306syp.h>#define SDA_PIN 12#define SCL_PIN 11Adafruit_ssd1306syp display(SDA_PIN, SCL_PIN);const int buttonPin2 = 2; //trigger buttonconst int buttonPin9 = 9; //state change buttonconst int soundPin4 = 4;const int soundPin7 = 7;int battPower = 0;int ammo = 6;int buttonState; //trigger buttonint buttonState2; //state change buttonint state = 0; //state change flagint previous = LOW; long time = 0; long debounce = 200;//time delay duration checked against millis //so program doesn't think the button is //pushed more than oncevoid setup(){ delay(1000); display.initialize(); pinMode(buttonPin2, INPUT); pinMode(buttonPin9, INPUT);}void loop(){//this is where the display gets it's information on what to print to the screen display.clear(); display.setTextSize(1); display.setCursor(0, 0); display.println(" << SWSCA SPECIAL >>"); display.print("Batt Health: %"); display.print(battPower); display.setTextSize(2); display.setCursor(0, 16); display.println("AMMO: DMG:"); display.setCursor(12, 33); display.setTextSize(4); display.println(ammo); if (state==0){ //this is the part where it checks the value of "state" to determine whether to display "ARC" or "FLM" display.setCursor(56, 33); display.setTextSize(4); display.println("ARC"); } if (state==1){ display.setCursor(56, 33); display.setTextSize(4); display.println("FLM"); } display.update(); buttonState = digitalRead(buttonPin2); battPower = battPower + 8; if (battPower >= 100) { battPower = 100; } if (buttonState == HIGH) { battPower = battPower - 50; ammo--; delay(1000); if (battPower <= 0) { battPower = 0; } if (ammo == -1) { ammo = 6; } } //this is where buttonPin9 (state change button) is set up //as a switch buttonState2 = digitalRead(buttonPin9); //read buttonPin9 for a HIGH or LOW signal //below, we say, if the button is pushed, and the previous state was low //(a check to allow holding the button without it looping,) //and its been more than 200 milliseconds since we last pushed the button //(giving it time to clear the noise (multiple HIGH signals)) then.. if (buttonState2 == HIGH && previous == LOW && millis() - time > debounce) { //we do one of two things, if state==0, change it to 1, otherwise, make it zero if (state == 0) //and the value of the state variable tells //the screen wether to display "ARC" or "FLM" state =1; else state = 0; time = millis(); //write down the new time on the clock } previous = buttonState2; //store the current value of buttonstate2 //to a variable so we can check against it on the next loop //to decide whether or not to proceed to the "if" statement //if enough time has passed}
Here are some pictures I have of the process:
This was the first pass of paint, flat black primer.
This was the second pass, a dry rub of silver "Liquid Leaf" paint to give it a gun metal look similar to, but a little lighter than a graphite rub.
First layer of silicone for the brush on mold for the clear reservoir
Reservoir re-cast in Crystal Clear
Fitting all the electronics into the gun after soldering everything together.
Those are all the pics I have, if you need more I can take more