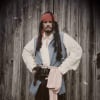
Lucius Malfoy Impersonation Cosplay Costume Jason Isaacs Impersonation Cosplay Costume

Darrell GreenDarrell Green ✭✭✭
edited December 12 in Costumes & Cosplay
I was initially working on a Denethor build when I found that I needed to be ultra blonde before becoming Denethor Gray. This led to beginning a Lucius Malfoy Impersonation disguise level cosplay.

In the following, I will share my props, process and special effects makeup steps to coming as close as I could to Lucius Malfoy from the first movie to the last and back again to my version of Lucius attending Hogwarts as a young man.

This, of course, means that I aged, returned to my own age and then grew younger in several makeup effects stages to be Lucius across nearly 30 plus years.

After staring at your own project, for too long, you can be confused as to the quality of the outcome so I hope you also see Lucius in each stage.Continued below.


Comments

  • Here are the initial inspiration pictures for this intended build:


  • Main elements for the Jason Isaacs - Lucius Malfoy pose:

    1) Blonde Straight Hair with specific styling (done)

    2) Stubble (some scenes), facial disguise (nose) and age makeup and effects, brow fill and shape (done)

    3) Facial manipulation (jaw extended during poses, eyelids folded, nose flared and retracted (yes, I can do that), lips pursed), throat skin both loosened and tightened (different scenes) (done)

    4) Robe (already owned black hooded robe)

    5) Under shirts - (done, created faux double pin color)

    6) Rings - (scanned, cleaned and corrected, printed, painted, done)

    7) Chair (using Denethor's chair)

    8) Snakeskin Vest (done)

    9) Brooch (scanned, cleaned, printed, painted, done)

    10) Cane (scanned, cleaned, printed, painted, added staff pole, done)

    11) Backdrop (numerous colored backdrops used but may use clipped background on several)

    12) Outer dress coat (owned)

    13) Outer fur vest with snake clasps (done)

    14) Cufflinks and color pins (done)

    15) Battle surcoat (made collar only)

    16) Blue orb (owned Labradorite natural stone ball)

    17) Lighting (done)

    18) Hat (hand made, done)
  • Darrell GreenDarrell Green ✭✭✭
    edited December 12
    1) Blonde Straight Hair with specific styling

    My initial reason for doing this build (and so quickly) was my sudden blondeness. I was working on getting to gray for Denethor (Lord of the Rings) and had to bleach deeply to get to a level 9 or 10 blonde to go back to gray. This was a long process of studying and asking questions and several times I had bleached but not nearly enough. After seeing a stellar bleaching session with Brad Mondo (XMondo products) I had sent a request to his product team to teach me the terms I needed to ask all the right questions. Within an hour, they responded and gave me all the jargon and product names I needed to have to work with their products as well as local salons and supply stores. Xmondo has a great line of products and the support is obviously epic compared to what I expect nowadays. I will NOT be guiding you through this process as it can be disastrous if not completed correctly and that "correctly" can change due to the hair type you already have being different than mine. Seek advice, seek help or get it done in a salon. It can burn you and bald you, be warned.

    I highly recommend bonding additives. These were totally new to me and actually strengthen your hair which is totally necessary because bleach is so damaging. Use much more conditioner afterward than you thought and then do that twice. Continue to do so for weeks, not kidding. Do NOT wash your hair before bleaching as the natural oil on your scalp will help protect you from the bleach. Many bleaching videos showed people applying protective lotions and sealers to their forehead, ears, face and neck to keep bleach from touching these areas (all the none hair covered parts of your head).

    Straightening: On the day of poses, do not blow dry your hair but let it hang dry (toweling is OK). Use heat protectants if you have them but not completely necessary. Carefully comb out your hair, starting at the ends, and then use your choice of straightening methods. I used the flat clamp straightener:


    Again, caution, get advice, watch videos. Do NOT hold in one spot or it will melt your hair. As soon as you close this, begin pulling it down your hair. Do NOT clamp it tightly or you will pull out hair.

    Styling: I had to part my hair differently so I had to separate and then wet that line. I then used hairspray to set the part. I then used a standard curling iron, without the clamp, barrel only, to place the one curve near his temple.

    In some scenes this is falling into his face. In some it is hanging by his ear. In several it is behind his back.

    For scenes where his hair is noticeably shorter than mine, I could not cut it. I need the length for Denethor next week. I cheated a little in these photos and put much of my hair's length over my shoulder, allowing the tips to hang in the front. For the most part, this worked.

    Oh, and one small, mind-blowing revelation: to go from freshly bleached hair (brassy yellow) to blonde or platinum, you add violet or blue. Honestly, I just let the heroes at Sally's Beauty Supply pick the color for me.

    I did use bonding agent in my bleach, as well, for double protection.

    It only takes a short inspection of Lucius through the movies to see that in some scenes he has perfect white blond hair but in others he has clearly brassy yellow bleached hair. This is especially true of his later years when he is looking very burned out.
    Post edited by Darrell Green on
  • 2) Stubble (some scenes), facial disguise (nose) and age makeup and effects, brow fill and shape -

    Although I can grow some stubble, it was not in the pattern of Lucius. I used alcohol markers (cleans with alcohol wipes) as I did not have the ability to spackle myself with liquid paints and a stipple brush while looking in the mirror. In some scenes he has gray stubble and in other ages he has black. My marker set has many shades so I could do some lines (ultra fine tip), some dots and some overall coverage (put down first layer).

    I used some standard beauty makeup tricks on my nose but to make it wider instead of thinner. Using a lighter shade (powder), I painted on a larger area of reflection on the edges of the bridge of my nose and under the tip to form a bulb. I then used a shadow shade of tan brown to eliminate the bottom 1/8 inch of my nostrils. Zoom in and it is noticeable but not at full 5 to 10 feet out. Lucius's nose seems to change shape with age so I am assuming that some shading tricks were done to Jason's nose in the earlier films. However, full 360 lighting can hide many contours but filling in creases with light.

    For the aged scenes, in the last movie, I used a lighter foundation shade for my overall face and neck and used red on my under eye, lids and lips to match that done to Jason. The crew did an amazing job of making him look haggard and worn, dropping 20 years at the end of the day with the makeup cleaned off.

    Brow - Jason has a full brow that often looks to extend even further due to its naturally blending into the curves of his eye socket. On the outer edge of his eye, his brow comes very close. For these areas I drew in the hairs with fine tip and then blended in a lighter shade of overall coverage matching his brow shape. I also darkened my own brown hairs to match (alcohol markers). You can use any product that you wish that is meant for safe use around eyes but do not attempt to use products you have never used before as you can easily get drips into your eye during and after application or as late as cleanup. I take classes at Stan Winston so am a bit more confident than most on using alcohol wipes to clean up after. You do NOT want that in your eye.

    I am happy to say that at no point do his ears show as they are covered by his hair.
  • 3) Facial manipulation (jaw extended during poses, eyelids folded, nose flared and retracted (yes, I can do that), lips pursed), throat skin both loosened and tightened (different scenes)

    Neck - I used several tongue tricks to extend my neck (turkey neck) and to shrink it (sucking in with mouth sealed shut) in order to match different poses. I do not believe I was fully successful at this technique as even Jason's neck changed within a single scene.

    Jaw - It took me quite a few days to figure out that Jason seems to have an underbite or just an unusually strong jaw. This is common with handsome male actors who play domineering personalities. This was quite difficult as a muscle memory trick and I was not willing to create the mouth bite guard needed for a true match. I did the best that I could with the short window I had before going to Denethor's build. I feel that it was less of a necessity in some scenes but was particularly important in his costume test poses. These are the photos taken of the entire outfit but not within one of the scenes from the movies. Usually used for promotional purposes or for approval from directors and similar. Often these are the better photos to use for costume building and cosplay but can sometimes not be accurate to in scene versions of the same. Lighting plays a huge part in this as many of the lines that show on Jason's face, in scene, do not show in the inspiration pose photos (camel brown backdrop). Photographers purposely overfill with lighting when taking portrait photos to do this exact thing. They intentionally remove the creases and shadows normally scene on the face. This makes the person look much smoother and younger. It is referred to as "fill lighting".

    Nose - I needed, in addition to makeup, to flare my nostrils while also retracting my nose. This is very difficult to describe but I can pull my nose closer to my face using facial muscles. Here, again, I was partially successful in most poses. I could not use the nasal flare filling (cotton usually, thank you joberg) due to the need to pull the nose in as well. I won't even count the number of photos that I looked like I was seizing or cramping.

    Eyes - This was a per pose change as Lucius has extremely expressive eyes (Jason). This was usually completed using my dual projection camera method. I have projector that shows one half my face (what the camera sees) and one half the inspiration photo from the scene. I can change my expression, while having it side by side with the photo. This gets tricky when looking directly at the camera but side glance shots are easily projected in the area of the room needed for each separate pose.

    Lips - Jason Isaacs and thereby Lucius Malfoy have a very tight smile but is not "tight lipped". There is still a cupid bow shape needed but not wide and not pouty. Doing this while extending the jaw is very difficult. Doing it without looking strained is even harder.
  • 4) Robe (already owned black hooded robe)

    Because the hooded robe scene in the end of the last movie is so brief, I was able to use a no arms, shawl type that I had won for free in the Wish app years ago and just photograph it from angles not showing the armhole area.


  • 5) Under shirts -

    Lucius has all custom clothing. Nothing he wears is common. Most of his great coats have no pockets and no buttons. His shirts has oddly shaped cuffs, always the cufflink type but not available unless custom cut. I avoided photographing the area of the cuff that was custom. Out of sight, out of mind. Around the collar, he has two buttons instead of one and uses cufflinks here as well.

    I created a faux collar. A short piece of white table cloth, folded top and bottom, was used to make a band type tie. To this I attached elastic fasteners that attached at the back of the neck. On the white, open facing, section, I placed the two cufflink toppers that I had made (later described). I put this on like a tie and laid the collar over this.


    For the black shirts (different scenes), I used my own black shirts that had black buttons and covered the exposed buttons with the vest and coat.


  • 6) Rings -

    For Lucius's first few movies he had a ring on both hands. Both are snakes, I believe that the one with 3 snakes represents his family. For such a sucky, mean person, he very much protects and loves his family.

    I captured pictures of his rings from photos and pushed these through a 2d to 3d render and then cleaned and reshaped areas in Blender.

    I printed numerous sizes and tested them before choosing a set to sand and paint (aged silver). I used green glitter to create the gem eyes. A spot of super glue and a powdering of glitter did the trick impressively. The eyes are very reflective, like gems.


  • 7) Chair -

    I had already created a chair that I will be using for Denethor and it is a similar chair to what Lucius is sitting in for the meeting where his wand is broken.

  • 8) Snakeskin Vest

    I cheated here with a black shirt that had a similar pattern in velvet. I flipped the collar inside out and sewed it down to simulate the standing collar on the vest.

  • 9) Brooch -

    I did the same photo scan to 3d with cleanup in Blender. This one was in need of attachment so I hotglued two pins to the back. It received a darker silver paint and I masked the gem area to leave it white. I then painted over this gem area with fingernail polish.


  • 10) Cane -

    I did the same screen capture, 2d to 3d and then print with this cane head. It is NOT worthy of anything more than a remote picture. I would advise purchasing this cane or a good stl file if you intend to do anything more than a quicky costume.

    I attached a threaded, black broom handle from the dollar store and cut it to length. This length will change with your height and should look good for your pose.


  • 11) Backdrop -

    Because many of the inspiration photos are not from the movie itself, they contain photographer's backdrops. I dug through my wife's sheets sets to find appropriate colors and had some in my fabric collection. In some scenes, I changed these colors by shading or lighting them. I have two full sets of backdrop poles. This allowed me a backdrop and a projection screen at any point in the room.
  • 12) Outer dress coat -

    Lucius has a coat with no buttons and no pockets. I took the photos in such a way as to hide the areas of my suit coat that contained buttons, pockets or button holes.


  • 13) Outer fur vest with snake clasps -

    In several scenes and several movies, Lucius wears an ornate and downright gaudy outer coat. I think this falls into the category of surcoat but it is several layers above where a surcoat is usually worn.

    Two faux fur coats lost their lives for this build. One was a vest, when turned inside out, it gave me fur at the sleeve openings and the black area of the main coverage. A second coat was cut and turned into the long shawl color.


    Both were only jacket length versus the movie coat being floor length. Again, I just cropped my photos to hide the missing portion.

    The two large clasps were screen captured, 2d to 3d converted and then HEAVILY cleaned up in Blender. These were then painted, numerous times to finally get a dark enough shade to not shine like bright silver (they project as iron on the movie). After printing several to get the correct size (both sides are the same printed object), I hotglued them to the vest. This is NOT RECOMMENDED. The hot glue destroys the fur and I was extremely lucky to get it cleaned up. Instead, I advise adding pins to the back and using those to secure it to the vest.


  • 14) Cufflinks and collar pins -

    The cufflinks were screen captured, 2d to 3d rendered and printed at over 5/8 inch long. I then painted them silver but also used alcohol markers to add in the scales. I used the same glitter trick to add the eyes. These were then glued to the faux collar. I did not end up using them as cufflinks because I was avoiding taking a picture of the custom cuff area. I did not like the screen captures and added detail to the head of the snake in blender.


  • 15) Battle surcoat -

    In the final movie, Lucius wears a surcoat that I believe is some form of magical armor. I made only the collar section from a short portion of a nylon sleeping bag. I painted the entire thing matte black and then lightly sprayed gold to simulate the iridescent quality of his cloth. I sewed the extra lines in the collar and then attached elastic closures to use as a collar. Over this, I placed the black robe from a previous post (above).


  • 16) Blue orb -

    I tried to objects for the glowing blue ball. I had one solar light from the dollar tree but it was shaped like a light bulb.


    I also owned a Labradorite natural stone ball. This, when pointed correctly at the light, reflected an inner blue light that I liked even better than the movie prop.


  • Darrell GreenDarrell Green ✭✭✭
    edited December 12
    17) Lighting -

    Lighting was very important for a Lucius build. First the movie scenes have drastically varying lighting and no single light source was going to make my poses look like the movie scenes. I used one overhead and 3 posable, directable lights


    Often I front lit my backdrops to hide my cast shadow so the backdrop would look farther away. It was, at most times, inches from my back.

    In one scene, I needed to make the background disappear into a large dining hall. I placed a matte black drop cloth and then shielded all of the room lighting to point only directly down at the chair. This made it very difficult to use any fill lighting to hide the creases on my face. It did do a great job of creating a disappearing background.


    Post edited by Darrell Green on
  • During the design phase, I needed to distinguish the similarities and differences of our faces. This usually entails using my comparison app on my phone but it is quite broken and I have a ticket in with the vendor. The other tool is split face, half me, half Lucius. This shows me what is glaringly different as the brain is seriously triggered trying to balance the photo. Eyebrows, lips and nose were the largest differences but only after noticing the chin length could I actively change myself to alleviate the difference. Each set below showed me what I still needed to change.


  • Darrell GreenDarrell Green ✭✭✭
    edited December 12
    I shot way too many photos and nearly gave up digging through them to find the ones closest to Lucius. Without my facial comparison app, I am just flying blind on my own opinion and I had stared at me posing as Lucius for toooooo long to be a good judge. But in the end I still had to decide, so, here are my final pics for in-movie scenes. I will post a separate section for those that I deemed possible "young lucius" pictures of approximately his last year in school and early college. Keep in mind that the older ones took aging effects and the younger took de-aging effects. I am currently 53 which is older by many of Jason's 38 years in Chamber of Secrets and just comparable to his final film age. Also of major note, his final film age was greatly exaggerated due to his hard years in prison and in the service of the evil lord.

    I do not use AI, nor photoshop to change myself nor the costume/props. All are actual photos. I do change the lighting filters if I can closer match the lighting of the original scene. In any that I use an inserted digital background, I will post that it is so. So far, I have done no background swaps for Lucius.

    Forgive my lame descriptions but this is how I separated them while posing. It goes in order of Oldest to Youngest from top-down:


    Final Battle:


    continued below 
  • Darrell GreenDarrell Green ✭✭✭
    edited December 12
    At table:


  • Darrell GreenDarrell Green ✭✭✭
    edited December 12
    Glowing Ball:


  • Hat:


  • Darrell GreenDarrell Green ✭✭✭
    edited December 12
    No Hat:


  • Darrell GreenDarrell Green ✭✭✭
    edited December 12
    While doing my de-aging, I ran a bit heavy on the fountain of youth potion. Here are my "Lucius in College" (1st and 2nd pics) and "Lucius in Hogwarts" (3rd picture).


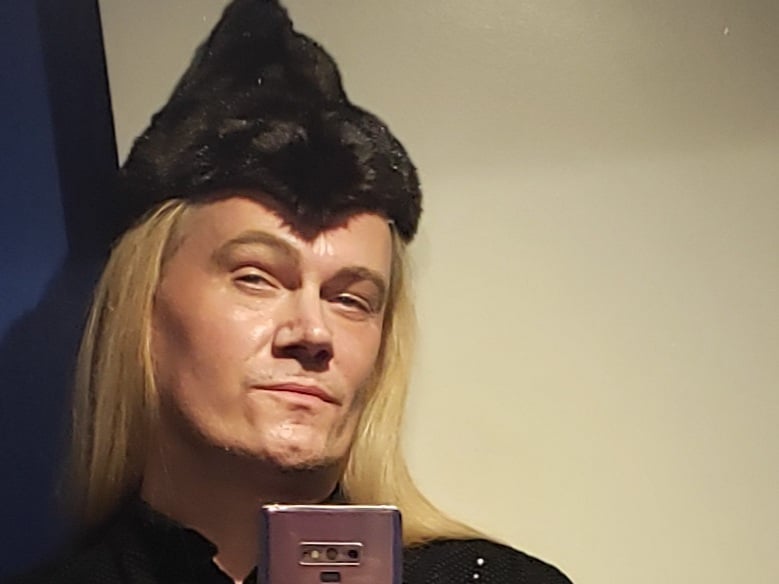
    This last one was a quick test after my initial de-aging and was a mirror reflection shot on my cell phone. Not only a bad picture but I caught the bathroom lights as a second reflection back onto my face. But it is totally worth it to see how I jumped from one age to the next in about 30 hours.


    Just for giggles... I woke up like this:


    Changed to this:


    and the next day to this:


    Post edited by Darrell Green on
  • 18) Hat -

    And, of course, seeing that last pic reminds me to showcase the hat..... sigh.

    The hat was made from the remnants of one of the fur coats. I made the famous sailor paper hat in fur. First my pattern. The long edge of the 90 degree triangle is half the distance around my head, at the temple:


    And then doubled and test fit:


    and then the ring of outer fur:


    And then connected the two:


  • Side by side comparisons:


  • And the facial comparison app results:


Sign In or Register to comment.