
Rubber-band-powered eye blink mechanism
I hope you'll have a look at this odd experiment from an amateur.
I've made two simple animatronic masks in the past, both for classes I was taking. One was at a small special fx shop in Manhattan, and the other at the Art Institute of Pittsburgh. I no longer have access to the materials and equipment I used back then. (Some of which are poisonous chemicals I probably wouldn't be allowed to have in my apartment anyway.) So I'm always looking for cheap and easily available substitutes.
A few years ago I was watching a video in which a fursuiter was being interviewed for a local TV newscast. He was showing off his home-made costume, which was pretty impressive. It had the typical hollow mascot head, and as he showed the interior, I could see, squinting at the low-resolution video, that it was supported by some kind of metal framework. I thought, "this is homemade? Who can do metalwork at home?" Then the guy humblebrags, "So as you can see, I made this out of paper clips..."
Brilliant!
So I bought a box of paper clips. Don't laugh! It seemed the perfect cheap substitute for a fiberglass shell or vacu-formed plastic. The metal is easily pliable, but holds its shape when you are done shaping it.
I conceived of a face-hugging metal framework, upon which a mask could be built. My jaw would be uncovered, so the character could talk. I wanted to put the eyes near the sides of the head, to achieve an alien/animal look. And, I wanted the eyes to blink. I came up with a clever mechanism for this.
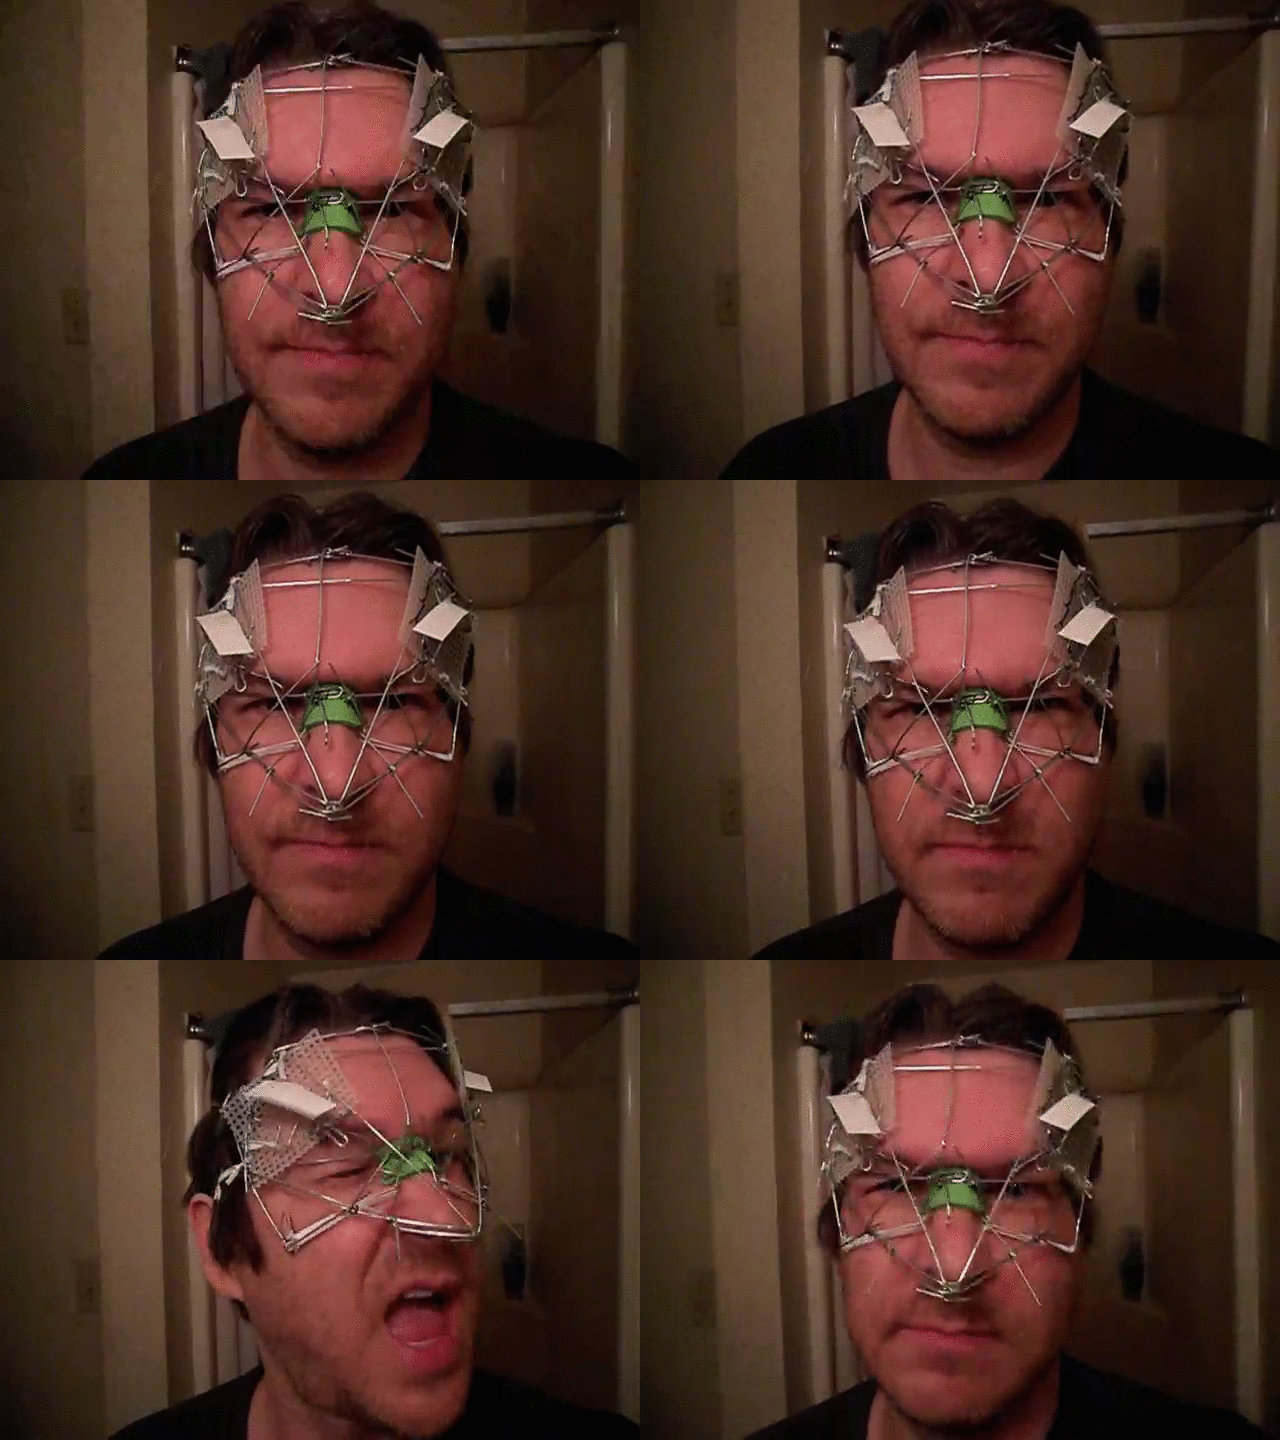
I taped strips of paper to the eyelids so that it's easier to see them move in the video. The eyes blink when I scrunch up my nose. There are no motors or batteries; just a couple of rubber bands. The eyelids are not connected to each other, so each one can wink independently.
Details to follow.
I've made two simple animatronic masks in the past, both for classes I was taking. One was at a small special fx shop in Manhattan, and the other at the Art Institute of Pittsburgh. I no longer have access to the materials and equipment I used back then. (Some of which are poisonous chemicals I probably wouldn't be allowed to have in my apartment anyway.) So I'm always looking for cheap and easily available substitutes.
A few years ago I was watching a video in which a fursuiter was being interviewed for a local TV newscast. He was showing off his home-made costume, which was pretty impressive. It had the typical hollow mascot head, and as he showed the interior, I could see, squinting at the low-resolution video, that it was supported by some kind of metal framework. I thought, "this is homemade? Who can do metalwork at home?" Then the guy humblebrags, "So as you can see, I made this out of paper clips..."
Brilliant!
So I bought a box of paper clips. Don't laugh! It seemed the perfect cheap substitute for a fiberglass shell or vacu-formed plastic. The metal is easily pliable, but holds its shape when you are done shaping it.
I conceived of a face-hugging metal framework, upon which a mask could be built. My jaw would be uncovered, so the character could talk. I wanted to put the eyes near the sides of the head, to achieve an alien/animal look. And, I wanted the eyes to blink. I came up with a clever mechanism for this.

I taped strips of paper to the eyelids so that it's easier to see them move in the video. The eyes blink when I scrunch up my nose. There are no motors or batteries; just a couple of rubber bands. The eyelids are not connected to each other, so each one can wink independently.
Details to follow.
3
Comments
-
First, here are some old photos of the mask framework before I added moving parts.

I figured out which parts of my face move the least: my hairline, and the bridge of my nose. The black elastic in the back has to pull the framework tight against those places to prevent the mask from slipping. If the mask is too loose, wrinkling my nose will simply move the whole mask. I sewed on a (green) piece of foam pad to keep the metal from digging into my skin.
You'll see that there is a sort of pyramid formed by 4 lines that meet in front of the tip of my nose: 2 lines from above the forehead, 2 from beside my eyes. Those two lower lines are the axes of rotation for the two main moving parts.
The two main moving parts are basically L-shaped pieces of metal. The "corner" of the L rests against the side of my nose. The "foot" of the L wraps around the axis to form a hinge. The top of the L connects to the eyelid mechanism.
These drawings are not necessarily accurate to what I ended up constructing, but they illustrate the general method.
Notice that the elastic pulls sideways. (To keep the hinge from sliding sideways along the axis, I wrapped more metal around the axis to form a barrier next to the hinge.) The elastic is anchored to a point lower than the axis, so that when my nose pushes up on the corner of the L, the elastic gets very slightly stretched. It has just enough tension to pull the L back down when I relax my nose. Too much tension would prevent my nose from pushing it at all.
Because the foot of the L is anchored to the axis, the L doesn't move in a straight line: it tries to rotate. When my nose pushes up on the corner of the L, the top of the L doesn't move straight up; it tilts away from my face. The taller the L, the more horizontal the motion.
Here's what happens at the top of the L:
The eyelid is a moving part held in place by two "hooks" that allow it to swivel. The hooks are the ends of a paper clip that has been twist-tied to a small plastic needlepoint grid, which in turn is twist-tied to the metal framework. The grids roughly cover the front edges of my temples, which is where I wanted the eyes to be placed. The twist-ties made it easy to reposition the eyelid assembly on the needlepoint grid until I found an arrangement that looked "right" before installing the L-shaped pieces.
The top of the L hooks the eyelid piece at a point close to the eyelid's center of rotation. This turns a small horizontal movement into a large rotation, so the eyelid flips over when the L tilts forward.
This is a photo of the finished left eyelid mechanism, with an attempt at a latex skin on the eyelid. The vertical part of the L piece is not a straight line; it has some angles in it, to prevent it from bumping into other parts when it moves.
It's a very finicky mechanism. I wanted to eventually put foam flesh on the mask with a layer of liquid latex skin. The problem is, the proper functioning of the mechanism relies on the overall shape of the framework. Every time I try to add something to the framework, a bit of distortion takes place. That distortion hinders the movement, so I have to make adjustments. "Adjustment" means bending the metal. And of course, if you bend a paper clip too many times, it snaps. After having to replace broken pieces several times, I got frustrated and gave up.
So there are some kinks to work out, but I think this is a good proof-of-concept. Maybe someone else, with more resources and better time management skills, can take this idea further.
3 -
Brilliant and scaleable. I was working on a method for reshaping my hairline for matching character hairlines for cosplay. Your frame and strap method is what I was missing as I was relying on just the frame. This led to total loss of placement after only small head movements. I had been using a much thicker wire and could easily use clips instead with the possibility of much finer adjustments to match hairline contours. My intention was to avoid having to do the adhesion and makeup coverage for lace wigs as well as the hair color matching. I will try this again using the plastic coated paper clips in a matching color. Because my cosplay is for photos, I am not worried about the need for long term use or exaggerated movements.0
-
Wow! That is really awesome. Great mechanical design. I love the creativity and resourcefulness of it!
The range of motion looks great as well. Can't wait to see how this continues to evolve!
Thanks for sharing this with us!
/Chris1 -
Love this! I wonder of some of the non-moving parts of the frame could be made out of a thermoplastic to maintain rigidity - or even 3D printed? This is a great start....gets me thinking...
1
Categories
- All Categories
- 97 CURRENT CONTEST
- 97 2025 Halloween Costume Contest
- 1.3K COMMUNITY
- 1K General
- 62 Tutorial Reviews
- 98 Suggestions and FAQ
- 82 Job Listings
- 40 Artists for Hire
- 1.8K CHARACTER CREATION
- 165 Costumes & Cosplay
- 148 Lab work
- 95 Props
- 152 Puppets
- 36 Stop Motion
- 18 VFX
- 39 Student Projects
- 478 Sculpture
- 159 Fabrication
- 160 Animatronics
- 177 Makeup Effects
- 130 Painting
- 29 Traditional/Digital Design
- 8.1K PAST CONTESTS
- 244 Creature Making Contest 2025
- 100 2024 Halloween Costume Contest
- 198 Character Making Contest 2024
- 343 Creature Making Contest 2024
- 131 2023 Halloween Costume Contest
- 168 Monster Making Contest 2023
- 239 Creature Making Contest 2023
- 117 2022 Halloween Costume Contest
- 309 Character Sculpting Contest 2022
- 133 Character Makeup Contest 2022
- 170 2021 Halloween Costume Contest
- 261 Creature Sculpting Contest 2021
- 209 Character Makeup Contest 2021
- 354 Creature Making Contest
- 200 2020 Halloween Costume Contest
- 203 Monster Makeup Contest
- 372 Creature Painting Contest
- 244 Horror Character Contest
- 182 2019 Halloween Costume Contest
- 260 Character Makeup Contest 2019
- 351 Character Sculpting Contest
- 279 2018 Halloween Costume Contest
- 292 Alien Art Contest 2018
- 251 Character Makeup Contest
- 389 Monster Making Contest
- 167 2017 Halloween Costume Contest
- 153 Heroes & Villains Contest
- 221 Cosplay Contest
- 215 Creature Sculpting Contest
- 107 Puppet Contest
- 161 Alien Art Contest
- 98 Halloween Costume Contest
- 149 Robot Art Contest
- 269 Dino Art Contest
- 592 Creature Contest
- 5 ALUMNI
- 275 ON DEMAND WEBCOURSES
- 1 Hand Puppet Detail and Finishing Techniques
- 24 Animation for Animatronics
- 9 How To Make a Mask - Wearable Dynamic Art
- 11 3-Axis Robotic Mechanisms
- 5 Neck Mechanisms
- 24 How To Make a Monster Suit with Bill Bryan & Ted Haines
- 19 Character Animatronics
- 5 How to Sculpt a Dinosaur
- 5 How To Build An Animatronic Head
- 5 Creature Costume Basics
- 4 Puppet Mechanism Basics
- 1 Tattoo Makeup - Cover, Create, & Apply
- 2 How To Make Horror Props
- 1 The Fine Art of Horror Painting
- 1 Fantasy Maquette Sculpting In CX5(S)
- 14 The Business of Making Monsters
- Production Design - The Process Of Creating A World For Film
- 4 Character Makeup - Multi-Piece Prosthetic Application
- 3 Prosthetic Makeup Basics - Gelatin Facial Appliances
- 5 Stop Motion Animation with the Chiodo Bros.
- 11 Blood, Gore and Makeup Effects
- 7 How to Punch Hair - Hairwork for Silicone Characters
- 3 Bodycasting on a Budget with Ted Haines
- 2 Portrait Illustration with Terry Wolfinger
- 5 Mastering Marionettes - Design, Construction & Performance with Scott Land
- 1 Creature Makeup - Multi-piece silicone prosthetic application
- 12 Muscle Suit Fabrication
- 11 Wig & Hair Basics
- 4 Silicone Prosthetic Transfer Appliances
- 3 Building Miniatures: Small-Scale Model Making - Part 5
- 9 Toy Design & Sculpture for Action Figures & Collectibles
- 1 Building Miniatures: Small-Scale Model Making - Part 4
- 2 Human Head Anatomy & Sculpture
- 1 How to Make a Foam Puppet - Part 3
- 1 Building Miniatures: Small-Scale Model Making - Part 3
- 5 How to Make a Foam Puppet - Part 2
- 3 How To Make a Foam Puppet - Part 1
- 1 Building Miniatures: Small-Scale Model Making - Part 2
- 14 Animatronic Control Systems - Arduino Programming Basics with David Covarrubias
- 3 Building Miniatures: Small-Scale Model Making - Part 1
- 3 Advanced Creature Teeth: Prosthetic Dental Appliances - Part 2
- 1 3D Pumpkin Carving - How to Carve a Pumpkin from the Outside In
- 5 How To Make A Latex Rubber Mask Part 3
- 3 Advanced Creature Teeth - Part 1
- 11 How To Make A Latex Rubber Mask Part 2
- 6 How To Make A Latex Rubber Mask Part 1
- 294 PAST LIVE WEBCOURSES
- 11 Monster Sculpting
- 8 Platinum Silicone Mask Painting
- 5 Feather Work: Puppets, Costumes, Hair & Makeup
- 9 How To Make Eyes For Puppets, Masks, & Makeups
- Working with Wigs - Wig & Hair Basics with Connie Grayson Criswell
- 14 Muscle Suit Fabrication with Ted Haines
- 7 Homework - Muscle Suit Fabrication with Ted Haines
- 13 Toy Design & Sculpture for Action Figures & Collectibles with Sandy Collora
- 10 Homework - Toy Design & Sculpture for Action Figures & Collectibles with Sandy Collora
- 13 Human Head Anatomy & Sculpture with Jordu Schell
- 11 Homework - Human Head Anatomy & Sculpture with Jordu Schell
- 18 Mastering Marionettes - Design, Construction & Performance with Scott Land
- 13 Homework - Mastering Marionettes - Design, Construction & Performance with Scott Land
- 16 Puppet Mechanism Basics - Eyes, Brows & Ears with BJ Guyer - Watch & Chat
- 11 Homework - Puppet Mechanism Basics - Eyes, Brows & Ears with BJ Guyer
- 12 Advanced Creature Teeth -- with John Cherevka
- 3 On Camera Hand Puppet Performance
- 9 Silicone Prosthetic Transfer Appliances - Age Makeup with Neill Gorton
- 3 Practical Magic: The Art of In-Camera Visual Effects with Joey Shanks
- 9 Buisness of Making Monsters with Shannon Shea
- 11 Stop Motion Animation with the Chiodo Bros
- 5 Foam Carving Puppets with BJ Guyer
- 3 3D Pumpkin Carving with Andy Bergholtz
- 4 Prosthetic Makeup Basics with Rob Burman
- 13 How to Make a Latex Mask with Tim Martin
- 2 Character Illustration with Terry Wolfinger
- 3 Halloween Costumes - Fabric Effects with Dawn Dininger and Amy Whetsel
- 9 Blood, Makeup & Gore FX with Gary J. Tunnicliffe
- 13 Hand Puppet Design and Fabrication with BJ Guyer
- 3 How to Sculpt a Dinosaur with Christopher Darga
- 2 Airbrush FX: Beginning to Advanced with Craig Fraser
- 1 Female Figure Sculpting in Cx5 wtih Adam Beane
- 3 Creature Design: Maquette Sculpting with Casey Love
- 3 How to Make a Sci Fi Helmet with Fon Davis
- 2 Hyper Realistic Silicone Painting with Tim Gore
- 2 Josh Herman Zbrush Creature Sculpting
- 13 Textures and Forms with Don Lanning Oct 26, 2013
- 9 Character Rendering in Photoshop with Dan LuVisi
- 2 Creature Maquette Painting with Jordu Schell
- 24 Textures and Forms with Don Lanning May 04, 2013
- 3 Tattoo Makeup A-to-Z: Cover, Create, and Apply with Christien Tinsley
- 11 Creature Design w/ Casey Love - Sculpting
- 7 Creature Design With Casey Love - Translucent Creature Painting
- 3 Creature Maquette Sculpting with Jordu Schell


