Plastic bag monster - check out my cocoon build

Hello SWSCA,
I recently made a cocoon puppet/set piece for an indie film called All Jacked Up And Full Of Worms. I designed it based on the courses on plastic bag monster technology from Bill Bryan and Steve Johnson. The scene showed characters inside a giant cocoon, so I decided to make a big cocoon panel that we could wrap around the actors, and inflate it with air to give it substance and life.

I made a video showing my process and the cocoon inflated - I guess what's missing is showing you the actual shot we got when we wrapped it around the actors, but it's still cool I think:
 https://www.youtube.com/watch?v=DM3EtHmyILk
I used the fan from an air dancer to inflate it - it was 1.0 HP - here's a pic for reference:

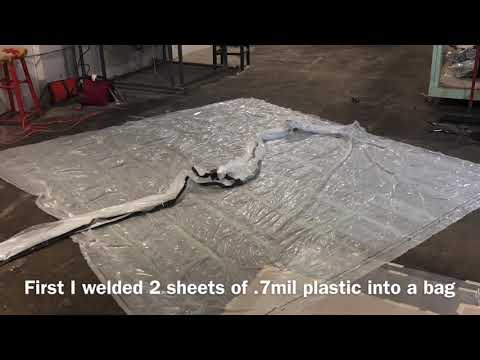
I welded the .7 mil plastic together using a soldering iron on the edges. The piece was basically a giant square, and I didn't want it to puff out real big in the middle, so I used a heat gun to weld the plastic together in a zig zag pattern on the interior; I was kinda going for an intestiney vibe. I welded sleeves into the sides of the piece so that I could mount the whole thing onto a frame. I used 1/2" steel conduit for the 2 upright pieces of the frame, and 1/2" pvc for the 2 horizontal pieces of the frame - I wanted something flexible on the top and the bottom that would allow me to wrap the piece around actors, and something rigid on the sides that would keep the piece upright. I connected the 4 pieces of the frame with 1/2" pvc elbows.
I welded some plastic together into a large duct that would deliver the air from the fan on the floor to the back of the cocoon. I made the duct pretty long because the fan is very loud and I didn't want it to be too close to the actors' ears. The whole time I was making this, I was worried that the power of the fan would tear this thin plastic monster apart. I built an exhaust port into the duct, like 18" above the fan, thinking I only needed about half the power of the fan. The first time I turned on the fan, it ripped open a second hole in the plastic right next to the exhaust port I had already made. I turned off the fan and reinforced the edges of this new hole with duct tape. I had the idea to put the fan on a dimmer, so that I could control the intensity of the blowing and find the "sweet spot" where it fully inflated the plastic but didn't rip it apart. I posted about this on an electronics forum and got a lot of responses, but it seemed like there was a chance I would either damage the fan or damage the dimmer, and I didn't have a lot of time or electronics smarts, so I went with the "exhaust port" method - it was basically just a big reinforced hole in the ducting. I guess the next step would have been creating a way to open and close the exhaust port as a way to decrease/increase air flow through the cocoon - I could have even like taped the hole halfway closed or something to get more airflow in the cocoon.
Before painting, I pinched and pulled out a lot of "flagellum" in the front end of the cocoon - like Bill and Steve do in the tutorials. Then I snipped the ends off of them - I wanted to make little tendrils that would dance around as air escaped through them. I made like 9 rows of 7 tendrils - but when I turned on the fan, the whole thing kind of sagged - I deduced that I had made too many tendrils and the thing wasn't inflating now because the air was all escaping through the tendrils before pushing out and inflating the walls. I started taping up and closing off the tendrils a row at a time, testing the piece after I closed up each row. Eventually I ended up closing up all of the tendrils - no dancing air tendrils for me this time. Again, I could have I guess taped up one of the exhaust ports to get more air flow through the piece - I just ran out of time!
Anyway I'm pretty happy with how it turned out, especially with being new at the plastic bag business! The plastic bag technology is really fun to play with and I also love how it gives me the ability to make something big without a ton of sculpting/mold/casting, and a super modest materials budget. I'm already thinking of ways to use it on future projects.
I'd love to hear what you guys think! Thanks for reading!
-BenG
I recently made a cocoon puppet/set piece for an indie film called All Jacked Up And Full Of Worms. I designed it based on the courses on plastic bag monster technology from Bill Bryan and Steve Johnson. The scene showed characters inside a giant cocoon, so I decided to make a big cocoon panel that we could wrap around the actors, and inflate it with air to give it substance and life.
I made a video showing my process and the cocoon inflated - I guess what's missing is showing you the actual shot we got when we wrapped it around the actors, but it's still cool I think:
https://www.youtube.com/watch?v=DM3EtHmyILkI used the fan from an air dancer to inflate it - it was 1.0 HP - here's a pic for reference:

I welded the .7 mil plastic together using a soldering iron on the edges. The piece was basically a giant square, and I didn't want it to puff out real big in the middle, so I used a heat gun to weld the plastic together in a zig zag pattern on the interior; I was kinda going for an intestiney vibe. I welded sleeves into the sides of the piece so that I could mount the whole thing onto a frame. I used 1/2" steel conduit for the 2 upright pieces of the frame, and 1/2" pvc for the 2 horizontal pieces of the frame - I wanted something flexible on the top and the bottom that would allow me to wrap the piece around actors, and something rigid on the sides that would keep the piece upright. I connected the 4 pieces of the frame with 1/2" pvc elbows.
I welded some plastic together into a large duct that would deliver the air from the fan on the floor to the back of the cocoon. I made the duct pretty long because the fan is very loud and I didn't want it to be too close to the actors' ears. The whole time I was making this, I was worried that the power of the fan would tear this thin plastic monster apart. I built an exhaust port into the duct, like 18" above the fan, thinking I only needed about half the power of the fan. The first time I turned on the fan, it ripped open a second hole in the plastic right next to the exhaust port I had already made. I turned off the fan and reinforced the edges of this new hole with duct tape. I had the idea to put the fan on a dimmer, so that I could control the intensity of the blowing and find the "sweet spot" where it fully inflated the plastic but didn't rip it apart. I posted about this on an electronics forum and got a lot of responses, but it seemed like there was a chance I would either damage the fan or damage the dimmer, and I didn't have a lot of time or electronics smarts, so I went with the "exhaust port" method - it was basically just a big reinforced hole in the ducting. I guess the next step would have been creating a way to open and close the exhaust port as a way to decrease/increase air flow through the cocoon - I could have even like taped the hole halfway closed or something to get more airflow in the cocoon.
Before painting, I pinched and pulled out a lot of "flagellum" in the front end of the cocoon - like Bill and Steve do in the tutorials. Then I snipped the ends off of them - I wanted to make little tendrils that would dance around as air escaped through them. I made like 9 rows of 7 tendrils - but when I turned on the fan, the whole thing kind of sagged - I deduced that I had made too many tendrils and the thing wasn't inflating now because the air was all escaping through the tendrils before pushing out and inflating the walls. I started taping up and closing off the tendrils a row at a time, testing the piece after I closed up each row. Eventually I ended up closing up all of the tendrils - no dancing air tendrils for me this time. Again, I could have I guess taped up one of the exhaust ports to get more air flow through the piece - I just ran out of time!
Anyway I'm pretty happy with how it turned out, especially with being new at the plastic bag business! The plastic bag technology is really fun to play with and I also love how it gives me the ability to make something big without a ton of sculpting/mold/casting, and a super modest materials budget. I'm already thinking of ways to use it on future projects.
I'd love to hear what you guys think! Thanks for reading!
-BenG
0
Comments
/Chris