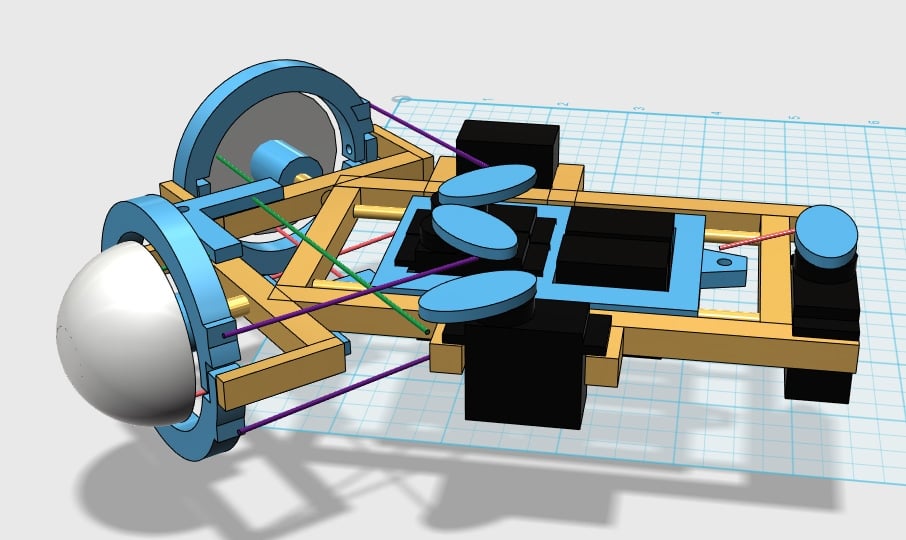
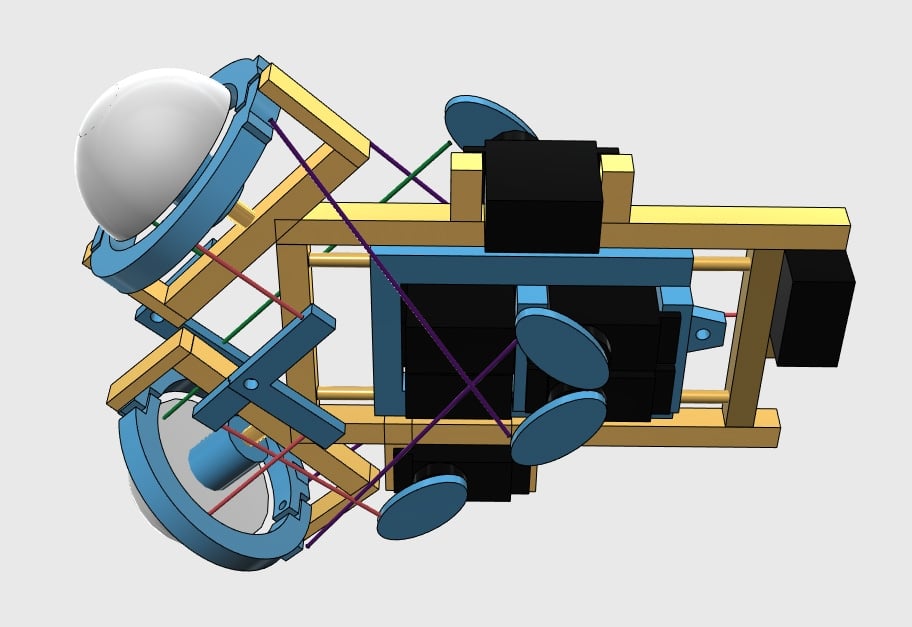
Angled eye mechanism.
in Animatronics
Hello all!
I'm finally able to put some time in on my project, and I realized I have an issue. My original eye mechanism was the standard forward facing setup. Since I'm doing a western dragon, the eyes will be somewhere around 45 deg outward facing. Has anyone dealt with a setup like this? I know I'll be able to create one, but wanted to know if there were any references I could draw from. Here are some pics of my WIP, if anyone has any input.
I had another thought. Scary, I know...
I've seen eyelid setups that follow the up/down of the eye. Very realistic. They have all been software controlled. I'm wondering if it would be too much engineering to do this mechanically? I've already added a separate blink carriage to the eyelid control servo array.
This is just the basic shape, and layout, and it's only digital design currently, so making changes is no problem!


1

Comments
I actually have some experience addressing this problem, and it's a bit more challenging than you might think.
The main challenge is that if your eyes are looking forward by default (as predators that use binocular vision do) and are angled backwards, when the eyes look left/right the back side of the eyeballs become more visible than they would on a normal front-facing mechanism. This means you can't use partial eye shells, and must use something closer to a full sphere. It also means the connection points for rotating the eyes risk becoming visible.
With the eye mechanism you have depicted above, the eyes would always be facing outward (walleyed), and the character could never look forward. Drawing a pupil on your eye mechs helps to visualize this challenge.
If you can get away with that design, it's much easier. But if the character needs to make eye contact, or be seen from the front, it's more challenging as they would appear walleyed.
You can see some of my designs to tackle this challenge here on the thread discussing my Skeksis project:
http://forums.stanwinstonschool.com/discussion/comment/7402
And this video shows a slightly older version of my mech:
I would love to find a more elegant solution, but so far this is the best I've come up with.
As far as addressing eyelid control so they move as the eye looks up/down, that is not too difficult to setup on more advanced RC transmitters that allow mixing of channels. You just have to set the channels for the upper and lower lid to be modified by the channel that controls the eye up/down movement.
/Chris
I see the issue with the range of travel of the eye. I did some testing, and with my current design. A 1.5 in. diameter eye blank on a universal joint mount, with a 1.125 in. bore gives me +/-44 degrees in all directions. I could easily get more if I shave the back edge off a bit more. Right now that leaves 1.25" of the 1.5" sphere, so there should be enough of a skirt to prevent anything showing at the edges.
If I place the mount pegs at like 35 or 40 degrees from forward, do you think that would work?
Keep in mind that due to the mounting angle of the eye, the pupil will not be at the center of the eye sphere, but 35-40 degrees forward. I would do some motion tests with a pupil on the eye, and with the eye sitting in a rough opening at the same angle as the eye socket on your head. That will help you visualize the range of motion before any mechs are exposed, and see how far left/right it can look.
I sure hope your design works, because having to go crazy complicated like my design is not fun.
/Chris
The image shows the pupil in the forward position, but the real eye will be centered or maybe 5 deg forward. I've left spots to add additional servos in case the single servo with the 90 deg horns don't work out. After that, it's Arduino coding to offset the movements.
I'm pretty happy with the design. Fairly compact, and simple. I'll be printing the parts over the next couple days so I can start assembly.
/Chris
If anyone has some input... what material would be good for the eyelids? In the past I tried vacuum forming .040" PETG but it seemed really stiff for the application.
I found this image that can also give an idea regarding vision range for non-human creatures.
Reading up on different types of eyesight has been interesting. Hard to find info on reptiles, which is what I have been using as a reference.
I would recommend vacuforming the eyelids out of low density polyethelene. It forms extremely well. Barge contact cement adheres pretty well to it. And, it is strong, yet pliable enough to not scratch up the polish on your eyes. It also will not cause a lot of drag, should it contact the eyes. Make a "stand-in" buck of your eyes, with an approximation of the eyelid rings attached directly to the eyes. If your eyes are set to have corneal bulges, do not include them on the vacuforming buck, for the eyelids. After the eyelids have been vacuformed, cut a series of verticle slits in the eyelids, (like a crude approximation of a comb). when the eyelids are attached to the final eyelid rings, the eyelids will accommodate the eye bulge without restriction.
Overall, your design for the mechanics look pretty clean, and problem free. Depending on the design of your sculpted skin, I would recommend one alteration, though. The frame that holds the eyelids seems rather wide. You might consider making the profile closer to the eyelid rings. Don't feel you NEED to 3D print the entire frame & mechanics. Good old brass, bar stock can still be used in areas of high stress, that also could benefit from a low profile, too.
Remember, when it comes to mechanics, bigger isn't always better. The lower profile all you mechanics can be, the more room you will have to access everything, and/or add more mechanics. At the very least, lower profile mechanics physically weigh less, which is a blessing in and of itself.
The eyelid frame brackets are a bit wide. I can remake them from brass easy enough. It's all still a work in progress, so this is the time to make changes. Once I get the complete design worked out I'll make a 'final' version to clean up all the changes. My latest status. Lid linkages installed, and servos being controlled with the Arduino.
Would you be putting the 3D Models or STL's up on the forum.
Many thanks
Dave
Eye Frame Main STL
Eye Lid Set STL
Eye Frame Back STL
Eye Frame Arms STL
Even with the STL's one can enlarge or shrink using the printing program, or split the base if one has a wider head
Again many thanks for your kind generosity for sharing.
Sincerely
Dave