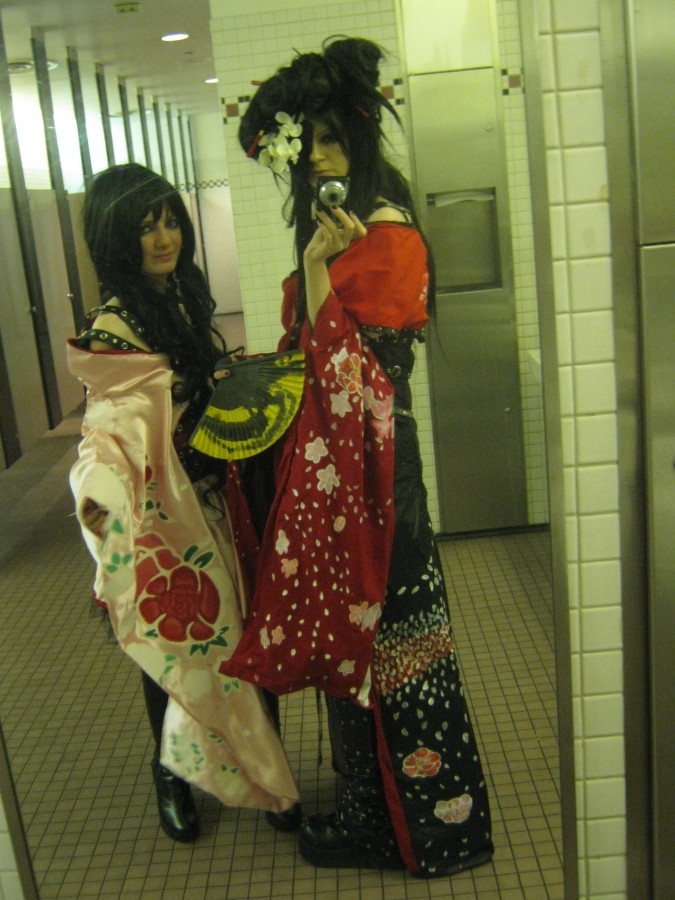
Asagi from Jrock band D (Ouka Saki Some ni Keri)

Hello! ") I have been costuming since 2007, but in 2010, I decided to learn how to make my own from scratch! I absolutely love creating costumes and building things.
I have been costuming since 2007, but in 2010, I decided to learn how to make my own from scratch! I absolutely love creating costumes and building things.
This costume was created over a period of many months, starting in November 2011 and ending in June of 2012. Most of this costume was constructed when I was 14 years old and it stills inspires me today, and I use everything I've learnt from it now!
Whenever I construct a new costume, I like picking something that I can look at and immediately go, "Okay, I'm going to have to learn this technique and work more on this skill". And that's exactly what this costume brought. For quite a few years, I was heavily into the culture of Japanese rock bands and visual kei because of the unique style and immensely intricate costumes they wore, things you'd never see anywhere else. With that being said, usually these costumes are only worn a few times, or sometimes even just once, for a four minute promotional video. And that's where the first challenge started, trying to gather reference photos to even start this build to make it as accurately as possible.
I proposed making this costume with my best friend, who would be portraying another member of the band, TsuneHito. We searched all over the internet for hours and hours trying to find any reference to the paintings done on their kimonos, the types of fabrics that were used and the linings, their make up styles, hair styling, etc. I had purchased Japanese magazines that featured these costumes in them so we could get a better look. We really do owe it to our friends who had made these in the past who offered advice to us, because in the end, I think we had maybe 30 photos in total to work from, a lot of those being other costumers!
This costume has a plethora of pieces, everything that was worn hand created from scratch, including two skirts under the main skirt, a base shirt under the kimono top that had detachable sleeves, individually laced up boot covers over altered platform boots, a leather collar, obi with detachable bow for better transportation, hand painted fan and wig with detachable parts. Every piece of this costume was created with the thought in mind that this was going to have to be safely transported out to California from Michigan in a small suitcase along with five other costumes and props.

(Photo by Ben Chan Photography at Anime Expo 2012)
When creating the wig, I purchased a simple black base wig, which was cut appropriately. The hair pieces, or "hair balls", were circular pieces of fabric sewn and then stuffed with basic plush stuffing. Wefts were then one by one wrapped around the pieces, glued down with hot glue and tacky glue, and then bobby pins were attached underneath so the wig could be reconstructed in California and the accessories, hand painted chopsticks and a piece of a plastic flower, could be inserted back in.
At this point in time, I'd only been sewing for two years, so taking on something at this scale was a little intimidating and really pushed me further in my sewing abilities. The entire kimono had to be lined, and I'd never done lining before as I'm all self taught in sewing and I hadn't made any jackets or things that required linings. Talking to my friend, consulting my mother and watching various tutorials, I finally figured out a way that would best work for me to sew in the lining and it was a success! All seams were also finished with a zigzag stitch and everything was hemmed.

(Construction finished, displayed on mannequin)
I wanted a very rich and heavy fabric for the bases of the kimono that would take the majority of the paint, so I used a thinner cotton for the kimono top with a varying red tone which was accented with black vinyl. There was so much grommet tape used on this costume that I had to actually order two full bolts from JoAnns because I had already bought everything they had in the store, haha. Lining is also a thick white cotton as well as the black used. The bow has interfacing to keep its sturdy shape and there is an invisible zipper in the back of the obi (not traditional but I needed to be able to get this on easily by myself).
The necklaces were also hand beaded. All pieces were also created by eye, shapes drawn directly onto the fabric and then cut with no patterns used or drafted.

(Anime Expo 2012 masquerade, photo belongs to its rightful owner.)
Sewing all the garments took quite a bit of time, just around two months if I remember correctly. Once everything was put together, the painting process took place, which I was incredibly excited for but also nervous since it still wasn't clear where everything was placed on the original costume, especially tricky places like the back where his hair would cover everything.
Me and my friend would Skype together from evening until morning painting our costumes, discussing what we'd preform for our skit since we were entering the Anime Expo masquerade and wouldn't be able to practice until we saw each other at the convention.
First the black was layered on the fabric, slowly building up the color and thickness. Once finished with that part, I could begin the details. I took a fine tipped white paint pen and begun drawing out petal shapes, marking where I wanted to go back and fill them in later, sketching out the larger flowers as well to get a feel for space. All painting was done by hand since I didn't want to use the airbrush (I really do want to make Mark.2 of this costume and use the airbrush now), so it was all acrylics, fine tipped brushes, fabric paint and paint pens... A lotttt of paint pens. All colors of flowers were mixed and maintained to keep to what is on the original costume.
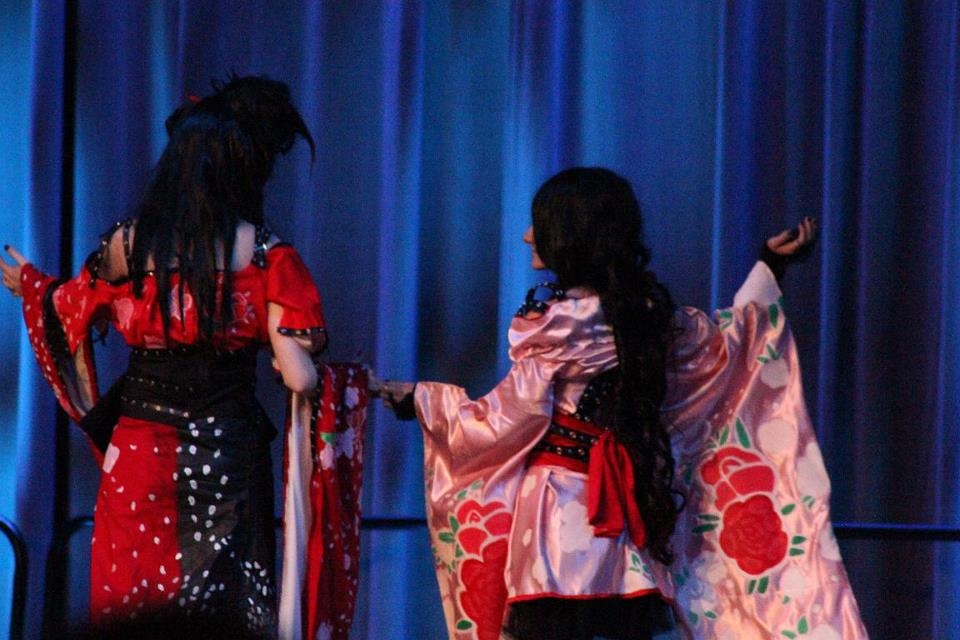
(Anime Expo 2012 masquerade, photo belongs to its rightful owner.)
The painting process really took until I had to leave for the convention, making sure all fabric was covered in petals and flowers, adding gradients and shading and details in spots where you'd never see. The larger petals were feathered with a brush, trying to keep the general shape for all. Here you can also see my friend's costume, which she hand sewed herself, making everything from scratch and painting it all as well.

(Photo from Youmacon 2012)
As important as the physical fabric pieces are, the make up is also very important. I used red contacts for the look, as Asagi always does, and experimented with different ways of achieving his eye make up look. I used a lipstick pen for the eyeshadow part as it really gave a true red color and could easily be blended.
The fan was an old folding fan I had that I coated with a flat yellow and then added black accents, replicating the design on his fan, and painted the wood black as well.

(Tattoo done, Anime Expo 2012 Day 1)
Asagi also has a tattoo that is shown since the shoulders are exposed, so it was important to me that this was recreated and portrayed in the final look. I was doing different variations of outfits he wore throughout the weekend, so this tattoo was created Day 1 and still survived until Day 3, which is when the red kimono was worn. I used a thick Sharpie (which I don't advise using in that large of an amount, but I'm not dead yet haha), drawing outlines of the roses and then went back and started shading them in carefully. This took about an hour to do and was sealed with hairspray in the end.

(Photo in 2017)
And this photo was taken about a month or so ago! This was the gathered skirt I wore under the kimono that I had created in a day in two sittings, taking about 8 hours or so. I had no clue what I was doing, only having done ruffles and gathering a handful of times prior but I still love how this looks all these years later. And it's still in perfect condition! (minus cat hair, because the cats love sleeping on it...)
Even 60+ costumes later, this is still one of my favorites.
*ADDED More progress pictures and photos of the costume in full.

(Photo by KamiDigital.com at Anime Expo 2012.)
Here you can see the wig more, details on the kimono and obi, and a better view of the fan. You can also see the necklaces a lot better, which were hand beaded. Also how the top laces up with ribbons.

(Photo by Populationgo.com at Anime Expo 2012.)
Here you can see the boot covers, which are put on by lacing up the backs - this always took such a long time to do, haha - the platform boots which were altered, lining of the skirt, and more details.

Progress picture of the undershirt and obi. The bow is a thick black cotton with a very stiff interfacing inside. Detailing on the red strips with bias tape were done with a zigzag stitch.

Progress shot of one of the sleeves as it was being worked on.
The detailing on the flowers is better depicted here; since there were so many flowers that had to be painted, I wanted to make each one a little unique, and just have fun with it. All of the cherry blossoms were kept in a similar design, trying to be uniform with one another but other flowers were accented with metallic paint pens and highlights / shadowing.

Detailing on the bottom of the skirt.
Here you can see the hundreds of petals that were painted on.
Also, you can see us being exhausted after we finished our skit in the masquerade, haha.
This costume was created over a period of many months, starting in November 2011 and ending in June of 2012. Most of this costume was constructed when I was 14 years old and it stills inspires me today, and I use everything I've learnt from it now!
Whenever I construct a new costume, I like picking something that I can look at and immediately go, "Okay, I'm going to have to learn this technique and work more on this skill". And that's exactly what this costume brought. For quite a few years, I was heavily into the culture of Japanese rock bands and visual kei because of the unique style and immensely intricate costumes they wore, things you'd never see anywhere else. With that being said, usually these costumes are only worn a few times, or sometimes even just once, for a four minute promotional video. And that's where the first challenge started, trying to gather reference photos to even start this build to make it as accurately as possible.
I proposed making this costume with my best friend, who would be portraying another member of the band, TsuneHito. We searched all over the internet for hours and hours trying to find any reference to the paintings done on their kimonos, the types of fabrics that were used and the linings, their make up styles, hair styling, etc. I had purchased Japanese magazines that featured these costumes in them so we could get a better look. We really do owe it to our friends who had made these in the past who offered advice to us, because in the end, I think we had maybe 30 photos in total to work from, a lot of those being other costumers!
This costume has a plethora of pieces, everything that was worn hand created from scratch, including two skirts under the main skirt, a base shirt under the kimono top that had detachable sleeves, individually laced up boot covers over altered platform boots, a leather collar, obi with detachable bow for better transportation, hand painted fan and wig with detachable parts. Every piece of this costume was created with the thought in mind that this was going to have to be safely transported out to California from Michigan in a small suitcase along with five other costumes and props.
(Photo by Ben Chan Photography at Anime Expo 2012)
When creating the wig, I purchased a simple black base wig, which was cut appropriately. The hair pieces, or "hair balls", were circular pieces of fabric sewn and then stuffed with basic plush stuffing. Wefts were then one by one wrapped around the pieces, glued down with hot glue and tacky glue, and then bobby pins were attached underneath so the wig could be reconstructed in California and the accessories, hand painted chopsticks and a piece of a plastic flower, could be inserted back in.
At this point in time, I'd only been sewing for two years, so taking on something at this scale was a little intimidating and really pushed me further in my sewing abilities. The entire kimono had to be lined, and I'd never done lining before as I'm all self taught in sewing and I hadn't made any jackets or things that required linings. Talking to my friend, consulting my mother and watching various tutorials, I finally figured out a way that would best work for me to sew in the lining and it was a success! All seams were also finished with a zigzag stitch and everything was hemmed.
(Construction finished, displayed on mannequin)
I wanted a very rich and heavy fabric for the bases of the kimono that would take the majority of the paint, so I used a thinner cotton for the kimono top with a varying red tone which was accented with black vinyl. There was so much grommet tape used on this costume that I had to actually order two full bolts from JoAnns because I had already bought everything they had in the store, haha. Lining is also a thick white cotton as well as the black used. The bow has interfacing to keep its sturdy shape and there is an invisible zipper in the back of the obi (not traditional but I needed to be able to get this on easily by myself).
The necklaces were also hand beaded. All pieces were also created by eye, shapes drawn directly onto the fabric and then cut with no patterns used or drafted.
(Anime Expo 2012 masquerade, photo belongs to its rightful owner.)
Sewing all the garments took quite a bit of time, just around two months if I remember correctly. Once everything was put together, the painting process took place, which I was incredibly excited for but also nervous since it still wasn't clear where everything was placed on the original costume, especially tricky places like the back where his hair would cover everything.
Me and my friend would Skype together from evening until morning painting our costumes, discussing what we'd preform for our skit since we were entering the Anime Expo masquerade and wouldn't be able to practice until we saw each other at the convention.
First the black was layered on the fabric, slowly building up the color and thickness. Once finished with that part, I could begin the details. I took a fine tipped white paint pen and begun drawing out petal shapes, marking where I wanted to go back and fill them in later, sketching out the larger flowers as well to get a feel for space. All painting was done by hand since I didn't want to use the airbrush (I really do want to make Mark.2 of this costume and use the airbrush now), so it was all acrylics, fine tipped brushes, fabric paint and paint pens... A lotttt of paint pens. All colors of flowers were mixed and maintained to keep to what is on the original costume.
(Anime Expo 2012 masquerade, photo belongs to its rightful owner.)
The painting process really took until I had to leave for the convention, making sure all fabric was covered in petals and flowers, adding gradients and shading and details in spots where you'd never see. The larger petals were feathered with a brush, trying to keep the general shape for all. Here you can also see my friend's costume, which she hand sewed herself, making everything from scratch and painting it all as well.
(Photo from Youmacon 2012)
As important as the physical fabric pieces are, the make up is also very important. I used red contacts for the look, as Asagi always does, and experimented with different ways of achieving his eye make up look. I used a lipstick pen for the eyeshadow part as it really gave a true red color and could easily be blended.
The fan was an old folding fan I had that I coated with a flat yellow and then added black accents, replicating the design on his fan, and painted the wood black as well.
(Tattoo done, Anime Expo 2012 Day 1)
Asagi also has a tattoo that is shown since the shoulders are exposed, so it was important to me that this was recreated and portrayed in the final look. I was doing different variations of outfits he wore throughout the weekend, so this tattoo was created Day 1 and still survived until Day 3, which is when the red kimono was worn. I used a thick Sharpie (which I don't advise using in that large of an amount, but I'm not dead yet haha), drawing outlines of the roses and then went back and started shading them in carefully. This took about an hour to do and was sealed with hairspray in the end.
(Photo in 2017)
And this photo was taken about a month or so ago! This was the gathered skirt I wore under the kimono that I had created in a day in two sittings, taking about 8 hours or so. I had no clue what I was doing, only having done ruffles and gathering a handful of times prior but I still love how this looks all these years later. And it's still in perfect condition! (minus cat hair, because the cats love sleeping on it...)
Even 60+ costumes later, this is still one of my favorites.
*ADDED More progress pictures and photos of the costume in full.
(Photo by KamiDigital.com at Anime Expo 2012.)
Here you can see the wig more, details on the kimono and obi, and a better view of the fan. You can also see the necklaces a lot better, which were hand beaded. Also how the top laces up with ribbons.
(Photo by Populationgo.com at Anime Expo 2012.)
Here you can see the boot covers, which are put on by lacing up the backs - this always took such a long time to do, haha - the platform boots which were altered, lining of the skirt, and more details.
Progress picture of the undershirt and obi. The bow is a thick black cotton with a very stiff interfacing inside. Detailing on the red strips with bias tape were done with a zigzag stitch.
Progress shot of one of the sleeves as it was being worked on.
The detailing on the flowers is better depicted here; since there were so many flowers that had to be painted, I wanted to make each one a little unique, and just have fun with it. All of the cherry blossoms were kept in a similar design, trying to be uniform with one another but other flowers were accented with metallic paint pens and highlights / shadowing.
Detailing on the bottom of the skirt.
Here you can see the hundreds of petals that were painted on.
Also, you can see us being exhausted after we finished our skit in the masquerade, haha.
Post edited by Hazel-Grey Kenny on
0