Alien Facehugger - One Person Cable control


Here is my attempt at an Alien Facehugger. Pretty new to learning about animatronics and made a few mistakes but hope you like him

 https://www.youtube.com/watch?v=jw9RVW5qvHc
 https://www.youtube.com/watch?v=tAes3m6jTko
 https://www.youtube.com/watch?v=YrE0pBEo2Pg
 https://www.youtube.com/watch?v=xhkfvxm0Iv8
----Metal Maquette Leg
After fabrication of the initial plastic leg maquette it was essential to produce a metal maquette to test the fluidity of movement with the added weight and source the various materials that would be fit for purpose. Initially one pivot point was produced to ensure the various metals would be not only strong enough but also bond well to each other. Brass stock was used to create the top of the ‘knuckle’ pivot point with steel coated in zinc utilized for the hinge stand offs, pipe clamp, nuts, bolts and spacing washers.
Technical Issues
At this stage there was a major technical issue with regards to attempting to solder the brass stock onto the zinc coated steel. Some brass stock immediately held strong after plating the steel with solder, however, other pieces were extremely brittle and loose causing the metal joint to hyperextend locking the joint into an extended position. Aligning the cable supporting disc when using Lock Tite was difficult to attain due to the position of the nuts when tightening in place. Metal burs and sharp edges caused some fraying on the return elastic after approximately 200 bends of each joint.
Design Modifications
After using several various flux and cleaning routines the decision was taken to still solder the brass stock into position and add a small pipe clamp to ensure there was absolutely no movement when the model was being pupeteered. The control cable was placed in position to ensure correct alignment of the supporting discs and all sharp edges and burs were filed down to a rounded edge.
Result
The resulting action from making all the relevant modifications was a correctly aligned cable run, a reduced risk of rips and tears in the outer skin and return elastic and a greatly reduced risk of the brass stock coming loose during operation.
------Chassis Design
Technical Issues
The type of metal utilized taking into consideration strength and weight along with workability during fabrication, the chosen metal was mild steel. To achieve the desires angle of the protruding legs the steel had to be scored initially with an angle grinder which was effective, however, the metal became very brittle as it was bent into position whilst it was too hot and snapped.
Design Modifications
The decision was taken to allow the metal to fully cool down after grinding and not scoring too deep in an even line.
Result
The end result was a much stronger angle bend that stayed in position to support the legs.
------Hand Control Mechanism
One hand control framework was assembled without solder and tensioning cable return was attached to check fluidity of movement prior to attaching the rest and finalizing with crimps.
Technical Issues
Whilst soldering the brass tubing the cable housing became too hot preventing the cable moving freely therefore limiting the overall movement
Design Modifications
The decision was taken to dissemble the thumb trigger mechanisms by de-soldering the joints to remove the cable housing exposing the bare cable then re-attach.
Result
This modification resulted in a cable that moved freely within the pipe.
-----Leg Fabrication
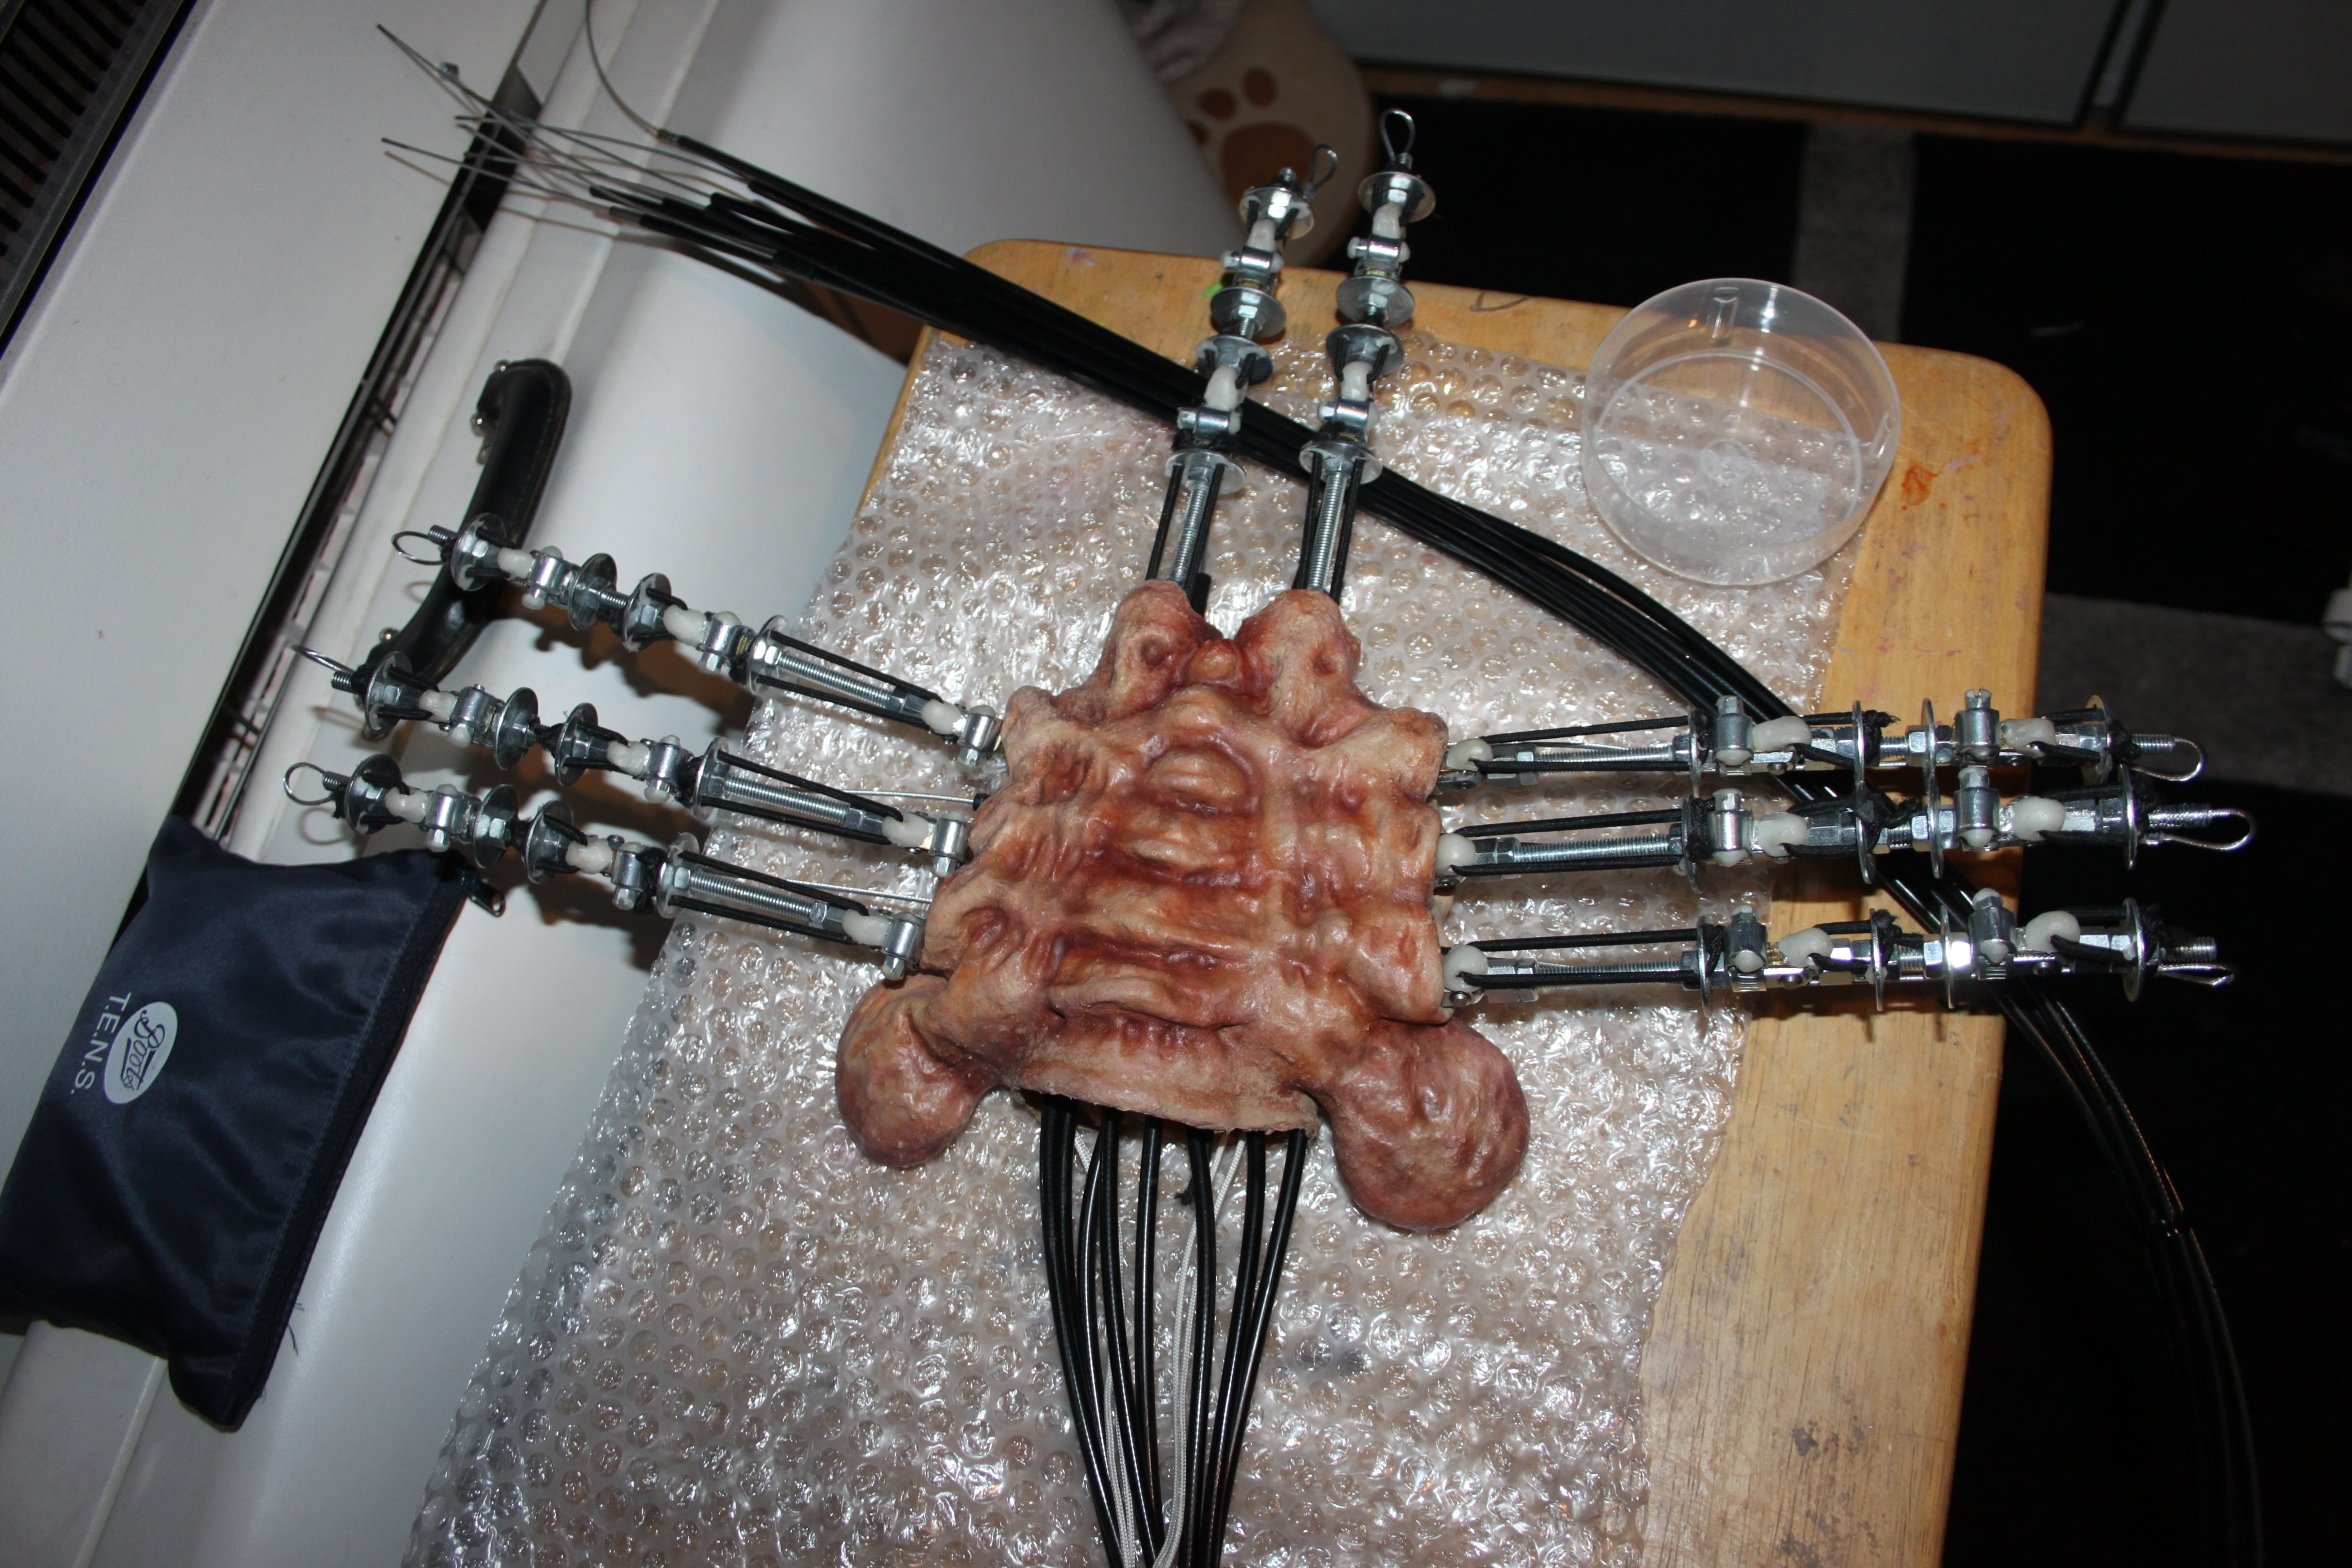
Four steel discs per leg were initially required to support the return elastic and cable run. This disc required subsequent holes to be drilled in one as a template then accurately drilled out using the drill press. Brass stock was cut into strips and supporting tubes were also cut, flux was added and soldered into position to enable the return elastic to be attached. The flux was removed with a damp cloth. These were then soldered onto the steel hinge stand offs and further supported with the addition of a small pipe clamp. Steel threaded rod was measured into the desired lengths for each leg segment and an angle grinder was used to cut them accurately, removing all burs with a hand file.
------Chassis Fabrication
A scale cardboard template was used to achieve the correct shape in the mild steel. Using an angle grinder the metal was scored allowing it to bend into the desired shape and angles to receive the legs. Unnecessary metal in panels were cut into the bottom of the chassis to alleviate some of the weight. Holes were drilled into the sides of the chassis ready to receive the bolts from each leg.
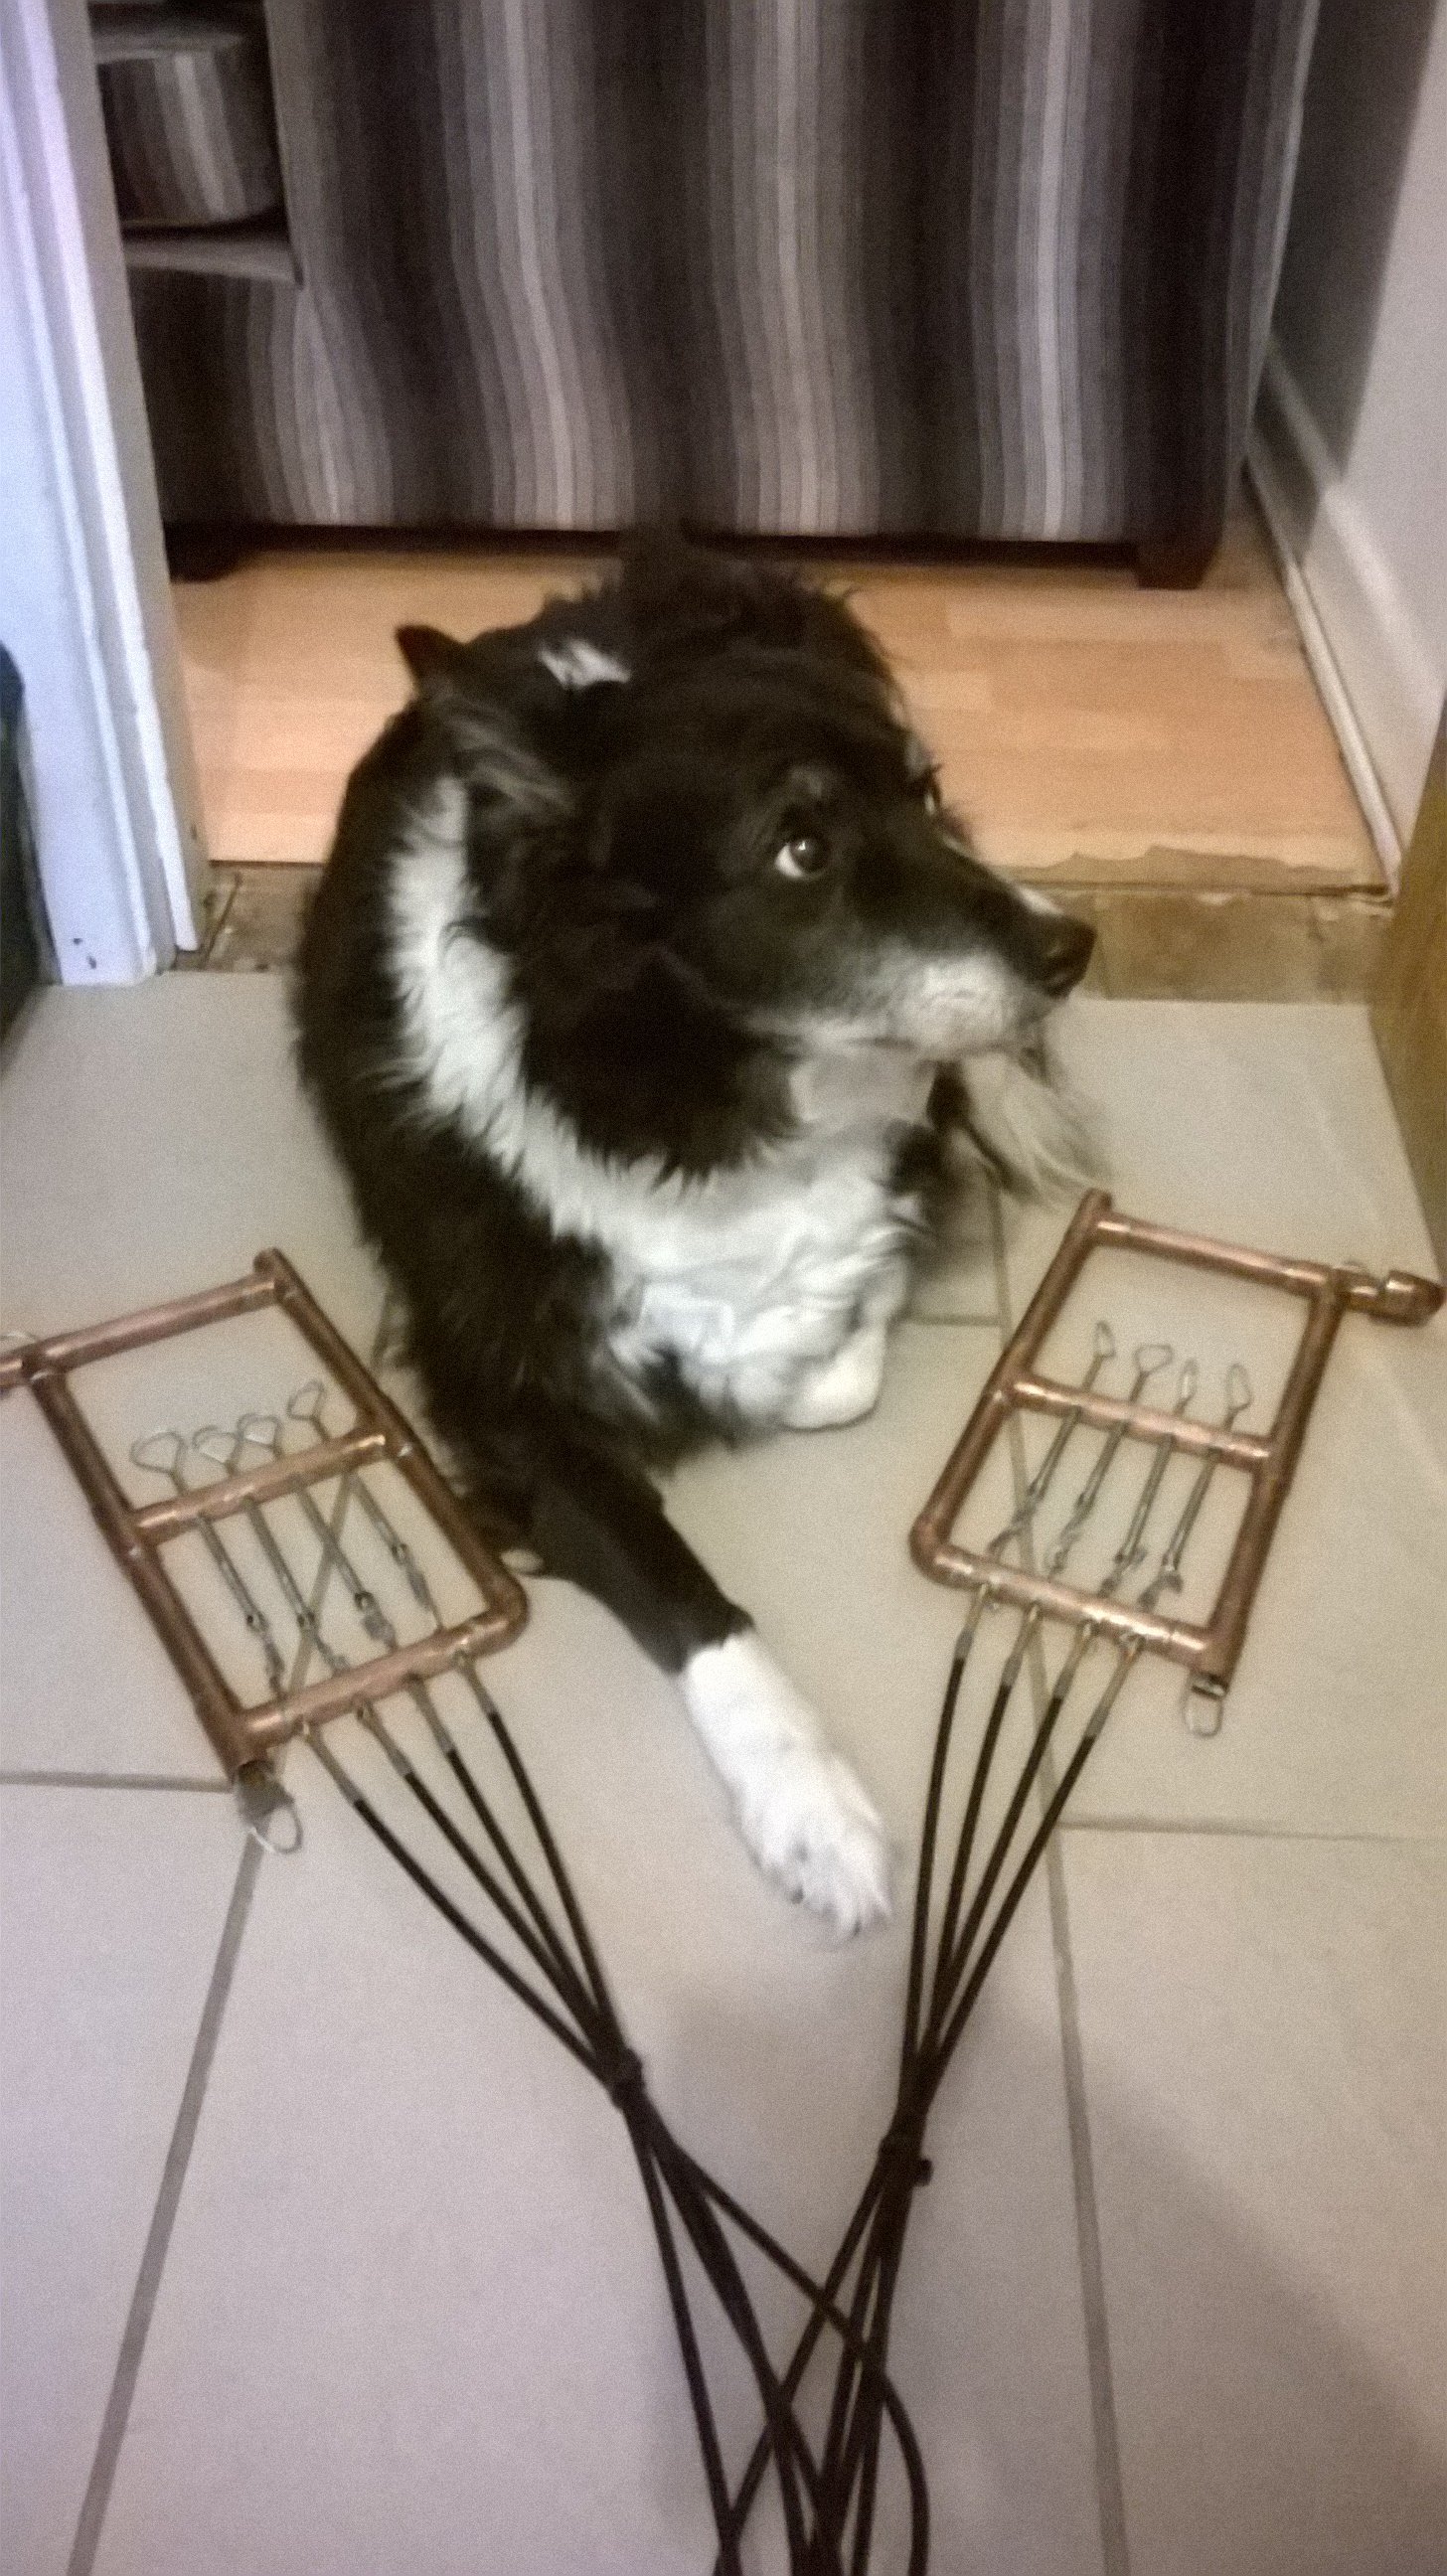
-----Hand Control Mechanism Fabrication (Peter Weir Clarke's Very Cool Hand Control Design Tutorial )
Copper pipe was measured and cut into the desired lengths using a 15 mm pipe cutter. L and T shape and copper fittings were used to achieve the correct shape and bespoke length. Holes were measure into the middle and top supporting pipes prior to soldering and holes were made to receive cable tensioning mechanism housing brass stock. The brass stock was cut into adequate lengths and placed into the pre-drilled holes. Flux was then added to the pipe joints and brass stock housing and placed on block to be soldered into positon. All flux was removed using a damp cloth and the brass stock housing was cut flush with the copper pipe using a Dremel tool. All metal burs were then removed with a small hand file.
Brass stock two sizes below the brass housing was cut into the correct lengths and cable was passed into the pipe and returned back through to create a finger loop. These were then fed into the housing and two compression springs per finger was added to assist with the cable return. Locking nuts were added to the pipe to prevent the springs sliding off and the cable was crimped into final position. Cable was then fed through the top copper bar pre-drilled holes crimped to the existing finger control cables under slight tension.
------Outer Skin Fabrication
The mechanism was clayed up
to achieve the desired shape and texture. Three trials were undertaken to create
an effective skin shell with an adequate negative space for the mechanism. The
final shell was produced with a simple latex slush mould that was used to
create liquid latex sleeves and very thin nylon tights were added to increase
the overall durability. Nails were produced using mouldable plastic Coolmorph and the entire leg
was airbrushed, building the colour up in thin washes to achieve the desired
colour and shading. The nails had
three coats of nail varnish added for extra strength and effect.
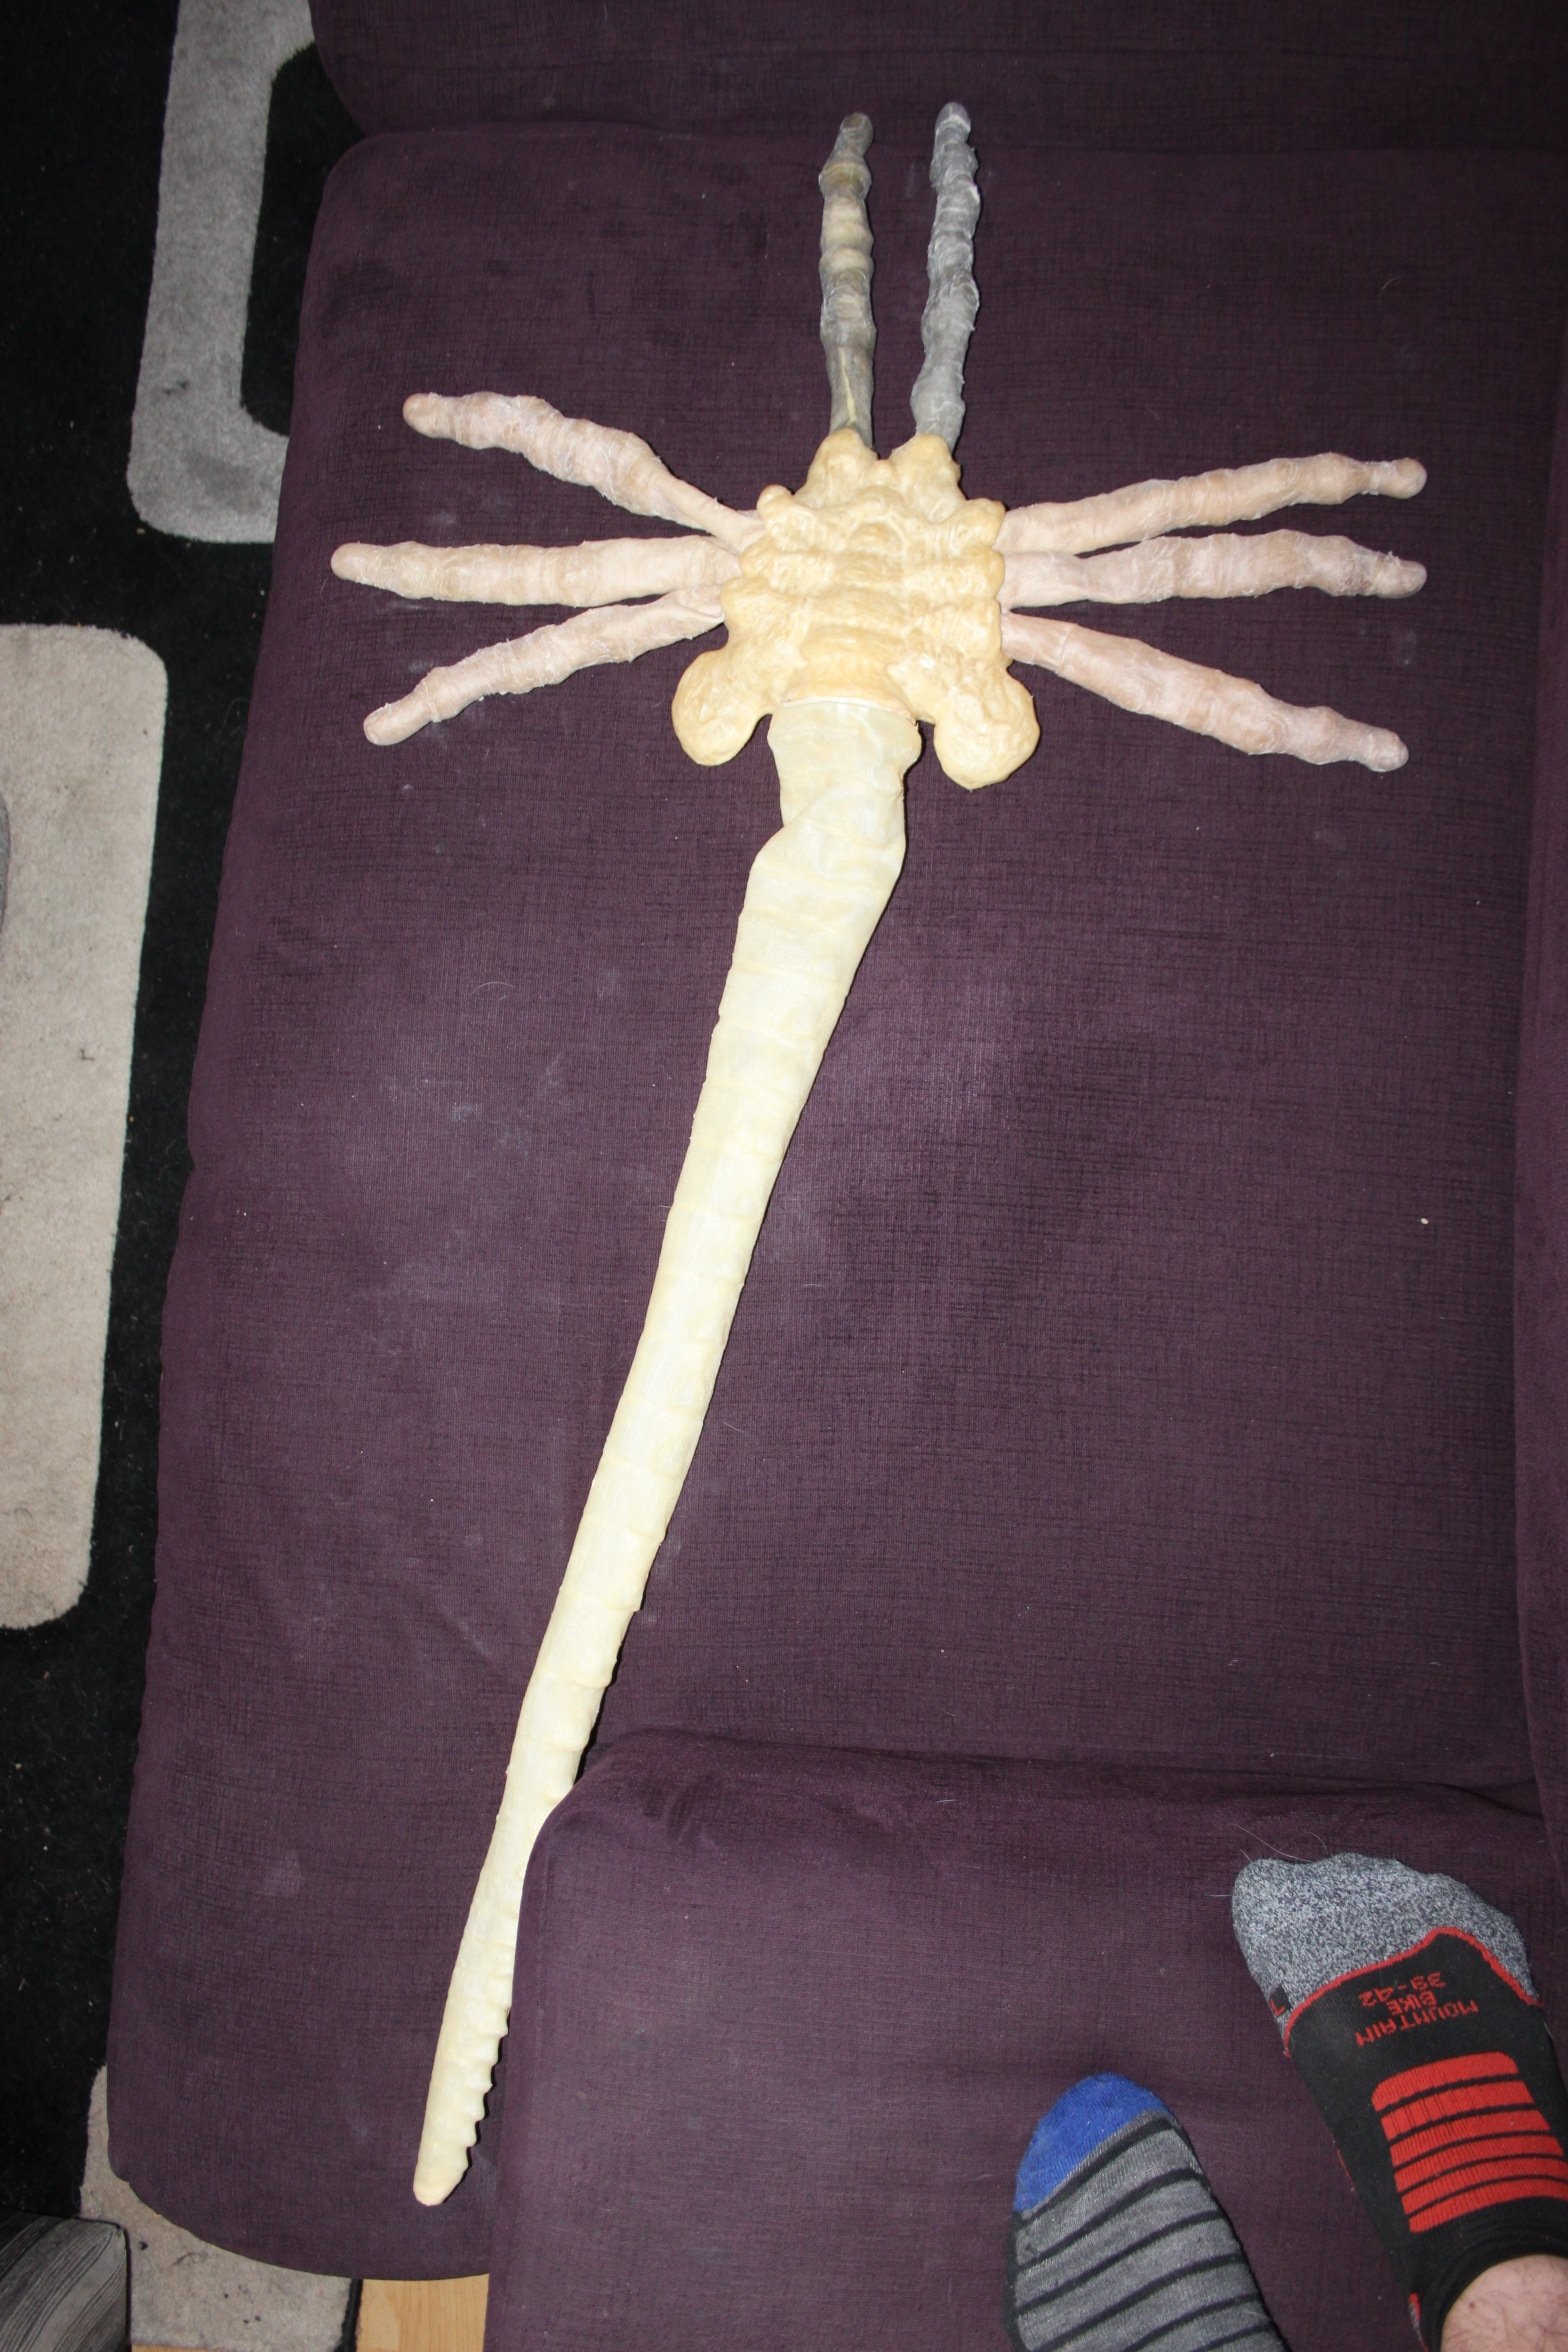
-----Tail
The main tail internal
support structure was formed using high density pipe covering foam, shaved into
the rough shape and covered in Le Beau Touche clay to achieve the desired form,
shape and detail






Comments
-
Love it!0

Categories
- All Categories
- 97 CURRENT CONTEST
- 97 2025 Halloween Costume Contest
- 1.3K COMMUNITY
- 1K General
- 62 Tutorial Reviews
- 98 Suggestions and FAQ
- 82 Job Listings
- 40 Artists for Hire
- 1.8K CHARACTER CREATION
- 165 Costumes & Cosplay
- 148 Lab work
- 95 Props
- 152 Puppets
- 36 Stop Motion
- 18 VFX
- 39 Student Projects
- 478 Sculpture
- 159 Fabrication
- 160 Animatronics
- 177 Makeup Effects
- 130 Painting
- 29 Traditional/Digital Design
- 8.1K PAST CONTESTS
- 244 Creature Making Contest 2025
- 100 2024 Halloween Costume Contest
- 198 Character Making Contest 2024
- 343 Creature Making Contest 2024
- 131 2023 Halloween Costume Contest
- 168 Monster Making Contest 2023
- 239 Creature Making Contest 2023
- 117 2022 Halloween Costume Contest
- 309 Character Sculpting Contest 2022
- 133 Character Makeup Contest 2022
- 170 2021 Halloween Costume Contest
- 261 Creature Sculpting Contest 2021
- 209 Character Makeup Contest 2021
- 354 Creature Making Contest
- 200 2020 Halloween Costume Contest
- 203 Monster Makeup Contest
- 372 Creature Painting Contest
- 244 Horror Character Contest
- 182 2019 Halloween Costume Contest
- 260 Character Makeup Contest 2019
- 351 Character Sculpting Contest
- 279 2018 Halloween Costume Contest
- 292 Alien Art Contest 2018
- 251 Character Makeup Contest
- 389 Monster Making Contest
- 167 2017 Halloween Costume Contest
- 153 Heroes & Villains Contest
- 221 Cosplay Contest
- 215 Creature Sculpting Contest
- 107 Puppet Contest
- 161 Alien Art Contest
- 98 Halloween Costume Contest
- 149 Robot Art Contest
- 269 Dino Art Contest
- 592 Creature Contest
- 5 ALUMNI
- 275 ON DEMAND WEBCOURSES
- 1 Hand Puppet Detail and Finishing Techniques
- 24 Animation for Animatronics
- 9 How To Make a Mask - Wearable Dynamic Art
- 11 3-Axis Robotic Mechanisms
- 5 Neck Mechanisms
- 24 How To Make a Monster Suit with Bill Bryan & Ted Haines
- 19 Character Animatronics
- 5 How to Sculpt a Dinosaur
- 5 How To Build An Animatronic Head
- 5 Creature Costume Basics
- 4 Puppet Mechanism Basics
- 1 Tattoo Makeup - Cover, Create, & Apply
- 2 How To Make Horror Props
- 1 The Fine Art of Horror Painting
- 1 Fantasy Maquette Sculpting In CX5(S)
- 14 The Business of Making Monsters
- Production Design - The Process Of Creating A World For Film
- 4 Character Makeup - Multi-Piece Prosthetic Application
- 3 Prosthetic Makeup Basics - Gelatin Facial Appliances
- 5 Stop Motion Animation with the Chiodo Bros.
- 11 Blood, Gore and Makeup Effects
- 7 How to Punch Hair - Hairwork for Silicone Characters
- 3 Bodycasting on a Budget with Ted Haines
- 2 Portrait Illustration with Terry Wolfinger
- 5 Mastering Marionettes - Design, Construction & Performance with Scott Land
- 1 Creature Makeup - Multi-piece silicone prosthetic application
- 12 Muscle Suit Fabrication
- 11 Wig & Hair Basics
- 4 Silicone Prosthetic Transfer Appliances
- 3 Building Miniatures: Small-Scale Model Making - Part 5
- 9 Toy Design & Sculpture for Action Figures & Collectibles
- 1 Building Miniatures: Small-Scale Model Making - Part 4
- 2 Human Head Anatomy & Sculpture
- 1 How to Make a Foam Puppet - Part 3
- 1 Building Miniatures: Small-Scale Model Making - Part 3
- 5 How to Make a Foam Puppet - Part 2
- 3 How To Make a Foam Puppet - Part 1
- 1 Building Miniatures: Small-Scale Model Making - Part 2
- 14 Animatronic Control Systems - Arduino Programming Basics with David Covarrubias
- 3 Building Miniatures: Small-Scale Model Making - Part 1
- 3 Advanced Creature Teeth: Prosthetic Dental Appliances - Part 2
- 1 3D Pumpkin Carving - How to Carve a Pumpkin from the Outside In
- 5 How To Make A Latex Rubber Mask Part 3
- 3 Advanced Creature Teeth - Part 1
- 11 How To Make A Latex Rubber Mask Part 2
- 6 How To Make A Latex Rubber Mask Part 1
- 294 PAST LIVE WEBCOURSES
- 11 Monster Sculpting
- 8 Platinum Silicone Mask Painting
- 5 Feather Work: Puppets, Costumes, Hair & Makeup
- 9 How To Make Eyes For Puppets, Masks, & Makeups
- Working with Wigs - Wig & Hair Basics with Connie Grayson Criswell
- 14 Muscle Suit Fabrication with Ted Haines
- 7 Homework - Muscle Suit Fabrication with Ted Haines
- 13 Toy Design & Sculpture for Action Figures & Collectibles with Sandy Collora
- 10 Homework - Toy Design & Sculpture for Action Figures & Collectibles with Sandy Collora
- 13 Human Head Anatomy & Sculpture with Jordu Schell
- 11 Homework - Human Head Anatomy & Sculpture with Jordu Schell
- 18 Mastering Marionettes - Design, Construction & Performance with Scott Land
- 13 Homework - Mastering Marionettes - Design, Construction & Performance with Scott Land
- 16 Puppet Mechanism Basics - Eyes, Brows & Ears with BJ Guyer - Watch & Chat
- 11 Homework - Puppet Mechanism Basics - Eyes, Brows & Ears with BJ Guyer
- 12 Advanced Creature Teeth -- with John Cherevka
- 3 On Camera Hand Puppet Performance
- 9 Silicone Prosthetic Transfer Appliances - Age Makeup with Neill Gorton
- 3 Practical Magic: The Art of In-Camera Visual Effects with Joey Shanks
- 9 Buisness of Making Monsters with Shannon Shea
- 11 Stop Motion Animation with the Chiodo Bros
- 5 Foam Carving Puppets with BJ Guyer
- 3 3D Pumpkin Carving with Andy Bergholtz
- 4 Prosthetic Makeup Basics with Rob Burman
- 13 How to Make a Latex Mask with Tim Martin
- 2 Character Illustration with Terry Wolfinger
- 3 Halloween Costumes - Fabric Effects with Dawn Dininger and Amy Whetsel
- 9 Blood, Makeup & Gore FX with Gary J. Tunnicliffe
- 13 Hand Puppet Design and Fabrication with BJ Guyer
- 3 How to Sculpt a Dinosaur with Christopher Darga
- 2 Airbrush FX: Beginning to Advanced with Craig Fraser
- 1 Female Figure Sculpting in Cx5 wtih Adam Beane
- 3 Creature Design: Maquette Sculpting with Casey Love
- 3 How to Make a Sci Fi Helmet with Fon Davis
- 2 Hyper Realistic Silicone Painting with Tim Gore
- 2 Josh Herman Zbrush Creature Sculpting
- 13 Textures and Forms with Don Lanning Oct 26, 2013
- 9 Character Rendering in Photoshop with Dan LuVisi
- 2 Creature Maquette Painting with Jordu Schell
- 24 Textures and Forms with Don Lanning May 04, 2013
- 3 Tattoo Makeup A-to-Z: Cover, Create, and Apply with Christien Tinsley
- 11 Creature Design w/ Casey Love - Sculpting
- 7 Creature Design With Casey Love - Translucent Creature Painting
- 3 Creature Maquette Sculpting with Jordu Schell