Engineer Puppet (Halo 3: ODST)
 Alexander H
✭✭✭
Alexander H
✭✭✭

Last May I went over to Calgary, Canada to meet some fellow Halo friends at Otafest 2024. I know these goofballs well and I knew I had to make something unique to share with them - so I made a Halo 3 ODST Engineer puppet! In keeping with the naming conventions of Halo lore, it's name is Smaller Than Average, but it's much more fun to call it Lumpy Space Princess.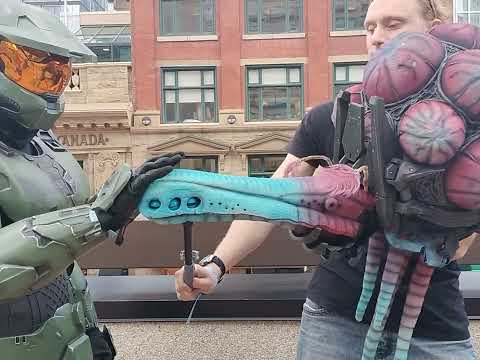 https://www.youtube.com/watch?v=Iu6j3HOpeVo
Many different processes are used to bring the character to life, and I had to make sure it could all pack up for a trip from Australia to Canada and back. The body is an EVA foam balloon shape with foam clay details, whilst the tentacles, sacs and the head are upholstery foam. Using this material I could cut and sand the parts to shape, colour them, while being soft and flexible, and easy to pack for an overseas trip. The courses by BJ Guyer were invaluable, as it was my first time using upholstery foam in a fashion that was sculpted, or wouldn't be covered. Having insight to his mechanics also helped.
The sacs work via a cable mechanism hooked up to a glove inside the body. With my left fingers, I can flex and relax them to control the inflation and deflation of most of the sacs.

For the eyes, another nylon line mechanism is used to pull the eyelids down, with springs pulling them back open. Gears inside of the eyeball also drive the bottom eyelids open. This is all controlled with a trigger mechanism held by the right hand, which doubles as the rod to control the movement of the head. I'm currently re-working this mechanism to make it more reliable, quieter, and require less tuning/strings.

For some extra motion, the tentacles are weighed with fishing ball bearings to add mass and momentum, allowing them to swing much more. The dyed ostrich feathers on the tentacles, as well as for the antennae, move with motion and the breeze to add some more animation.

The puppet’s armour was all 3D modelled in Blender, then 3D printed individually and attached to each other and the body with screws (except the neck armour, which uses strapping and Velcro). To paint the armour, layers of spray paints (including black, metallics, clear coats then the final coat) were stacked up and then stripped back down using a brick, files and sandpaper for more natural-appearing weathering - as shown below, on a different project:
I like to call it the "Buttercup" method, because you build it up just to let it down.
There's still a lot of detail that I left out because of how many different methodologies went into this, but you can read just about everything here on the 405th Forums.
I look forward to learning more from the Stan Winston school and forums, and continuing to update the puppet!
Comments
/Chris