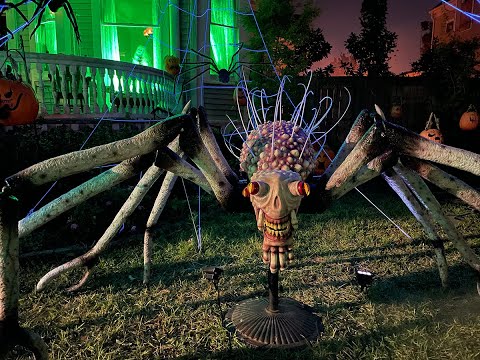
"The Widower" - Animated Spider-like Creature Creation Inspired by "THE MIST" by Stephen King

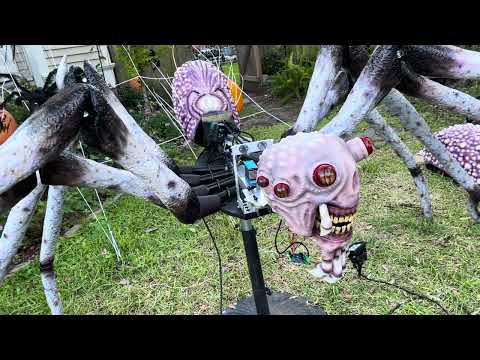
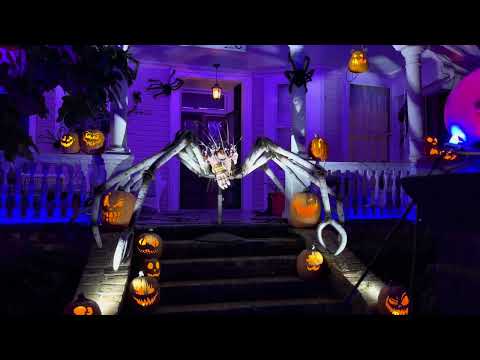
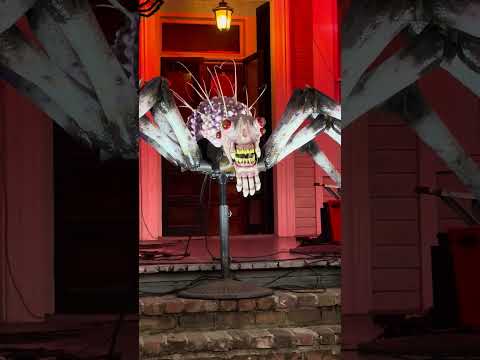
I built this animated creature from scratch, heavily inspired by the spider-like "Gray Widower" in the Stephen King novella, "The Mist" as well as the movie (and the amazing props in it by the legendary Greg Nicotero) and other depictions based on it. I've very much admired the spiny hairs, crab-like claw legs, and overall creepy appearance from the elongated human-like teeth, bumpy body, and sculpted bony legs. I decided the scale up the size of the creature to several times bigger than the book version (which was described as similar to a large dog). I also made custom eyes using light pipes for pupils and used reflected light off a the back of the eyes to simulate a real "tapetum lucedum" eye refections like you'd see in real spiders. I recently turned it into an animated character by creating a custom 5-function servo-driven mechanism to animate the head (2-axes), jaw, and the the 2 fang-like pedipalps.
I used some less-common techniques on this one...it's as tough as fiberglass but the substrate is cardboard and contact cement skimmed with papier mache clay and case bumps. Spiny hairs are ostrich quills. Head is EVA underskull with foam clay and hard coated. Teeth are sculpting foam epoxied to 3D-printed jaws. Legs are carved from EPS with sandwiched PVC "bones" with articulated joints. Back, tail and head are hollow to fit power supplies and control systems. The head is very light to accommodate servos and animated mechanisms. The base is a heavy-duty umbrella stand that is usually well-hidden by ground fog.
I also used more conventional techniques and owe a lot to the what I've learned over the years taking these SWSCA classes. Hope you enjoy!


 https://youtu.be/kyuNrvdwOL8
And here's a brief video of him in action:

For the bumps, I used candy cabochon molds to cast various sized bumps -- over 1,000 total. I demanded and reshaped each one by hand before they fully hardened, since the creature looks much better with oddly shaped bumps rather than perfect domes. I also used epoxy putty to cemented small caps that I 3D printed. These are used to plug in the long spiny hairs, which are actually ostrich quills with the feather portion stripped away. They are removable for storage.


 https://youtu.be/PrXaj6cOSUo


 https://youtu.be/b5GAhKMFFyA
 https://youtu.be/1RO6ig13ASA
 https://youtu.be/pyVz4JIyyAo
Just for a fun bit of absurd comic relief, and because he's a spider, one night I made him lip sync "Drop Dead Legs."
I used some less-common techniques on this one...it's as tough as fiberglass but the substrate is cardboard and contact cement skimmed with papier mache clay and case bumps. Spiny hairs are ostrich quills. Head is EVA underskull with foam clay and hard coated. Teeth are sculpting foam epoxied to 3D-printed jaws. Legs are carved from EPS with sandwiched PVC "bones" with articulated joints. Back, tail and head are hollow to fit power supplies and control systems. The head is very light to accommodate servos and animated mechanisms. The base is a heavy-duty umbrella stand that is usually well-hidden by ground fog.
I also used more conventional techniques and owe a lot to the what I've learned over the years taking these SWSCA classes. Hope you enjoy!
Here is a build overview video I made before I turned him into an animated prop (he was originally a static prop). It goes into a lot of the detail of the different processes involved:
https://youtu.be/kyuNrvdwOL8And here's a brief video of him in action:
 https://youtu.be/N0TJCXg6YOw
Sculpting The Body
The whole prop is hard-coated with several coats of industrial polyurea/epoxy to give it fiberglass-like toughness, but for the armature and substrate I opted for less common methods. I first created armatures with aluminum wire, then used thin cardboard strips coated with contact cement to create a hollow, shell-shaped body, I then used a skim coat of commercial papier mache clay formula.For the bumps, I used candy cabochon molds to cast various sized bumps -- over 1,000 total. I demanded and reshaped each one by hand before they fully hardened, since the creature looks much better with oddly shaped bumps rather than perfect domes. I also used epoxy putty to cemented small caps that I 3D printed. These are used to plug in the long spiny hairs, which are actually ostrich quills with the feather portion stripped away. They are removable for storage.


Sculpting The Legs
I sculpted the legs out of EPS foam using hot wire and rasp techniques to create surface texture. Because of the size and taper, I decided to create a PVC "skeleton" to strengthen them. This also allowed me to put in articulated joints to make the legs posable. Some of the smaller joint fittings (for 1/2" portions) weren't commercially available, so I had to design them in CAD and 3D print them. Before carving the foam, I routed out channels in 2" thick sheets of foam, inserted the PVC, and glued them together to create a 4" thick rough shapes for carving.Sculpting The Mouth and Teeth
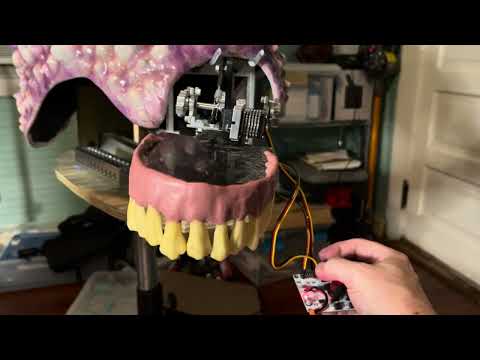
For the mouth, I designed the jaws in CAD and 3D printed the base for the jaws. I couldn't source such elongated human teeth so I carved them from scratch using sculpting foam, inspired by Tim Martin's class on foam carving. I then used sculpting epoxy that I pigmented a pinkish color to look like gums and used that to attach the teeth.Sculpting The Head
For the head, I wanted it to be lightweight and hollow, and I also wanted to experiment with a different sculpting technique than I was used to. I first made a head form with foil and packing tape, wrapped that in clear cellophane and duct tape, then drew outlines of the shape, cut them out, flattened them and used as a template to make an "underskull" out of lightweight EVA foam -- it's a similar technique to how someone make a custom cosplay foam template. Once I had the underskull completed, I used foam clay to sculpt in all the facial details. Foam clay is a very different experience and took some getting used to, but I'm pleased with the results. I then hard-coated with the same coating as the res of the prop to strengthen and waterproof it.Molding, Casting, and Lighting the Eyes
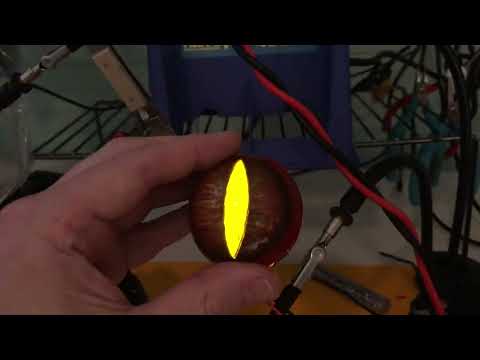
I needed 6 eyes total in 3 different sizes, so I decided to mold, cast and paint them from scratch, especially after watching the John Cherevka eye class on SWSCA. I also wanted them to subtly glow - in a realistic fashion like actual creatures that have reflective retinas ("tapetum lucidum") where only the pupil glows and the glowing intensity changes based on the viewing angle. So I designed a method to bounce the light off of the back of the eyes and pipe the light through light pipe "pupils". I cast cabochons in silicone and also cast the oval pupils inserts that I designed in CAD and 3D printed. After casting the pupils in transparent epoxy, I used amber lens tape on the outside so they'd light up yellow. I partially filled the molds with transparent epoxy then glued the light pipes to them then hand-painted the striations in the irises using heavy magnification. Then I backfilled the sclera portions using epoxy that I tinted red. Finally, I soldered yellow LED arrays that pointed towards "retinas" domes that I 3D printed and painted white.https://youtu.be/PrXaj6cOSUoAirbrushing
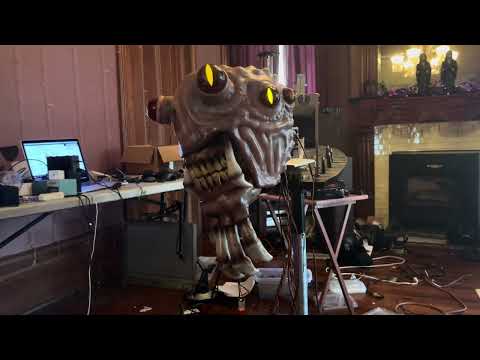
Airbrushing was the fun part, and I relied heavily on things I learned in the Stan Winston courses, e.g., taking the time to layer in a lot of different colors and details, using reference photos and looking for cues such as more translucent/bluish skin in certain areas, veining, mottling, bruising, blemishes, and such. Was heavily inspired by Steve Wang's "Creature Mask Painting" class, which is much more detailed and in a different medium (silicone) but many of the tips are universal. I also learned to be patient and and not rush. I decided to make the head more skin tone, more "fetal" which adds to the uncanny human-like features and distinguishes it from the hardened abdomen and tail. I also opted to make the legs more grayish, bone-like appearance, but with a vascular system. Once it was all done, I coated everything in a UVLS clear coat in gloss to increase the "sliminess" and provide water resistance and UV protection.Animating
I eventually turned this static prop into an animated prop using a mechanism I designed and built myself that utilizes five servos: 1 in the neck for head pan (the head is mounted to a turntable bearing), 1 for head tilt (sideways tilt), 1 for jaw with spring counterbalance, and finally, 1 for each of the fang-like pedipalps. The aluminum parts are a combination of commercially available robotics parts and parts I milled by hand out of 6061 aluminum. The power supplies and control board fit inside the hollow back of the creature. The movement is fully sequenced and integrated with the servos via a DMX to PWM interface that allows precise control, not only for custom monster-like movement but also silly things like making the creature talk or sing.https://youtu.be/b5GAhKMFFyAhttps://youtu.be/1RO6ig13ASAhttps://youtu.be/pyVz4JIyyAoBONUS
Did I mention he can sing?Just for a fun bit of absurd comic relief, and because he's a spider, one night I made him lip sync "Drop Dead Legs."
 https://youtu.be/SP0w2K1mK08
2