Half Life 2 Headcrab Hand Puppet
 Alexander H
✭✭✭
Alexander H
✭✭✭
If you could adopt a headcrab, would you?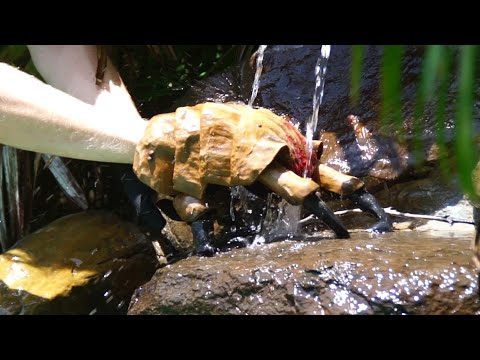 https://www.youtube.com/watch?v=Ex6ttvC0PWg
Meet Eugene, the Half Life 2 Headcrab!
In early 2023, I decided to try out Zbrush, to give myself some experience in a more industry recognised modelling program. One of the creatures I sculpted was the headcrab - with some influences from the Half Life Alyx headcrab, such as veins and warts. Always gotta make a creature just a bit more unsettling.
Towards the end of the year, I wanted to try an alternative to having to cast silicone and latex for creatures. My attempt was to use flexible PLA, and 3D print a creature and test the materialistic properties. As you may have guessed by now, that creature was the headcrab.
Taking the Zbrush model, I modified it in Blender - my primary modelling program - to have a hollow body (somewhere to put my hands) and some rings near the… mouth… for my front hands to grab on. The legs were also hollowed out for my fingers to fit in.

The result of this model was my first prototype of the puppet. As you can see in the video, while the material is flexible, unfortunately it does not have the ability to compress and stretch like latex or silicone does, meaning that it was easy to decide that flexible PLA is not a suitable replacement for creature skins in most circumstances.
But I still had a roll of flexible filament and a dream.
So I modified the model to split it up into parts. Each back leg was split in two; the body split in four; and the front legs also split in two. This will give the body enough space between parts to allow them to rotate and twist, adding some more dynamics in the body instead of one solid chunk.
For the front claws, I used a modified version of this 3D articulated finger model by Dragonator. By moving the mechanism over the first knuckle onto the bottom, I could keep above the knuckle free for the printed skin. Because of the length of the claws, I used articulated fingers to give it a sort of animation I wouldn’t be able to do with just my fingers, no matter how long they are.

Breaking the puppet up into sections may seem like it defeats the purpose of using flexible filament in the first place. But doing this method would have been much more difficult by using solid filament, and on the plus side, gives it a softer, more skin-like texture. Especially the warts. They feel really weird to touch. You can even ask the people I made touch them.
Originally I really struggled to make the front legs move well enough through the opening in the mouth section of the body. Tolerances were really close, and were going to get smaller after everything was layered up. So, with too little filament left to reprint, I cut back around the “shroud“ of the legs on the mouth section, and also slimmed down the tentacles of the mouth on the outsides. This gave much more room to reduce friction, making walking easier.
Once everything was printed and ready to go, I roughly sanded down the prints to help with adhesion, then primed every part of flexible filament in two layers of Leak Seal. This flexible coating removed the layer lines and would allow my paint to adhere well.
In between layers of Leak Seal, I glued on some warts made up of tiny rolled foam clay balls. Like I said earlier, if you’re gonna make a creature icky, why not take it that one step further? I also extended out the back leg claws prior to printing so that if the crab were to stand on someone’s hands, you could feel the claws “digging in” (without being uncomfortable).
The painting was achieved with a mix of hand painting and airbrushing to add in a few more tones. The blood on the mouth was a vivid variety of red paints, mixed with Mod Podge to make it a bit more glossy.
Once fully painted, I covered all the parts (except the mechanical parts) in E6000. This adhesive was chosen as it is clear, durable (so parts rubbing together won’t easily wear down), flexible, and as a bonus - waterproof!
Each of the body’s sections are held together via velcro, glued down with more E6000. This makes transportation easier, and using elastic attached to the velcro means I could stretch the body a bit if needed..
And with that, Eugene the headcrab puppet was brought to life!
You can find the original build thread on the RPF.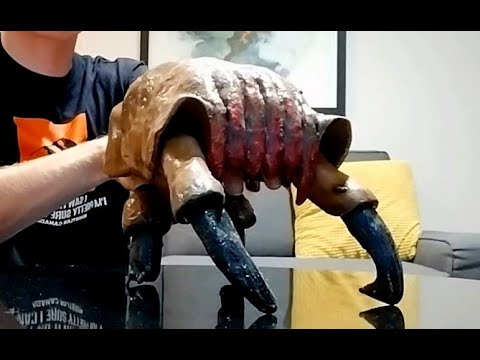 https://www.youtube.com/watch?v=NszmtMBzDNU
Comments
/Chris