Homework Week 1

Comments
-
Hi all!
Ok, here is the squirt gun I have to work with taken apart: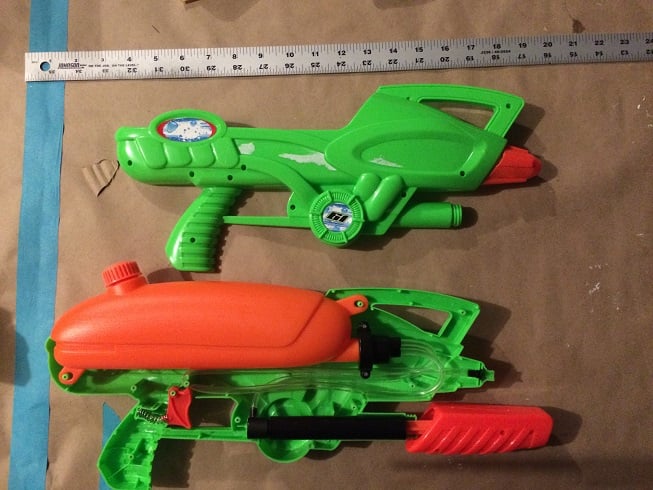
So, my initial idea here, is to make the orange water reservoir a frosted clear piece, and have it light up from the inside and get increasingly brighter and have a louder "charging hum" with each pump, then a flash "discharge" light at the barrel opening and firing sound effect when the trigger is pressed, and the reservoir would go dark again.
If not too daunting, I would also like to have the four U shaped pieces on the back have a button or two that could change the "mode" of the gun, going from a charging rifle, to some kind of automatic pulse rifle, that would be shown by some kind of screen/element in the small oval above them, the circular thing near the bottom as some type of information read out, with the ring around it lighting up, and an "ammo counter" displayed where the sticker currently is.
Here is the list of things I think I need when it's broken down:
Gun dimensions15 3/4 long2" circle thingy - lcd number read out screen, led ring to go around it2 1/4" small oval thingy- lcd character read out screen4 1/2" big oval thingy - possibly cut shapes and light from inside with amber led's4 small u shapes 3/4" wide each - push buttonsMold (with whatever I have enough of) and cast orange piece and circular ring in crystal clear
Button for trigger press
Button for mode change
LEDs2 stripsOne circular2 2" lcd screensArduino
Roll of wire
Soldering kit
Royalty free? sound effectsCharging humBlaster discharge
Automatic blaster discharge sound
Paint
airbrush and compressor
Cyno
kicker
The only materials I don't already have are the electronic parts. Not sure if this covers everything I'll need as I've never done this from scratch, only kit-bashed small electronics before (for example, my friend wanted his toilet to sound like a warp pipe from Mario Bros when he flushed it. I used the guts from sound bite keychains. It worked :P)
Josh1 -
Hey, my name is Paul DiPastina, I'm a programmer / game developer / part of a film group that makes youtube videos and I'll be updating my assignment throughout the day as I narrow down the parts I need.
For my project, I'll be working on some of the components of a suit of power armor for a local LARP. The armor will be built mostly out of EVA foam / cross linked polyethylene , which I've been doing a lot of work in lately. It needs to be comfortable to wear and run around in, contact safe, easy to get on and off, and the electronics need to be shielded from damage so they don't break or injure me when I get hit.
For this course, I will probably be focusing on lights / sounds, and the helmet servo, as well as parts of the foam exterior, which I will be patterning and crafting this weekend while I watch.
For the electronics, I've drawn a lot of inspiration from this Iron Man build:
http://www.instructables.com/id/Animatronic-Iron-Man-Mk-III-suit/?ALLSTEPS
I want to emulate their boot design as well as their helmet design. Eventually I would like to make the helmet system wireless, but I feel like the first prototype will not be. I will still be purchasing the parts so I can play with RFID applications.
The chest lights for my build need to be directly controlled by the board, though. The armor in-game has an overdrive effect, and I want to have the lights pulse and change color in overdrive to make it visually distinctive and intimidating. The iron man build uses a pre-built system for the lights on the center torso, but I'd like to roll my won. I would like to replace the lights they use with a neopixel ring, so that I can control the colors / brightness from the chip.
I'll be eliminating one of the Arduino boards because I don't have rocket pods or shoulder rockets or anything like that to control on my suit. I may consider adding a small text display with four buttons so I can track how much fuel I have and turn the suit on and off or engage overdrive mode.
Visually though, I don't want this to look like Iron Man's suit. I have other plans.
The power armor I wear in the game is supposed to be built from a suit of post-apoc crafted armor, so I wanted something a little more retro looking than iron man. At least to star out with as a base, I'm going with the Blood Dragon Armor design from Mass Effect, and basing it off of this individual's build (Note: Not my build), which as far as I've seen is the best execution of this particular cosplay:
http://geektyrant.com/news/mass-effect-blood-dragon-armor-cosplay-by-leon-chiro-cosplay
I've got some sketches drawn out for the different parts (crude, hand drawn template guestimates) and I'll try to upload those over the next 24 hours.
I've also done some crude mockups of the design modifications I want to make, to fit the armor design into the setting. This image may be jarring, so let me explain: My character belongs to a post-apoc gang I started called the Fundertakers. If that name doesn't speak for itself, this image should get the idea across.
Finally, the extensive parts list, which I will narrow down further until I know exactly what I need. I also need to add some parts from the materials list on this page, like a display and possibly an alternate sound system. I don't want to bite off TOO much more than I can chew, but I have been known to do that all the time and it usually works out in the end. I may not get to everything during this class but eventually I will, and as long as I've got a neat suit of power armor to wear at the event next month it's mission: success!
Parts List - Currently this comes out to $576, so consider this an "ideal" parts list, which I will pare down to something much more managable. I'll be working through the night to modify the parts list down, remove un-nessecary duplicates, etc.
Foamsmithing:
EVA Foam Tiles: 20 (most Mass Effect armor requires 16)
L200: 1 sheet each of 1/2", 1/4", 3/8" foam
Heat Gun
Dremel
Sandpaper
Persona Blades
Hot Glue
Super Glue
Barge
Assorted Straps (Elastic and non-elastic)
Assorted Buckles
Many of the following parts are copied directly from the iron man build's materials list, hence text like "I usually buy them in bulk" - that's the author of the original build talking, not me. My notes are in bold.LightsUnknown / miscellaneous:
Arduino ProMini 328 5V Sparkfun part # DEV-11113
Arduino ProMini 328 3.3V Sparkfun part # DEV-11114Arduino Pro 328 5V Sparkfun part # DEV-10915
8x RJ45 8-pin connector Ethernet cable connector Sparkfun part # PRT-006438x Breakout Board for RJ45 Sparkfun part # BOB-00716
4x JST RCY Connector for the helmet battery packs Sparkfun part # PRT-10501 These parts are on backorder, may need to find another solution.
SD/MicroSD Memory Card (4 GB SDHC) Adafruit Product ID: 1024x Straight Break Away Headers - for making connectors/servo leads Sparkfun part # PRT-00116
4x Female Headers for making connectors/servo leads Sparkfun part # PRT-001152x Adafruit Perma-Proto Quarter-sized Breadboard for mounting connectors, etc. Adafruit Product ID: 5896x TIP 120 transistors for turning on LEDs and triggering sound effects. Digkey sells them.
10 x power slide switches. These connect all of the individual power sources in the suit. Digikey sells them.High Strength Velcro
Wire and Ethernet Cables.Head
ID-12 RFID tag reader Sparkfun part # SEN-11827 (LA version is replacement)
XBee Series 1 module Sparkfun part # WRL-11215
Adafruit XBee Adapter board Adafruit Product ID: 126
Adafruit Wave Shield Adafruit Product ID: 94
Pololu 5V DC/DC converter D24V5F5 -steps down the helmet 7.4V battery voltage for the ProMini
Hitec HS-5087MH micro servo for the helmet chin section- Servocity.com
Hitec HS-7245MH mini servo for the helmet faceplate- Servocity.com
1-4 16mm RFID button tag (125 kHz) Sparkfun part # SEN-094176x AAA NiMH cells 1.2V for the helmet battery pack - local grocery storeRFID reader breakout Sparkfun part # Product SEN-08423 Parts on backorder, may need to hold off on RFID project until they come in.Boots
1 x Adafruit tactile on/off power switch for helmet- Adafruit Product ID: 1092
4-40 swivel links (pkg of 4)- you need two links for the helmet, two for the forearm missile and four for the hip pods- Servocity.com
4-40 12" length threaded rod- used to make the helmet and hip pod servo linkages- Servocity.com
SMD prototyping board- used for soldering the surface mount LEDs and resistors for the eyes. Sparkfun part # PRT-08708
2x Luxeon Rebel high power white LED for the lights in the boots Sparkfun part # BOB-09656 These parts are no longer available, I will need to find replacement LEDs.
Sharp GP2D120XJ00F Infrared Proximity Sensor Sensor for the bottom of the boot Sparkfun part # SEN-08959 This part is no longer available, so I am replacing it with what appears to be its successor, part # SEN-12728
7027 "BuckToot" LED Driver Module to power the Luxeon LEDs Sparkfun part # COM-09642 Also no longer available, I will need to find another solution for my LED driver needs as well. May try to replace both driver and LED with these from neopixel: http://www.adafruit.com/products/2376
34 x PLCC-2 package SMT white LEDs- 10 for the eyes and 24 for the chest light. You could easily substitute standard LEDs. I buy these in bulk on eBay but retailers like Digikey also sell them.
34 x 1206 package 100 Ohm SMT resistors- 10 for the eyes and 24 for the chest light.You could easily substitute standard resistors. I buy these surplus from a local shop but retailers like Digikey also sell them.
Neopixel Ring: http://www.adafruit.com/products/1586
Controller- FTDI Cable (Controller to PC Cable) - http://www.trossenrobotics.com/store/p/6406-FTDI-Cable-5V.aspx
- 6 Push Button Switches- http://www.allelectronics.com/make-a-store/item/mpb-227/dpdt-momentary-mini-pushbutton-pc-mt/1.html
- Screen - https://www.sparkfun.com/products/9395
- Connector for Easy Wiring - https://www.sparkfun.com/products/8733
- Soldering iron
- Solder
- Heatshrink
- Hobby wire
- Multitester
- Helping hands
- Experimenter breadboard - https://www.sparkfun.com/products/9567
- Jumper wires for breadboard - https://www.sparkfun.com/products/11026

2 -
Haha I'm going to be lucky if I can build a helmet that opens and closes and a neopixel ring that I can put into overdrive mode properly. But I am going to get to all of this stuff by the end of the year even if it kills me.2
-
Ok, so at first I was thinking about building a gun with a nozzle that opens before it shoots some sort of laser. Whilst looking for a solution for opening the nozzle, I found these really cool iris diaphragms. Then I got the idea to use two of them as "eyelids" and put some kind of controllable LED behind them.
This reminded me of Bubo, the mechanical owl from "Clash of the Titans" So a new idea was born: build an owl with servo-controlled iris diaphragms for eyelids and glowing eyes.
Whilst rummaging through the stuff I still had lying around, I found a slip ring. It has six wires going through it and I thought it would be cool if the owl's head could spin limitlessly. I still had a steppermotor and driver, so I'm thinking about using that for spinning the head. I'll have to see how I'm going to attach the motor to the head. Maybe I can print a ring gear and pinion, otherwise I'll have to see if I can find a pre-made one (they're expensive though, so rather not)
For the LED's, I ordered a pair of neopixel-jewels (they're almost the same size as the opening in the diaphragms)
I have some extra servo's, so if there's enough space in the head, I could try to animate the beak also.
As I'm not sure if the slip ring will allow me to use it for serial communication, I've got a pair of XBees for backup.
I also found a text-to speach module that I'd like to incorporate, which should give it a nice mechanical, "robot-like" voice.
Finally, I found some joysticks, which I could use for controlling the figure.
So it looks like I have most of the stuff I need (I ordered the diaphragms immediately when I found them and they came in yesterday, the LED's should come in hopefully tomorrow) The only thing missing is the owl figure itself.
I actually found a Bubo-prop, but if I'm not mistaken, it's made out of foam-latex, so I'm not going to be able to use it as-is.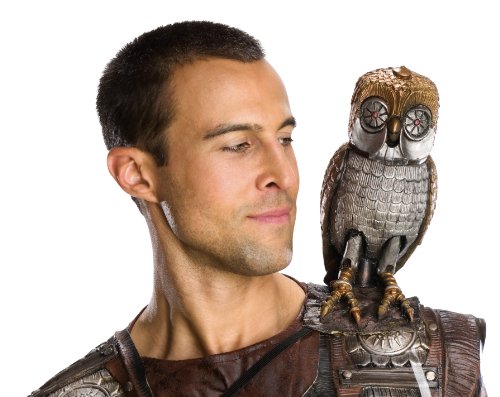
I ordered it anyway, because I'd like to try and 3D scan it, so I can make a 3D print. The nice thing about that would be that I'll be able to match the size of the eyes exactly to the size of the diaphragms. The only thing is, that my 3D printer is down at the moment. So I'm hoping to get it fixed in the next couple of days.
Other stuff like breadboards, hook-up wire, prototype boards, buttons etc. I should have plenty of. For now, I'm just going to use a bench power supply for power and a set of computer speakers for sound. Maybe later on, I'll exchange those with a battery and an internal speaker and amplifier.
So that's the basic idea. I hope to be able to actually build it (no idea how much time we'll be allowed to put it all together). Otherwise, getting the electronics to work will be a nice challenge by itself.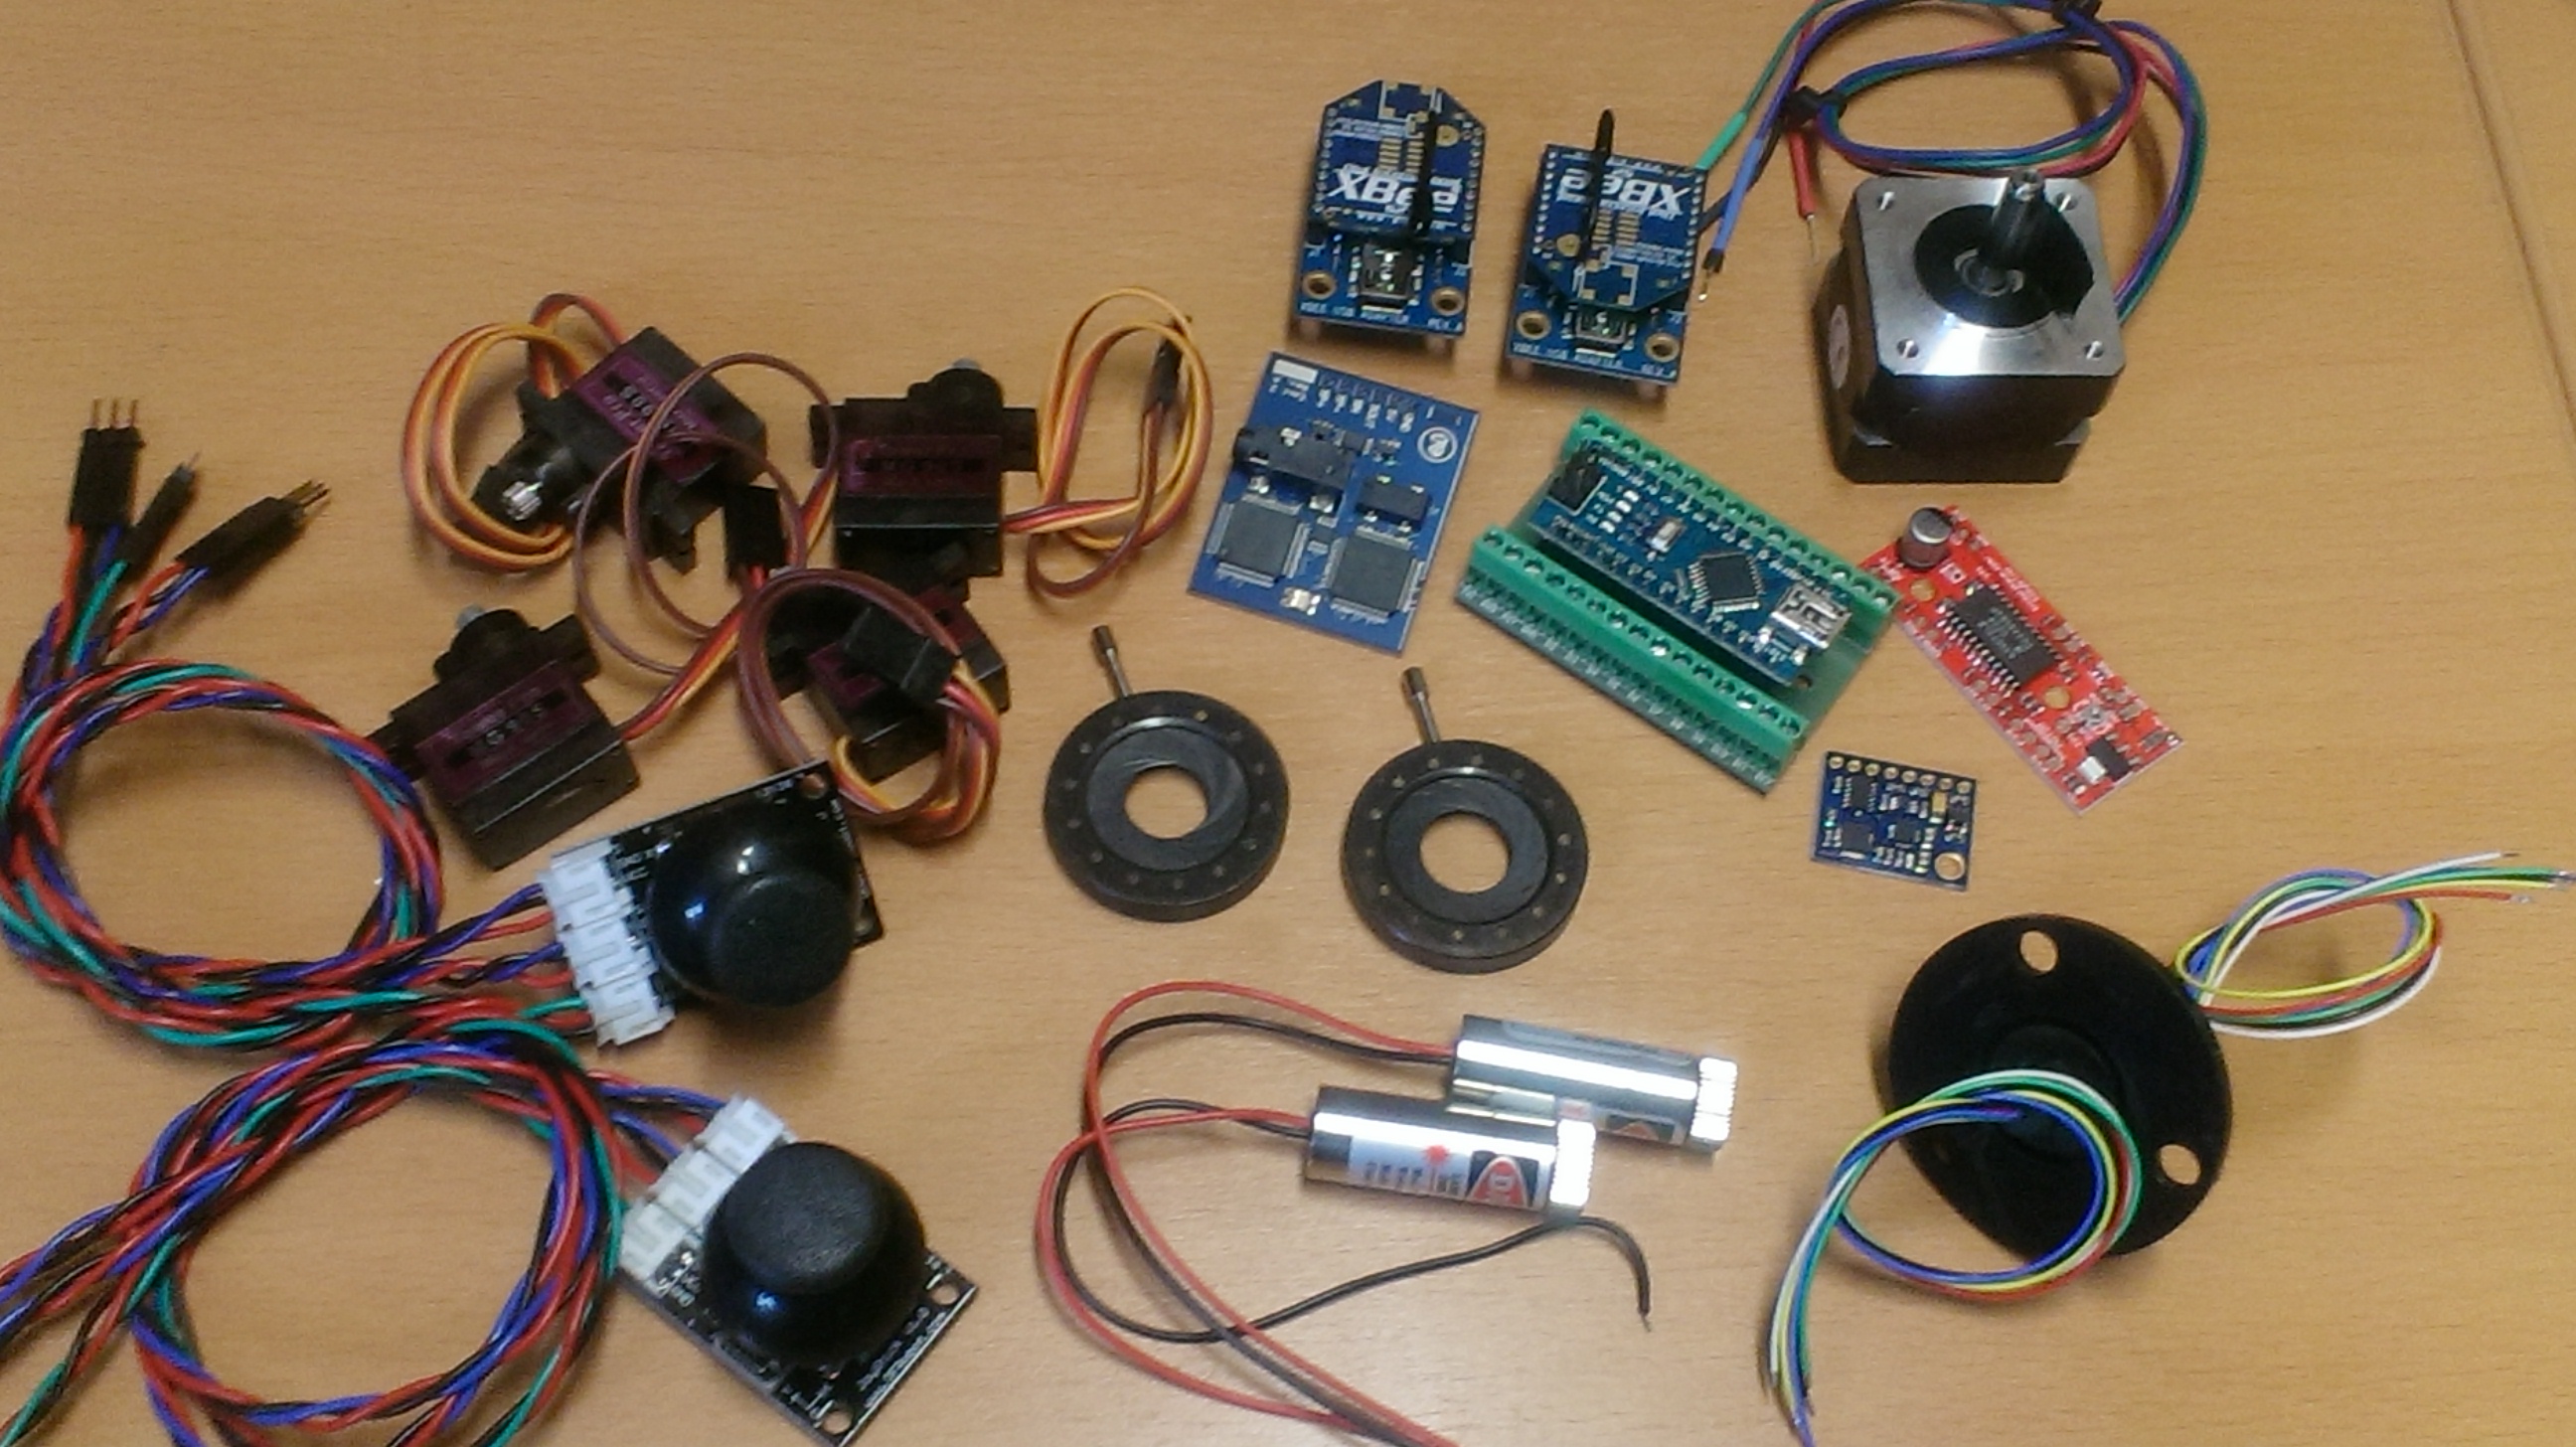
2 -
Hello!
So what I had in mind was to light and animate (on a basic level) the pieces of a 'Tetris lamp' that no longer works (photo attached).
What I wanted to do was make the yellow box (the 'head') rotate/swivel, and possibly the 'arms' as well, using I imagine a standard servo actuator. As well as this, I'll be inserting various LEDs in the parts (Neopixel ring in the 'head', neopixel sticks/individual LEDs in the rest of the pieces)
I also initially considered adding sound/music to it (sound effects, or maybe the tetris music) but not sure I'd get around to buying/ordering and actually adding that in in time, so I'm not including that for the time being.
Materials (either owned or ordered and on their way)
- Arduino Nano & terminal
- NeoPixel ring (for the 'head')
- Neopixel stick
- LEDs
- Adafruit standard servo
- Solderless breadboard, jumper wires, 12V power supply, push-switches, etc
Other stuff I might need:
- Simple straight/angle brackets for connecting the pieces together
- Laser pointers on the 'arms'
- Very possibly will discover I missed something or have the wrong part at some point when I actually start putting it all together....
1 -
Good evening everyone, my arduino project proposal is a "Waldo (Hand Puppet RC Device) telemetric input device
the Waldo is known as an ergomic-gonzo-kineti-telemetric input device for controlling both puppets and animatronics.
Please find attached all the notes I compiled including: Notes, References, Diagrams, Materials, Movements I'd like to get out of this project.
If anyone has some insights/advice, I'd be happy to hear it. See you all in class tomorrow!
1 -
I am Kevin Ilse's partner. I would have loved to follow your course as well, but I am a professional violinist and in our timezone your workshop starts when I usually leave for a gig... So I couldn't do it. I have heard nothing but good things about last session. Ilse is very enthusiastic and is (finally) completely mesmerised by Arduinos I could not be more grateful for that!I made a remote controlled bear a while ago. I use it on live shows for little kids... You should see their faces when it starts to move...Ilse suggested we made a new one, smaller and better using your skills and experience to guide us to the next level. If it is alright with you she would like to use that as her homework assignment.I made a couple of pictures of what we did this week.The bear necessitiesWe would like to make a new bear puppet. The prototype (the one you saw last time) is heavy, and big and and a bit sluggish. We found another bear in a garage sale, he's cuter, smaller and more suitable for our needs. However putting everything in there might prove a challenge.Goals :1.Move head horizontallysay no2.Move head verticallysay yes3.Move Legsget up / get down4.Raise armsay hiIf possible :5. Blink although we have no idea how this could be done.What we've done so far :There is not a lot of room in the head. The head is in itself only about 11cm. So I think it is best to put all the mechanics in the body

We think a fio would be best because it has room for an XBEE on board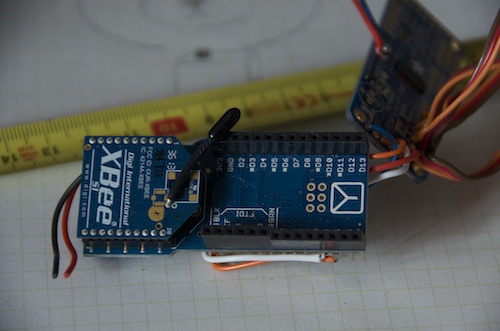
We crudely mounted and taped six servo's together. Maybe taping is not the best way to go but, just for proof of concept it works...

We were thinking about using the metal gear sego's by adafruit with analog feedback… So we can manually centre the servo's and have feedback.
we were thinking of using the adafruit pwm-servo driver to prevent jitter and timer issues. 1
1 -
Ok so I just found the forum, sorry for the (I think) late posting.
Inspiration
I've decided to take inspiration from a book called Frontier Incursion, a Sci-Fi book with a species called Starcats. Which are basically large cats that have glowing marks along their bodies.
Goal
Instead of trying to recreate the entire cat (for now) I've decided to focus solely on their ears. So I've created them out of fabric and cardboard while the skull top is paper mache and will focus on the movement of the ears.
I'm using the mechanism ideas from the plastic bag monsters course in creating the movement within the ears themselves allowing me to create different emotions based on position: relaxed, calm, angry and agitated.
(Sorry the photo's are sideways they're right on the computer I can't find a way to change them here)
Calm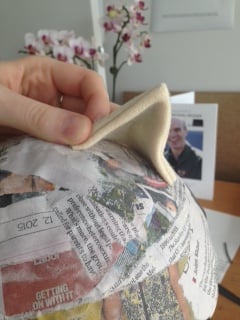
Alert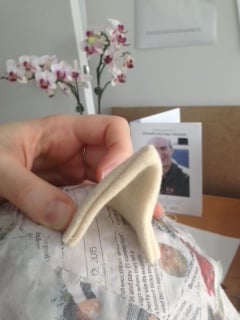
Angry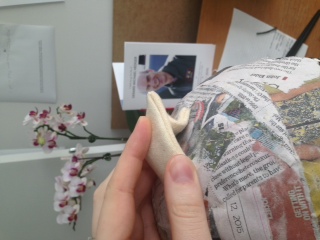
I am planning on using 3 servos for each ear but as they have not arrived yet I have also ordered 2 pan and tilt servos that I may be able to use instead. Which may save space.
They will be placed so one servo controls the 'calm/alert' state while, another controls the 'angry' state and the third should make the tip twitch as if the cat is agitated. (This would obviously be duplicated on each ear.)
I have an Arduino Uno that I am going to use for this version though for a later iteration I may require a smaller board. This will allow me the full range of inputs and outputs available on the board though I should not need them.
Electronic Components
-6 Servos or 2 Servos + 2 Pan & Tilt Servos
Mechanical Components
-Cat's Head
-Cat's ears x2
-Pivot Attachments
-Motivators (Likely cotton if strong enough)
Bonus Goal 1: Making the ears light up.
I plan on using black light paint with UV LEDs to illuminate it
Electronic Components
-UV LEDs
Mechanical Components
-UV Paint
-Fibre Optics (Possibly)
Bonus Goal 2: Sound reaction
I would also like to add a small microphone to the ears so the will automatically twitch based on sound. This will depend on component availability and coding difficulty in the time frame.
Electronic Components
-Microphone or speaker1 -
1 large pneumatic
1 medium pneumatic
2 red leds
1 speaker
1 pulley & cable assembly
1 scissor assembly
1 arduino uno
2 solenoids
2 relays
2 power supply
not sure about audio. maybe an audio repeater.
1 photo sensor to trigger prop.
Hardware for cylinders
air supply
sorry about the rush job.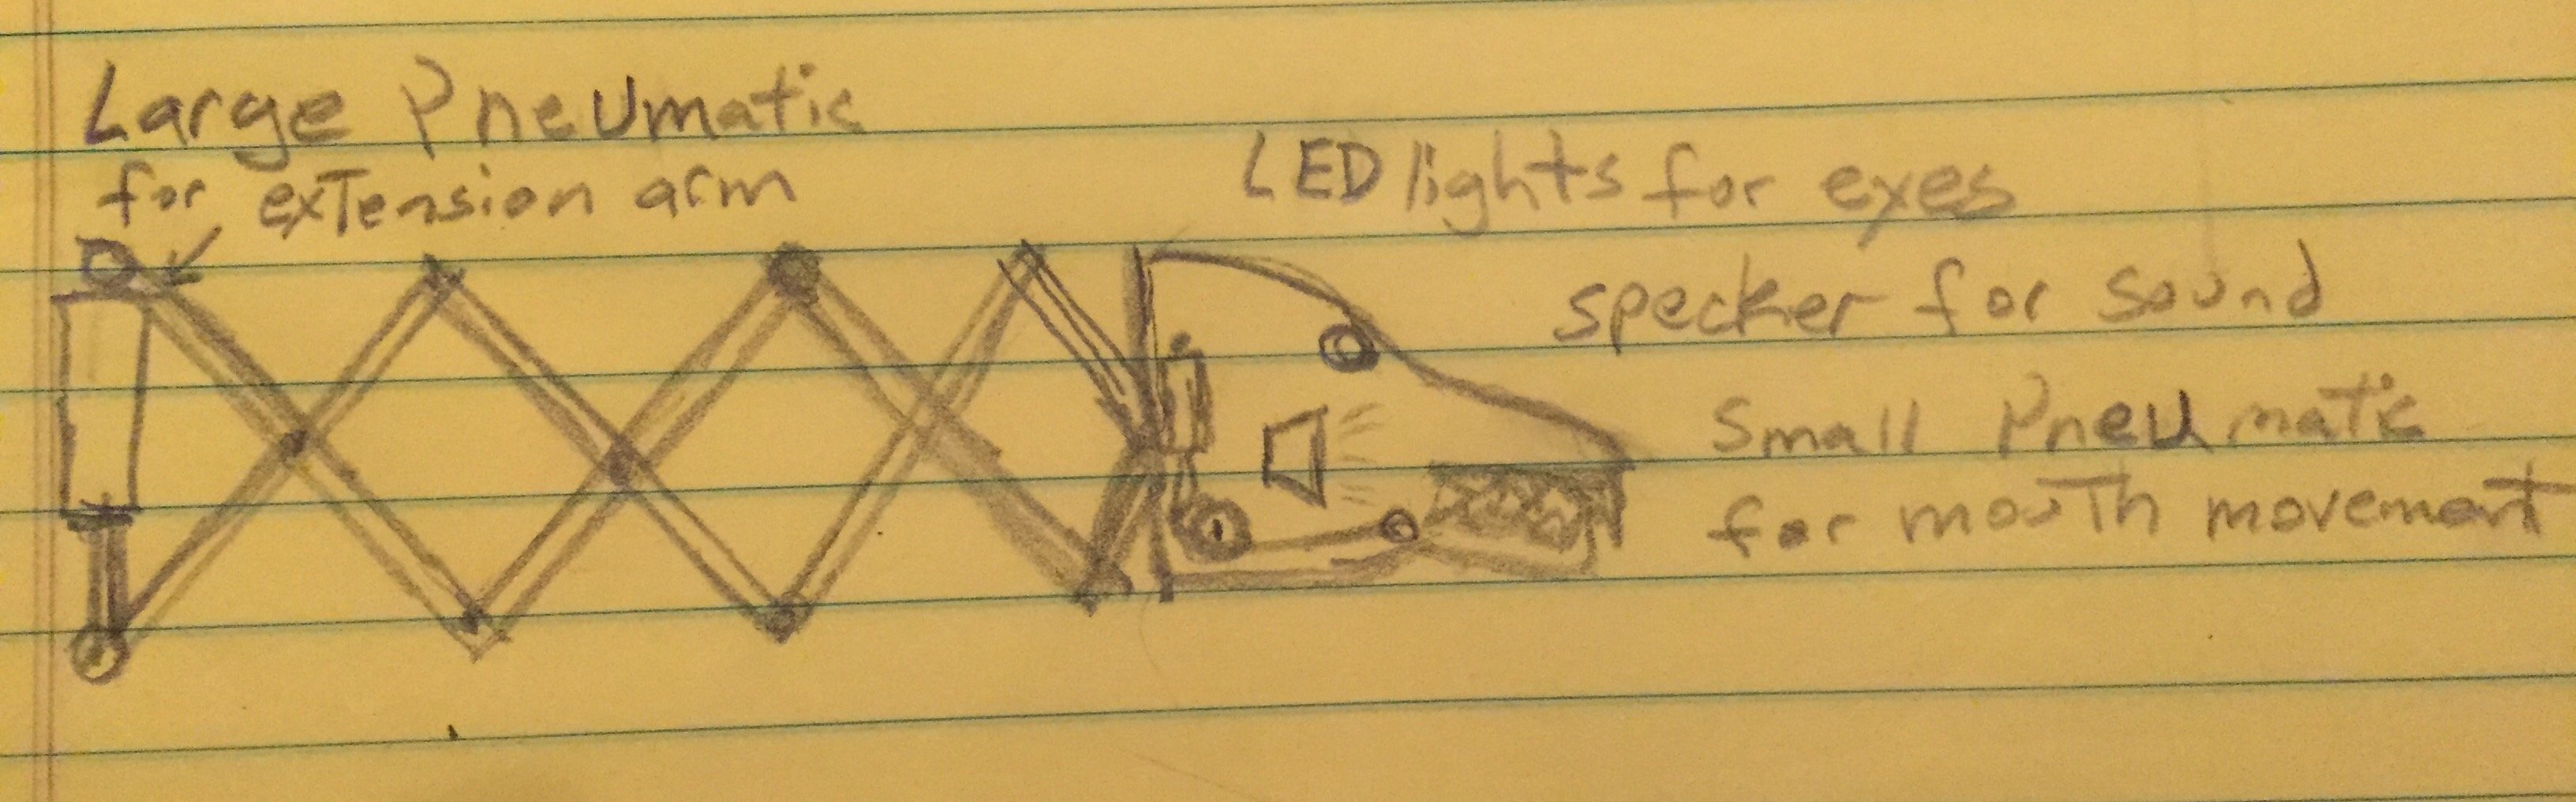
1 -
One question for David: could you please elaborate a bit about creating and using functions? That's one of the things that I still struggle with.
1 -
Seeing how we have only one class left, I encourage you guys with projects to look me up on Facebook and be my friends...I will be posting my own projects on there and also will be a great way to stay in touch after the class is over and your projects are submitted... it's been a blast so far and am excited to see you guys again for the final class on Saturday
 2
2 -
Hey David!
I added you on facebook, thanks for being so generous with your time already.
I have a question, I was looking up components for my gun, and I came accross this
http://www.amazon.com/SainSmart-Display-Touch-Adapter-Arduino/dp/B008FWSG3S/ref=sr_1_1?ie=UTF8&qid=1429570635&sr=8-1&keywords=arduino+screen
It's a touchscreen display. How difficult would it be incorporate that into the gun programming wise?
I was thinking about possibly using the touch response to switch the sound and light modes instead of push buttons like originally planned. Too much for this? Also,in case I can't find them before you respond, what are the basic calculator style number read out screens called?
Thanks!0 -
Just finally had a chance to look into this....
Its a complex screen. You will need 40 pins to hook up and lots more memory than the UNO can handle... They recoment the BIG Mega or even Better the DUe
programming it is also much harder because its a graphics screen and has a ton of commands... Its definitely not a beginner project, but thats not to say you cant do it...If its what you want then get it plug it in and start messing with example code...if its that important for your project then you will be better off with something simpler.... adafruit sells some screens that only require 3 or 4 wires into an arduino and are touch monitors... It might be a lot easier...
unfortunately I have never needed o use TFT monitors so Im not much help other than going over the specs with you....
0 -
Thanks Dave! Hopefully I can get my hands on a simpler screen, I just want it to display simple text, and also be a button that causes a state change in the lights and sound.
Here is the repost of my homework for this week:OK! I got something.
I toyed around with the neopixel example until I got a shimmering type effect..
behold:
Here is the code
#include <Adafruit_NeoPixel.h>
#include <avr/power.h>#define PIN 6
Adafruit_NeoPixel strip = Adafruit_NeoPixel(60, PIN, NEO_GRB + NEO_KHZ800);void setup() {
strip.begin();
strip.show(); // Initialize all pixels to 'off'
}void loop() {
for (int b = 30; b < 75; b++) {
int led=random(0,60);
//for ( int led = 0; led < 60; led++)
strip.setPixelColor(led, 0, 0, b);
}
strip.show();
delay(15);for (int bright = 75; bright >= 30; bright--) {
//for ( int led = 0; led < 60; led++)
int led=random(0,60);
strip.setPixelColor(led, 0, 0, bright);
}
strip.show();
delay(15);}
I'm going to bed now.. smile emoticon
...for three hours smile emoticon(It wouldn't let me insert the video
 )0
)0









Categories
- All Categories
- 97 CURRENT CONTEST
- 97 2025 Halloween Costume Contest
- 1.3K COMMUNITY
- 1K General
- 62 Tutorial Reviews
- 98 Suggestions and FAQ
- 82 Job Listings
- 40 Artists for Hire
- 1.8K CHARACTER CREATION
- 165 Costumes & Cosplay
- 148 Lab work
- 95 Props
- 152 Puppets
- 36 Stop Motion
- 18 VFX
- 39 Student Projects
- 478 Sculpture
- 159 Fabrication
- 160 Animatronics
- 177 Makeup Effects
- 130 Painting
- 29 Traditional/Digital Design
- 8.1K PAST CONTESTS
- 244 Creature Making Contest 2025
- 100 2024 Halloween Costume Contest
- 198 Character Making Contest 2024
- 343 Creature Making Contest 2024
- 131 2023 Halloween Costume Contest
- 168 Monster Making Contest 2023
- 239 Creature Making Contest 2023
- 117 2022 Halloween Costume Contest
- 309 Character Sculpting Contest 2022
- 133 Character Makeup Contest 2022
- 170 2021 Halloween Costume Contest
- 261 Creature Sculpting Contest 2021
- 209 Character Makeup Contest 2021
- 354 Creature Making Contest
- 200 2020 Halloween Costume Contest
- 203 Monster Makeup Contest
- 372 Creature Painting Contest
- 244 Horror Character Contest
- 182 2019 Halloween Costume Contest
- 260 Character Makeup Contest 2019
- 351 Character Sculpting Contest
- 279 2018 Halloween Costume Contest
- 292 Alien Art Contest 2018
- 251 Character Makeup Contest
- 389 Monster Making Contest
- 167 2017 Halloween Costume Contest
- 153 Heroes & Villains Contest
- 221 Cosplay Contest
- 215 Creature Sculpting Contest
- 107 Puppet Contest
- 161 Alien Art Contest
- 98 Halloween Costume Contest
- 149 Robot Art Contest
- 269 Dino Art Contest
- 592 Creature Contest
- 5 ALUMNI
- 275 ON DEMAND WEBCOURSES
- 1 Hand Puppet Detail and Finishing Techniques
- 24 Animation for Animatronics
- 9 How To Make a Mask - Wearable Dynamic Art
- 11 3-Axis Robotic Mechanisms
- 5 Neck Mechanisms
- 24 How To Make a Monster Suit with Bill Bryan & Ted Haines
- 19 Character Animatronics
- 5 How to Sculpt a Dinosaur
- 5 How To Build An Animatronic Head
- 5 Creature Costume Basics
- 4 Puppet Mechanism Basics
- 1 Tattoo Makeup - Cover, Create, & Apply
- 2 How To Make Horror Props
- 1 The Fine Art of Horror Painting
- 1 Fantasy Maquette Sculpting In CX5(S)
- 14 The Business of Making Monsters
- Production Design - The Process Of Creating A World For Film
- 4 Character Makeup - Multi-Piece Prosthetic Application
- 3 Prosthetic Makeup Basics - Gelatin Facial Appliances
- 5 Stop Motion Animation with the Chiodo Bros.
- 11 Blood, Gore and Makeup Effects
- 7 How to Punch Hair - Hairwork for Silicone Characters
- 3 Bodycasting on a Budget with Ted Haines
- 2 Portrait Illustration with Terry Wolfinger
- 5 Mastering Marionettes - Design, Construction & Performance with Scott Land
- 1 Creature Makeup - Multi-piece silicone prosthetic application
- 12 Muscle Suit Fabrication
- 11 Wig & Hair Basics
- 4 Silicone Prosthetic Transfer Appliances
- 3 Building Miniatures: Small-Scale Model Making - Part 5
- 9 Toy Design & Sculpture for Action Figures & Collectibles
- 1 Building Miniatures: Small-Scale Model Making - Part 4
- 2 Human Head Anatomy & Sculpture
- 1 How to Make a Foam Puppet - Part 3
- 1 Building Miniatures: Small-Scale Model Making - Part 3
- 5 How to Make a Foam Puppet - Part 2
- 3 How To Make a Foam Puppet - Part 1
- 1 Building Miniatures: Small-Scale Model Making - Part 2
- 14 Animatronic Control Systems - Arduino Programming Basics with David Covarrubias
- 3 Building Miniatures: Small-Scale Model Making - Part 1
- 3 Advanced Creature Teeth: Prosthetic Dental Appliances - Part 2
- 1 3D Pumpkin Carving - How to Carve a Pumpkin from the Outside In
- 5 How To Make A Latex Rubber Mask Part 3
- 3 Advanced Creature Teeth - Part 1
- 11 How To Make A Latex Rubber Mask Part 2
- 6 How To Make A Latex Rubber Mask Part 1
- 294 PAST LIVE WEBCOURSES
- 11 Monster Sculpting
- 8 Platinum Silicone Mask Painting
- 5 Feather Work: Puppets, Costumes, Hair & Makeup
- 9 How To Make Eyes For Puppets, Masks, & Makeups
- Working with Wigs - Wig & Hair Basics with Connie Grayson Criswell
- 14 Muscle Suit Fabrication with Ted Haines
- 7 Homework - Muscle Suit Fabrication with Ted Haines
- 13 Toy Design & Sculpture for Action Figures & Collectibles with Sandy Collora
- 10 Homework - Toy Design & Sculpture for Action Figures & Collectibles with Sandy Collora
- 13 Human Head Anatomy & Sculpture with Jordu Schell
- 11 Homework - Human Head Anatomy & Sculpture with Jordu Schell
- 18 Mastering Marionettes - Design, Construction & Performance with Scott Land
- 13 Homework - Mastering Marionettes - Design, Construction & Performance with Scott Land
- 16 Puppet Mechanism Basics - Eyes, Brows & Ears with BJ Guyer - Watch & Chat
- 11 Homework - Puppet Mechanism Basics - Eyes, Brows & Ears with BJ Guyer
- 12 Advanced Creature Teeth -- with John Cherevka
- 3 On Camera Hand Puppet Performance
- 9 Silicone Prosthetic Transfer Appliances - Age Makeup with Neill Gorton
- 3 Practical Magic: The Art of In-Camera Visual Effects with Joey Shanks
- 9 Buisness of Making Monsters with Shannon Shea
- 11 Stop Motion Animation with the Chiodo Bros
- 5 Foam Carving Puppets with BJ Guyer
- 3 3D Pumpkin Carving with Andy Bergholtz
- 4 Prosthetic Makeup Basics with Rob Burman
- 13 How to Make a Latex Mask with Tim Martin
- 2 Character Illustration with Terry Wolfinger
- 3 Halloween Costumes - Fabric Effects with Dawn Dininger and Amy Whetsel
- 9 Blood, Makeup & Gore FX with Gary J. Tunnicliffe
- 13 Hand Puppet Design and Fabrication with BJ Guyer
- 3 How to Sculpt a Dinosaur with Christopher Darga
- 2 Airbrush FX: Beginning to Advanced with Craig Fraser
- 1 Female Figure Sculpting in Cx5 wtih Adam Beane
- 3 Creature Design: Maquette Sculpting with Casey Love
- 3 How to Make a Sci Fi Helmet with Fon Davis
- 2 Hyper Realistic Silicone Painting with Tim Gore
- 2 Josh Herman Zbrush Creature Sculpting
- 13 Textures and Forms with Don Lanning Oct 26, 2013
- 9 Character Rendering in Photoshop with Dan LuVisi
- 2 Creature Maquette Painting with Jordu Schell
- 24 Textures and Forms with Don Lanning May 04, 2013
- 3 Tattoo Makeup A-to-Z: Cover, Create, and Apply with Christien Tinsley
- 11 Creature Design w/ Casey Love - Sculpting
- 7 Creature Design With Casey Love - Translucent Creature Painting
- 3 Creature Maquette Sculpting with Jordu Schell