Death Eater from Harry Potter

Now this was a mission, in all the costume took me 3 weeks to construct and a lot of research and learning new skills. The target was to construct a halloween costume inspired by Lucius Malfoy from the Harry Potter books, dressed up as a Death Eater (follower of bad guy Voldermort).
Here's an action shot of me in the full costume,

At the bottom of the post I've got a photo without the effects so you see all the details.
The mask I made by taking an Alginate cast of a dummy head and then adding plaster bandages to it to give it strength before I cast it in plaster. I then took the plaster cast and added clay to accentuate all the prominent features of the masks from the movies. I wanted to do this as it's my first time making a cast and a bit early to jump into life casting so a good way of me learning how that all works.
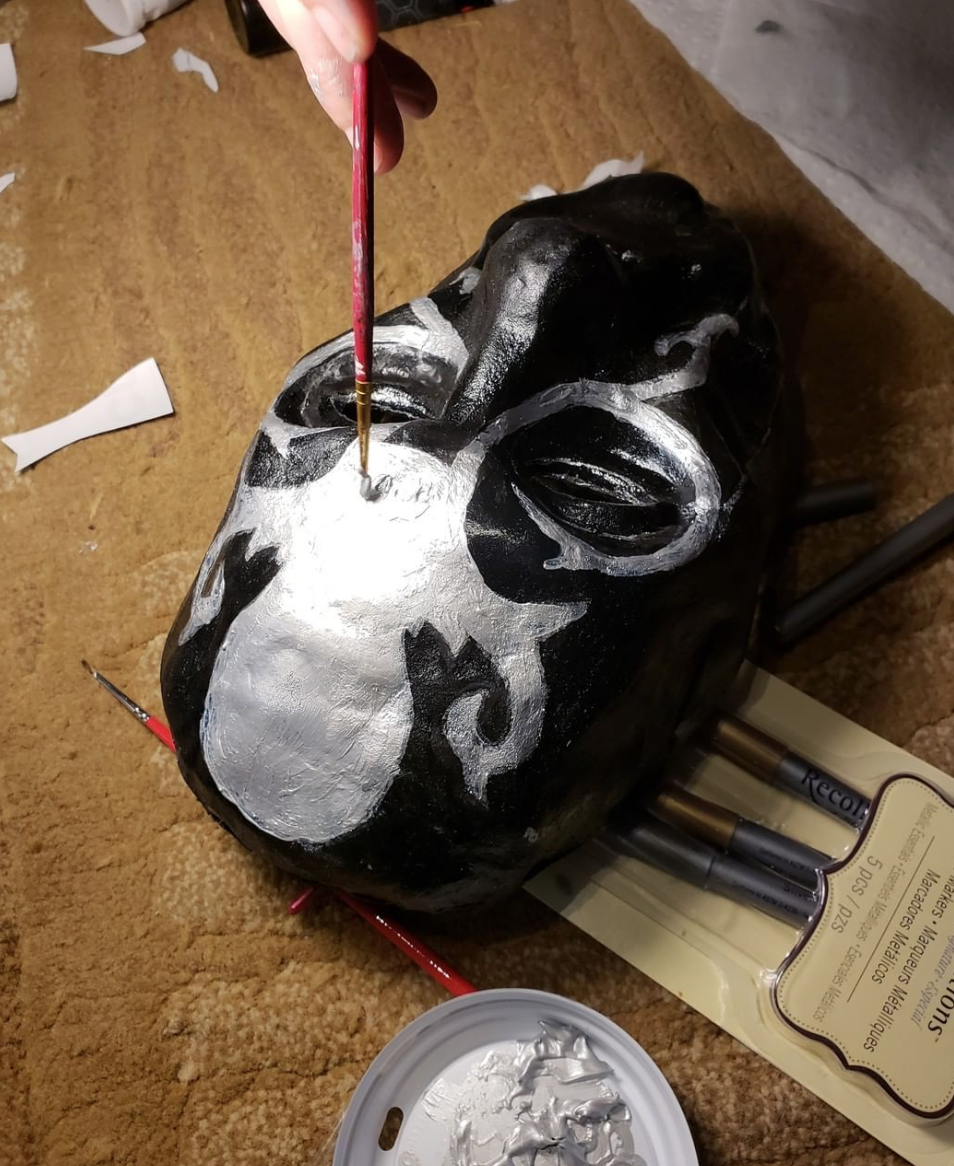
Once I had the clay how I wanted I used Worbla thermal plastic and a heat gun to make a cast of the clay model. And after that dried it was a lot of sanding with the dremel (use a mask to save your lungs) and time to get all the ridges of the thermal plastic smooth enough for painting, detail work and varnishing (3-4 hours).


Next it was the cloak.
I went thru some free templates and modded one I liked to incorporate a liner for the hood. Then it was measuring and a lot of cutting, pinning and about 20 hours of sewing. I added a hem to cloak to hide the bare cuts and give it a professional look.
I'm glad I picked fleece for the fabric as it's not too stretchy and really holds out well outdoors, plus the gold buttons I found make it look like you've just walked off a film set!

Stabbed myself a couple of times with the pins, taking a break every now and then as sewing this much heavy fabric together isn't fun. Did a victory dance when I got to the last stitch.

Next I worked on the Jerkin using faux leather on the outside and fleece on the inside for warmth.
I drove to a place outside town called Tandy Leather and talked thru the costume with the staff, showed him the photos and he was really impressed with how much work I put into it. I said I wanted to make it as authentic as possible so he showed me how to do the leather work without busting the bank. He was awesome and I'll definitely be going back.
I then put together cutting templates for the buckles in Fusion 360, printed them out and began cutting.

After about 3 days I had all the buckles built mimicking how a belt is constructed. I used rivets for all the leather work so it's was strong and started to build a look for it all.
I also used leather work and rivets to build the wand belt with a cheap metal strap I picked up at a thrift shop. Taking it apart to accommodate the wand holder.
I also added a loop to the back of the jerkin so the belt would stay in place.
I used a bit of pleated fabric to add the neck cravat and give my Lucius that classy look.

The snake belt buckle was more leather work and 3D printing, sanding it down to make good contact the the belt buckle, then painting and weathering.
For the legs I cut two length of fleece and hemmed them then added velcro to the end to secure it once it wrapped round the legs. I wanted to make leather spats but this actually goes well with the look giving it a kind of otherworldly look.
Similar to World War I leg wraps they had in the trenches.

For my first full costume this was a challenge but I'm really happy how it turned out. Me & my wife learned a lot and made some new friends along the way.

Can you believe the full costume takes about 30 minutes to put on, but super warm in the cold weather.
Can't wait to work on the next thing.
Best,
John Griffiths
instagram: https://www.instagram.com/fantasyprops/
Here's an action shot of me in the full costume,
At the bottom of the post I've got a photo without the effects so you see all the details.
The mask I made by taking an Alginate cast of a dummy head and then adding plaster bandages to it to give it strength before I cast it in plaster. I then took the plaster cast and added clay to accentuate all the prominent features of the masks from the movies. I wanted to do this as it's my first time making a cast and a bit early to jump into life casting so a good way of me learning how that all works.
Once I had the clay how I wanted I used Worbla thermal plastic and a heat gun to make a cast of the clay model. And after that dried it was a lot of sanding with the dremel (use a mask to save your lungs) and time to get all the ridges of the thermal plastic smooth enough for painting, detail work and varnishing (3-4 hours).
Next it was the cloak.
I went thru some free templates and modded one I liked to incorporate a liner for the hood. Then it was measuring and a lot of cutting, pinning and about 20 hours of sewing. I added a hem to cloak to hide the bare cuts and give it a professional look.
I'm glad I picked fleece for the fabric as it's not too stretchy and really holds out well outdoors, plus the gold buttons I found make it look like you've just walked off a film set!
Stabbed myself a couple of times with the pins, taking a break every now and then as sewing this much heavy fabric together isn't fun. Did a victory dance when I got to the last stitch.
Next I worked on the Jerkin using faux leather on the outside and fleece on the inside for warmth.
I drove to a place outside town called Tandy Leather and talked thru the costume with the staff, showed him the photos and he was really impressed with how much work I put into it. I said I wanted to make it as authentic as possible so he showed me how to do the leather work without busting the bank. He was awesome and I'll definitely be going back.
I then put together cutting templates for the buckles in Fusion 360, printed them out and began cutting.
After about 3 days I had all the buckles built mimicking how a belt is constructed. I used rivets for all the leather work so it's was strong and started to build a look for it all.
I also used leather work and rivets to build the wand belt with a cheap metal strap I picked up at a thrift shop. Taking it apart to accommodate the wand holder.
I also added a loop to the back of the jerkin so the belt would stay in place.
I used a bit of pleated fabric to add the neck cravat and give my Lucius that classy look.
The snake belt buckle was more leather work and 3D printing, sanding it down to make good contact the the belt buckle, then painting and weathering.
For the legs I cut two length of fleece and hemmed them then added velcro to the end to secure it once it wrapped round the legs. I wanted to make leather spats but this actually goes well with the look giving it a kind of otherworldly look.
Similar to World War I leg wraps they had in the trenches.
For my first full costume this was a challenge but I'm really happy how it turned out. Me & my wife learned a lot and made some new friends along the way.
Can you believe the full costume takes about 30 minutes to put on, but super warm in the cold weather.
Can't wait to work on the next thing.
Best,
John Griffiths
instagram: https://www.instagram.com/fantasyprops/
0
Comments
-
Nice work! Where did you get the template for the cloak?
0 -
Template I got from Fleece Fun, think it was based on the Red Riding Hood cape.
To clean up all the edges I used an overlock stitch and then a classic hem so it looked more professional. Took ages just because there was so much fabric.
I sewed on the buttons and then cut a piece of leather and cut out holes for the buttons reinforcing the button holes with stitching with my sewing machine and a strong leather needle.
0 -
P.S. with the sewing make sure to really load the bobbin so you don't get halfway and realize the bobbin died somewhere near the shoulder.
Needles I used a stretch needle for the fleece and a demin needle for the jerkin.0

Categories
- All Categories
- 97 CURRENT CONTEST
- 97 2025 Halloween Costume Contest
- 1.3K COMMUNITY
- 1K General
- 62 Tutorial Reviews
- 98 Suggestions and FAQ
- 82 Job Listings
- 40 Artists for Hire
- 1.8K CHARACTER CREATION
- 165 Costumes & Cosplay
- 148 Lab work
- 95 Props
- 152 Puppets
- 36 Stop Motion
- 18 VFX
- 39 Student Projects
- 478 Sculpture
- 159 Fabrication
- 160 Animatronics
- 177 Makeup Effects
- 130 Painting
- 29 Traditional/Digital Design
- 8.1K PAST CONTESTS
- 244 Creature Making Contest 2025
- 100 2024 Halloween Costume Contest
- 198 Character Making Contest 2024
- 343 Creature Making Contest 2024
- 131 2023 Halloween Costume Contest
- 168 Monster Making Contest 2023
- 239 Creature Making Contest 2023
- 117 2022 Halloween Costume Contest
- 309 Character Sculpting Contest 2022
- 133 Character Makeup Contest 2022
- 170 2021 Halloween Costume Contest
- 261 Creature Sculpting Contest 2021
- 209 Character Makeup Contest 2021
- 354 Creature Making Contest
- 200 2020 Halloween Costume Contest
- 203 Monster Makeup Contest
- 372 Creature Painting Contest
- 244 Horror Character Contest
- 182 2019 Halloween Costume Contest
- 260 Character Makeup Contest 2019
- 351 Character Sculpting Contest
- 279 2018 Halloween Costume Contest
- 292 Alien Art Contest 2018
- 251 Character Makeup Contest
- 389 Monster Making Contest
- 167 2017 Halloween Costume Contest
- 153 Heroes & Villains Contest
- 221 Cosplay Contest
- 215 Creature Sculpting Contest
- 107 Puppet Contest
- 161 Alien Art Contest
- 98 Halloween Costume Contest
- 149 Robot Art Contest
- 269 Dino Art Contest
- 592 Creature Contest
- 5 ALUMNI
- 275 ON DEMAND WEBCOURSES
- 1 Hand Puppet Detail and Finishing Techniques
- 24 Animation for Animatronics
- 9 How To Make a Mask - Wearable Dynamic Art
- 11 3-Axis Robotic Mechanisms
- 5 Neck Mechanisms
- 24 How To Make a Monster Suit with Bill Bryan & Ted Haines
- 19 Character Animatronics
- 5 How to Sculpt a Dinosaur
- 5 How To Build An Animatronic Head
- 5 Creature Costume Basics
- 4 Puppet Mechanism Basics
- 1 Tattoo Makeup - Cover, Create, & Apply
- 2 How To Make Horror Props
- 1 The Fine Art of Horror Painting
- 1 Fantasy Maquette Sculpting In CX5(S)
- 14 The Business of Making Monsters
- Production Design - The Process Of Creating A World For Film
- 4 Character Makeup - Multi-Piece Prosthetic Application
- 3 Prosthetic Makeup Basics - Gelatin Facial Appliances
- 5 Stop Motion Animation with the Chiodo Bros.
- 11 Blood, Gore and Makeup Effects
- 7 How to Punch Hair - Hairwork for Silicone Characters
- 3 Bodycasting on a Budget with Ted Haines
- 2 Portrait Illustration with Terry Wolfinger
- 5 Mastering Marionettes - Design, Construction & Performance with Scott Land
- 1 Creature Makeup - Multi-piece silicone prosthetic application
- 12 Muscle Suit Fabrication
- 11 Wig & Hair Basics
- 4 Silicone Prosthetic Transfer Appliances
- 3 Building Miniatures: Small-Scale Model Making - Part 5
- 9 Toy Design & Sculpture for Action Figures & Collectibles
- 1 Building Miniatures: Small-Scale Model Making - Part 4
- 2 Human Head Anatomy & Sculpture
- 1 How to Make a Foam Puppet - Part 3
- 1 Building Miniatures: Small-Scale Model Making - Part 3
- 5 How to Make a Foam Puppet - Part 2
- 3 How To Make a Foam Puppet - Part 1
- 1 Building Miniatures: Small-Scale Model Making - Part 2
- 14 Animatronic Control Systems - Arduino Programming Basics with David Covarrubias
- 3 Building Miniatures: Small-Scale Model Making - Part 1
- 3 Advanced Creature Teeth: Prosthetic Dental Appliances - Part 2
- 1 3D Pumpkin Carving - How to Carve a Pumpkin from the Outside In
- 5 How To Make A Latex Rubber Mask Part 3
- 3 Advanced Creature Teeth - Part 1
- 11 How To Make A Latex Rubber Mask Part 2
- 6 How To Make A Latex Rubber Mask Part 1
- 294 PAST LIVE WEBCOURSES
- 11 Monster Sculpting
- 8 Platinum Silicone Mask Painting
- 5 Feather Work: Puppets, Costumes, Hair & Makeup
- 9 How To Make Eyes For Puppets, Masks, & Makeups
- Working with Wigs - Wig & Hair Basics with Connie Grayson Criswell
- 14 Muscle Suit Fabrication with Ted Haines
- 7 Homework - Muscle Suit Fabrication with Ted Haines
- 13 Toy Design & Sculpture for Action Figures & Collectibles with Sandy Collora
- 10 Homework - Toy Design & Sculpture for Action Figures & Collectibles with Sandy Collora
- 13 Human Head Anatomy & Sculpture with Jordu Schell
- 11 Homework - Human Head Anatomy & Sculpture with Jordu Schell
- 18 Mastering Marionettes - Design, Construction & Performance with Scott Land
- 13 Homework - Mastering Marionettes - Design, Construction & Performance with Scott Land
- 16 Puppet Mechanism Basics - Eyes, Brows & Ears with BJ Guyer - Watch & Chat
- 11 Homework - Puppet Mechanism Basics - Eyes, Brows & Ears with BJ Guyer
- 12 Advanced Creature Teeth -- with John Cherevka
- 3 On Camera Hand Puppet Performance
- 9 Silicone Prosthetic Transfer Appliances - Age Makeup with Neill Gorton
- 3 Practical Magic: The Art of In-Camera Visual Effects with Joey Shanks
- 9 Buisness of Making Monsters with Shannon Shea
- 11 Stop Motion Animation with the Chiodo Bros
- 5 Foam Carving Puppets with BJ Guyer
- 3 3D Pumpkin Carving with Andy Bergholtz
- 4 Prosthetic Makeup Basics with Rob Burman
- 13 How to Make a Latex Mask with Tim Martin
- 2 Character Illustration with Terry Wolfinger
- 3 Halloween Costumes - Fabric Effects with Dawn Dininger and Amy Whetsel
- 9 Blood, Makeup & Gore FX with Gary J. Tunnicliffe
- 13 Hand Puppet Design and Fabrication with BJ Guyer
- 3 How to Sculpt a Dinosaur with Christopher Darga
- 2 Airbrush FX: Beginning to Advanced with Craig Fraser
- 1 Female Figure Sculpting in Cx5 wtih Adam Beane
- 3 Creature Design: Maquette Sculpting with Casey Love
- 3 How to Make a Sci Fi Helmet with Fon Davis
- 2 Hyper Realistic Silicone Painting with Tim Gore
- 2 Josh Herman Zbrush Creature Sculpting
- 13 Textures and Forms with Don Lanning Oct 26, 2013
- 9 Character Rendering in Photoshop with Dan LuVisi
- 2 Creature Maquette Painting with Jordu Schell
- 24 Textures and Forms with Don Lanning May 04, 2013
- 3 Tattoo Makeup A-to-Z: Cover, Create, and Apply with Christien Tinsley
- 11 Creature Design w/ Casey Love - Sculpting
- 7 Creature Design With Casey Love - Translucent Creature Painting
- 3 Creature Maquette Sculpting with Jordu Schell