Best Of

Re: Chimpanzee ( Pan troglodytes ) - Realistic bust + left arm
I can't find the words to describe how well that is done.

Chimpanzee ( Pan troglodytes ) - Realistic bust + left arm
Hello, I work as a special makeup artist in the Czech Republic, I would like to share with you my biggest work project so far
Chimpanzee (Pan troglodytes), adult, male
It was a month for me to explore the life, anatomy and other remarkable things, from the life of these amazing beings. ☺
It was a month for me to explore the life, anatomy and other remarkable things, from the life of these amazing beings. ☺
Everything is handmade, eyes, jaws (upper/lower), bust, and left arm, fur is horsehair, I did most of it for the first time based on SWSCHA courses - many thanks!
The whole production project took a month, I hope you like it
Used materials: Monster clay (for the statue), Dragon skin, Slacker, Foam-it, Smooth cast 25, crystal clear, and colors


LAIKASTUDIOS Archibald Snatcher Artdoll
Hi. This is my posable Artdoll. It's supposed to be Archibald Snatcher from LAIKA studios The Boxtrolls stop motion film. He has posable arms and legs. Wire armature. Soft body. Super sculpey clay head, hands, and feet. Clothes and top hat hand made and hand stitched by me. For color: Acrylics, water color pencils, soft pastels and all has been sealed. Hope you like him! My Instagram. @ LilPhantomsRoadshow 
")

Re: What's On Your Workbench? (Summer 2022)
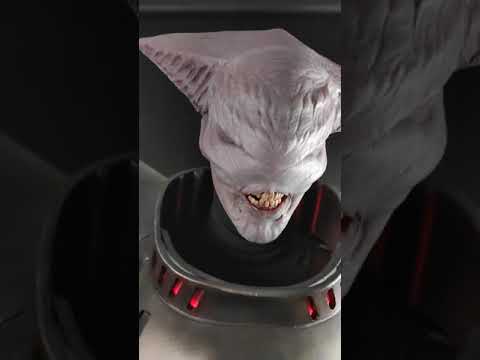
First time posting but just sharing this little project im doing its a silicone mask i was inspired by The Thing movies i love the first movie probably one of the best horrors of all time. I did have a facebook page with my work on there but unfortunately facebook have removed it. It was called Balsdons fx i have made quite a lot of silicone masks over the years.
Anyway this is what im working on at the moment.
The eyes are a little to big for the bottom head im going to order some smaller ones. Also there are loads of small tentacles to make for this and hair punching and still paint to do but i will get around to finish it soon.


Anyway this is what im working on at the moment.
The eyes are a little to big for the bottom head im going to order some smaller ones. Also there are loads of small tentacles to make for this and hair punching and still paint to do but i will get around to finish it soon.

Re: TMNT's Leatherhead
Thank you Chris. I couldn't have done it without the Stan Winston School of character arts. I mean, I could have, but it wouldn't have looked as good.
The tutorials that helped me the most were Shannon Shea's Garage Monsters series, and Steve Wang's creature mask painting.
I took the lessons Shannon gave about building a puppet out of foam, cotton balls, and latex then applied it to making a costume.
If the TReX head lesson had been around at the time I would have sprayed glue over the foam to seal it before coating it with latex. I did not know that trick and the foam soaked in a gallons of liquid latex.
Another tutorial that really helped me was the first I ordered. That was Steve Wang's. The way he painted Gill man was an inspiration. The lessons on motteling made a huge difference in the realism of the costume.
My only regret was I did not use thinned rubber cement to apply the paint. I was worried about the health side effects of the thinner and my garage having bad air circulation. So I just used water thinned acrylic paint. It looked great but did not flex with the costume. All the areas that rubbed the paint flacked off.
An alternative I wish I knew at the time was to tent the liquid latex with the acrylics and thin that down with water. Then the paint would bond and flex with the costume. I used that on my following costumes.
I coated the body of the lizardman in a flexible gloss coat but that only helped a little.
Live and learn.

Re: TMNT's Leatherhead
Exciting stuff! Your previous costume turned out great, so I can only imagine this one will be even more awesome. Can't wait to see what you do!
/Chris
/Chris

Psycho mask from Borderlands 3
Hey, I'd like to share a prop mask of a Psycho from video game Borderlands 3 I made a few years ago. It was sculpted by me with monster clay, mold in silicone and slush cast using urethane resin. All was left was to paint it using an airbrush and then a lot of handpaiting to look like it was pulled straight.
from the game.
To make it more accurate I installed some small blue LED lights behind see through mesh in the eyes and added some elastic straps to make the mask wearable.
Project by me (TentacleCreations) on instagram and fb and TentacleMakes on twitter


from the game.
To make it more accurate I installed some small blue LED lights behind see through mesh in the eyes and added some elastic straps to make the mask wearable.
Project by me (TentacleCreations) on instagram and fb and TentacleMakes on twitter

"Outsider" original character
Hey! I'd like to share a project I made for my sfx school diploma! This is Outsider, a murderous yet highly developed entity from a different galaxy.
I used many techniques in this project. I made a head and teeth cast on my model. Had to sculpt fake teeth, a front mask and a caul. This was my first time making fake teeth and a sillicone prostethic mask. The caul was made out of urethane resin and it acts like a helmet but it registers as a part of the organic mask.
The armor is just to highlight the sfx make up here and tie the character all togheter. It is made out of eva foam with RGB led lights programmed via an arduino pro trinket so the lights has a "breathing" animation.
The big black claws are actually made out of plastic "teeth" for decorating pumpkins.
I had a lot of fun making this project, I had to design it, plan everything and then finally make it!
Project by me (TentacleCreations) on instagram and fb and TentacleMakes on twitter
Photos by SandyGraphycos on instagram
Model - Glorfxedian on instagram
Project for this diploma was made for International College Dziewulscy
and here a quick video of the creepy teeth:
 https://www.youtube.com/watch?v=dDFkq2W9Wk0


I used many techniques in this project. I made a head and teeth cast on my model. Had to sculpt fake teeth, a front mask and a caul. This was my first time making fake teeth and a sillicone prostethic mask. The caul was made out of urethane resin and it acts like a helmet but it registers as a part of the organic mask.
The armor is just to highlight the sfx make up here and tie the character all togheter. It is made out of eva foam with RGB led lights programmed via an arduino pro trinket so the lights has a "breathing" animation.
The big black claws are actually made out of plastic "teeth" for decorating pumpkins.
I had a lot of fun making this project, I had to design it, plan everything and then finally make it!
Project by me (TentacleCreations) on instagram and fb and TentacleMakes on twitter
Photos by SandyGraphycos on instagram
Model - Glorfxedian on instagram
Project for this diploma was made for International College Dziewulscy
and here a quick video of the creepy teeth:
https://www.youtube.com/watch?v=dDFkq2W9Wk0