Best Of
Re: What's On Your Workbench? (Summer 2022)
Hey fellow artists! I am pleased to be able to share my current work with you. With moving to a new house, and setting up shop, I wanted to have some finished projects to display. An escape room company commissioned me for props, faux finishes, and the sculpture faces that represented each room. They only needed the sculptures, but later gave me the molds to make my own copies. Here is a pirate face, sculpted to look like a wood carving. I will include pics from my painting process. Thanks for checking it out, and I will post more as I complete them. Cheers!


These last three pics are of the finished painting.


And this is what they painted for the escape room.

These last three pics are of the finished painting.
And this is what they painted for the escape room.


"Sheriff Woody" from Toy Story
Hello!
My name is Stan. And I'd like to share my hand sculpted portrait of Sheriff Woody!
Sculpted with Super Sculpey, cast in resin and painted with acrylics:


I've also made his cowboy hat and cast it in flexible resin:


My name is Stan. And I'd like to share my hand sculpted portrait of Sheriff Woody!
Sculpted with Super Sculpey, cast in resin and painted with acrylics:
I've also made his cowboy hat and cast it in flexible resin:
Here are some Videos of casting, cleaning and painting of the hat:
1. Demold - https://www.instagram.com/reel/CcjB_X_ID2B/?utm_source=ig_web_copy_link
2. Cleaning & Painting - https://www.instagram.com/reel/Cct6E0cIQtB/?utm_source=ig_web_copy_link
This is my personal project I'm still working on. I like it so much because it's very challenging. I hope that one day, sculpting characters can be my full time job, because now I have time for my projects mostly on the weekends. Can't wait to finish it and add it to my portfolio.
In addition to the photos, I add the link to the complete video of the entire creation process on my YouTube:
Part 1: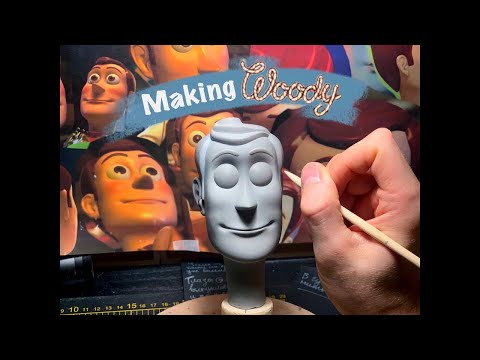 https://youtu.be/qrMJZyukoTo
Part 2: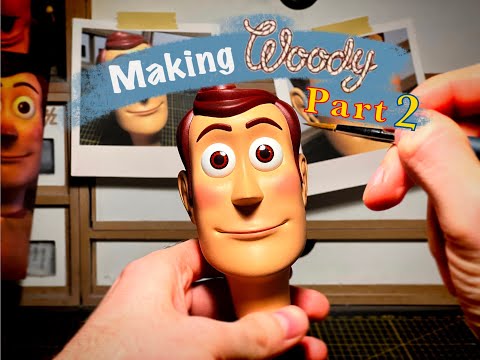 https://youtu.be/7TdZH0H8YD8
Now I'm working on his pull-string voice box. Here's a glimpse into the creative process:
Voice Box - https://www.instagram.com/reel/CebRPVkoMtr/?utm_source=ig_web_copy_link
Pull-string mechanism - https://www.instagram.com/reel/CequpbpIcCo/?utm_source=ig_web_copy_link
It's a privilege for me, to share my sculpture with the SWSCA community!
Hope you enjoy it!
Stan
Instagram: https://www.instagram.com/stansdiyworkshop/
YouTube: https://www.youtube.com/channel/UCVjtvYEUtqgfCNSOlSqeQVA
All rights to this character belong to Walt Disney Pictures and Pixar Animation Studios.
1. Demold - https://www.instagram.com/reel/CcjB_X_ID2B/?utm_source=ig_web_copy_link
2. Cleaning & Painting - https://www.instagram.com/reel/Cct6E0cIQtB/?utm_source=ig_web_copy_link
This is my personal project I'm still working on. I like it so much because it's very challenging. I hope that one day, sculpting characters can be my full time job, because now I have time for my projects mostly on the weekends. Can't wait to finish it and add it to my portfolio.
In addition to the photos, I add the link to the complete video of the entire creation process on my YouTube:
Part 1:
https://youtu.be/qrMJZyukoToPart 2:
https://youtu.be/7TdZH0H8YD8Now I'm working on his pull-string voice box. Here's a glimpse into the creative process:
Voice Box - https://www.instagram.com/reel/CebRPVkoMtr/?utm_source=ig_web_copy_link
Pull-string mechanism - https://www.instagram.com/reel/CequpbpIcCo/?utm_source=ig_web_copy_link
It's a privilege for me, to share my sculpture with the SWSCA community!
Hope you enjoy it!
Stan
Instagram: https://www.instagram.com/stansdiyworkshop/
YouTube: https://www.youtube.com/channel/UCVjtvYEUtqgfCNSOlSqeQVA
All rights to this character belong to Walt Disney Pictures and Pixar Animation Studios.

Haunted Mansion Ghost Host Resin Display Bust


 I am a huge Haunted Mansion fan. So I decided to create the Ghost Host from the Disney Painting inside the Mansion into a resin display bust. This was sculpted in WED clay and casted in resin . Bust is back filled with foam. Painted with high quality inks. This bust I feel brought out the creepiness of the character the Artists at Disney wanted to create.
Hocus Pocus BoooOOOOKKK (animatronic)
So with a sequel to hocus pocus just around the corner i thought i would post this. It was more of a commision for my wife. I made her a 1:1 animatronic hocus pocus book of shadows, here is a video of it along with a few pics


Re: *** Character Sculpting Contest 2022 Official Rules ***
Hi Jon,
Everyone is limited to 3 entries, so in this case, you would need to pick 3 sculpts and enter them individually as their own post. If they were all part of a larger sculpture/scene/diorama they could be entered as a single entry.
/Chris
Everyone is limited to 3 entries, so in this case, you would need to pick 3 sculpts and enter them individually as their own post. If they were all part of a larger sculpture/scene/diorama they could be entered as a single entry.
/Chris

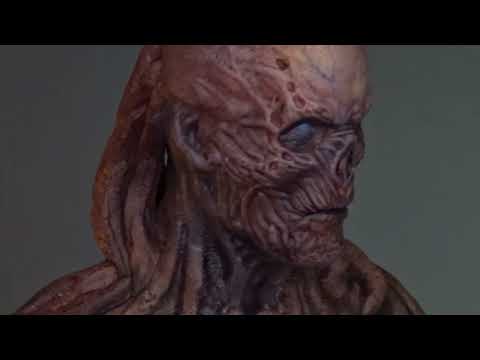
Monster mask
I started sculpting about a year ago and now spend all my time creating creatures and monsters. This is a monster mask I made out of WED clay. This creature I felt cannot talk hence it has no lips and is just a vicious killer, I have called it 'The Biter'. The mouth area is based on a crocodile which is why the teeth aren’t perfect.


Re: What's On Your Workbench? (Summer 2022)
 Working on molding and making a latex mask for this sculpt I have for a Halloween haunt I'm acting in!
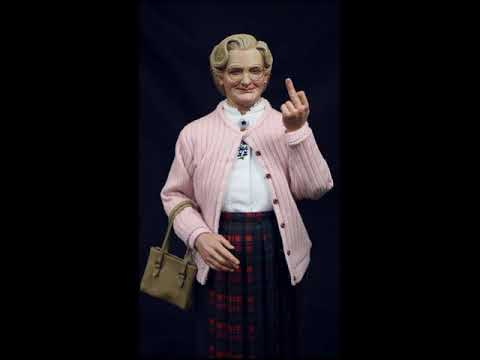
Mrs Doubtfire custom figure
This is a 1/6 scale figure made by me. Most of the sculpting (in zbrush) and painting were done by myself, namely the portrait, hands, shoes and her legs (not visible). The bust with mask is also sculpted by me and cast in silicone.
Accessories like eye glasses and broom were made by Robbie Jones
Clothing and fat suit were tailored by Choi Jin Chul


Video of the figure:
 https://www.youtube.com/watch?v=Jf-bHEgtvqE
 https://www.youtube.com/watch?v=_iK7MXPsHBs
Video of the silicone mask:
 https://www.youtube.com/watch?v=u6NYDiC4KlM
 https://www.youtube.com/watch?v=JZZEhrxrt70