Biomechanical Insectoid helmet

I designed and built a helmet last year for Denver's comicon
Materials: Fiberglass, Foam, twine, Epoxy Putty, Sunglasses lenses

Concept art (I only made the helmet)
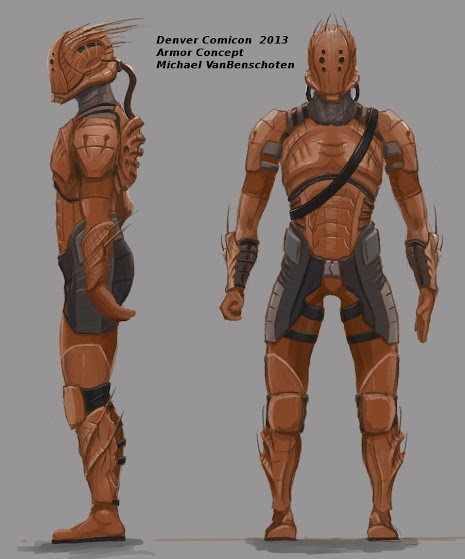
image

The actual helmet
image
image

Comments

  • Wow that's great! Would love to know more about your steps.
  • That's a great helmet, love the bio-mechanical look, I think its really had to do well (unless your H.R. Giger), but you nailed it, without it looking like a homage to Giger.
  • I like the use of sunglass lenses,  I would not have thought about that.  Was it difficult to get them to fit?  Did you have to modify or sculpt around their shape?


    What are you working on now?

  • My process for this was pretty simple. I started sculpting over a Styrofoam head to cut down on the amount of clay used. (It was a little smaller than my head, so the helmet turned out to be a tight fit. Live and learn, next time I'll use a lifecast of my own head. Also while I'm on the topic of things I'd do differently I'd do a lot more caliper measuring to ensure greater symmetry.) To ensure some of the more complex curves would be symmetric, I cut out cardboard templates as a sort of custom french curve guide.

    After sculpting, I made a 2 part jacket mold of latex supported by plaster. I did a series of tests beforehand to make sure the fiberglass resin wouldn't stick to the latex too badly and to figure out the best mold release. I think I used Vaseline (Petroleum Jelly for those in foreign lands) as a mold release because It worked well and I wasn't too concerned about mold life.

    In laying down the fiberglass I found the easiest way to work was to keep the mold halves separate, lying down a good layer of fiberglass. Then I set the haves together and laid fiberglass down the seam.

    After that was set, I trimmed the seams, and smoothed out some rough patches with epoxy putty.

    For painting I used 2 metallic spray-paints, a base-coat of a copper color. Then when thoroughly dried, a dark bronze color, I took a rag soaked with paint thinner and while the bronze color was still a little sticky, I wiped most of it away. Leaving it dark in the recesses.

    In adding the sunglasses I popped them out of their frames and cut/sanded them down to the correct size and shape and glued them in.

    I hope some of that is useful to you guys!
  • Oh yeah, What I'm working on now. The holiday retail craziness is behind us, so now I have time to sculpt some of my sketches. I'm working on a variety of busts and statuettes to sell this year at Denver comicon, hopefully to help fund a move to LA, where I will beg for work sweeping floors and running foam from any FX shop that will take me.
  • Thanks for the info on how you went about making the mask. The life cast would be a better fit, but not everyone has one of those sitting around. :-). I know I don't any more. If you ever have to use one of the foam heads again, bulk it out with foil then masking tape. I use old wine corks to bulk out torsos and heads for smaller sculptures. The Asian elephant has a cork and masking tape body. I then used Magic Sculpt as the base for the shape and did the skin with an epoxy putty called ProCreate. He is 1/30 scale. Smallest thing I have done. I guess I am just agreeing with you that saving the amount of clay used has always been a good thing, at least for me. Show us your new work when you get a chance. Matthew
  • Very cool, I hope to see the full build of it. Good luck, good luck.
  • That's some wonderfully awesome work you got there! :smiley: 
Sign In or Register to comment.